
This spring has been for me a
season of beet greens. It started when I
saw some beautiful beets at the store and suddenly realized I hadn’t had beets
in a while and that I was really hungry for them. These particular beets had beautiful tops…so
I saved them and added them to a pasta (or perhaps a grain pilaf…the exact
preparation escapes me now). Then
suddenly I had a couple private dinners in a row that included roasted beet
salads. So I had more beet greens—because
when you buy nice beets you almost always get the greens too…which basically makes
them free. So I made more pastas and
pilafs…and a fantastic soup (with pasta) that I hadn’t had in a while…
And still there were more. So when I came home from a class with a pastry
shell left from the demonstration, I decided to make a beet greens tart. Greens of all kinds make fantastic fillings
for tarts, so a tart of nothing but the greens…shrouded in a custard and enhanced
with a little onion and garlic…or bacon or sausage…would have been
delicious. But at the time I happened to
have some mushrooms on hand. I
remembered a good pasta I made a year or two ago with mushrooms, greens and bread crumbs. So I decided to turn that
pasta into a tart.

I hadn’t planned on posting the recipe—there are after
all, many, many tart recipes on my blog—but this tart was the thing I decided
to make again when I ended up with another windfall of beet greens. Anytime I like something so much that I make
it twice in a short span of time, it’s usually a good indication that I should
post the recipe—if for no other reason than I know I will be glad I did when at
some point down the road I want to make a well-liked dish again and I can’t
find my notes.
Aside from selfish reasons, I thought the post would
be instructive. It is the season of
greens at the markets…and people are always looking for ways to use this
abundance. This tart is a great way to
do this. Even if you don’t have beet
greens: You can of course replace the
beet greens with spinach or chard…even kale (just remember to blanch kale
before adding it to the pan with the onions).
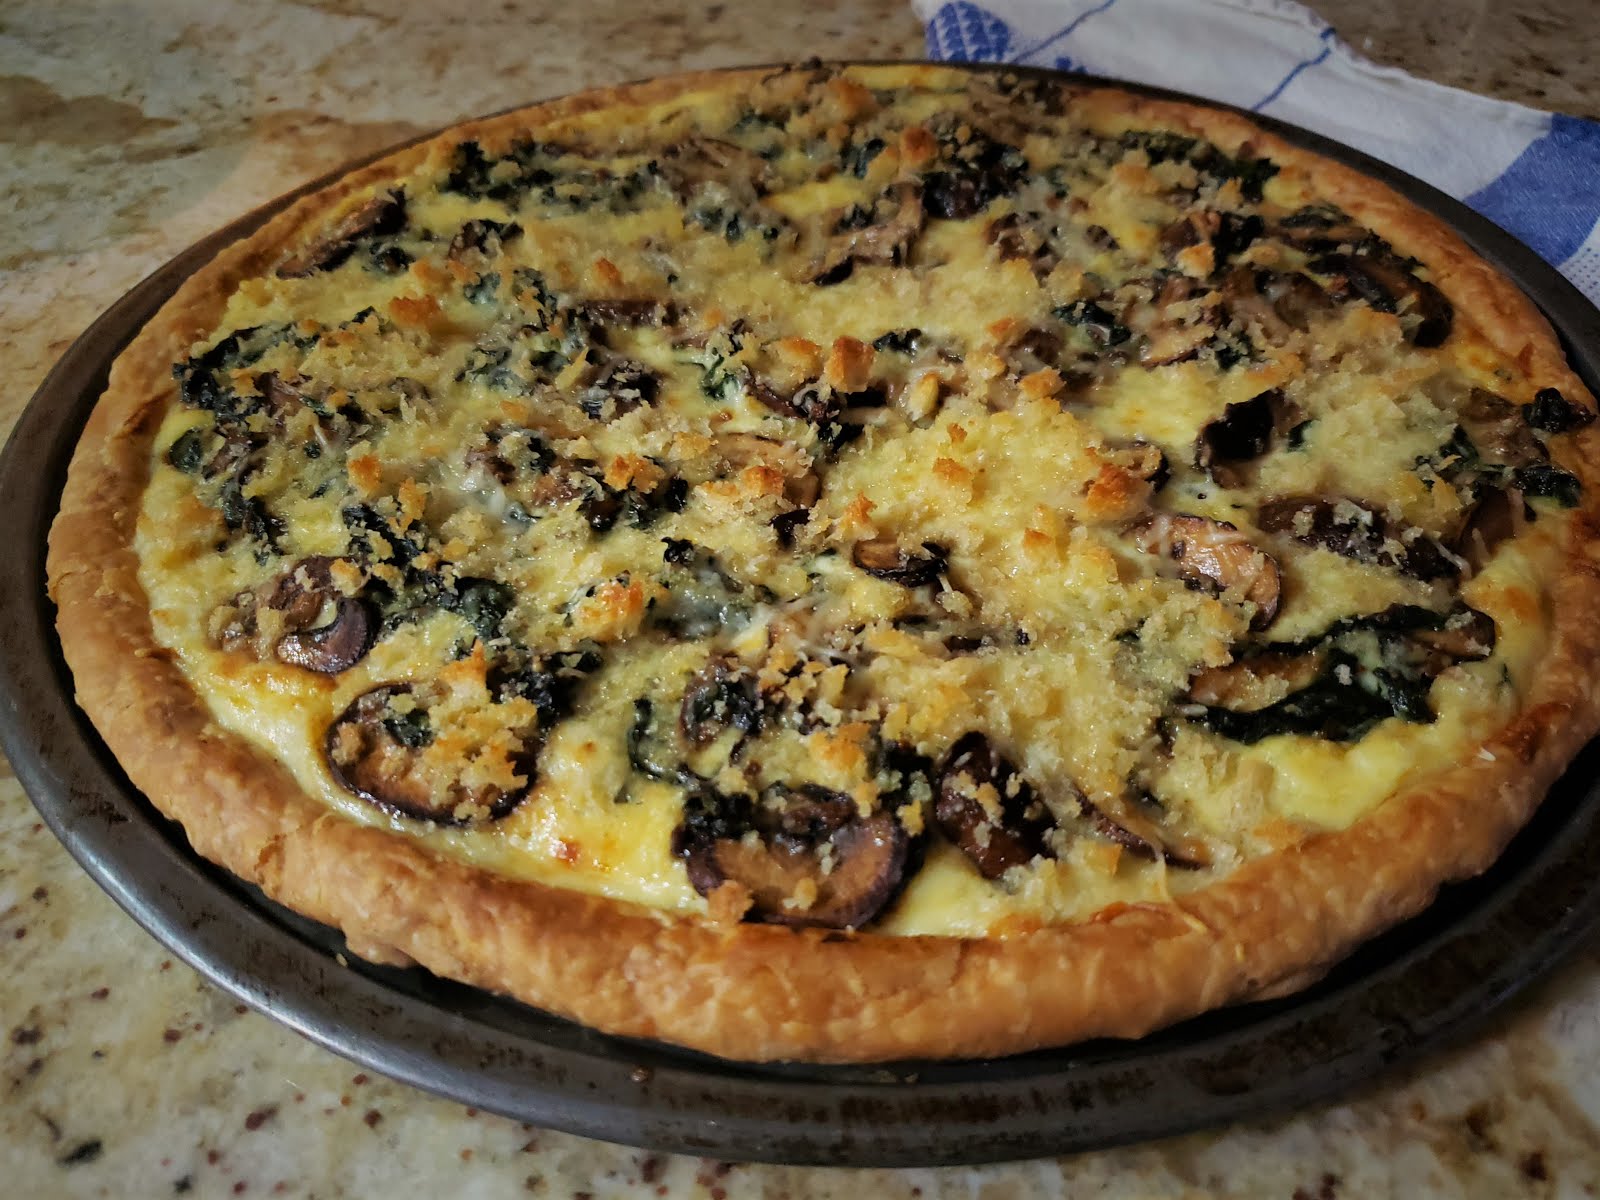
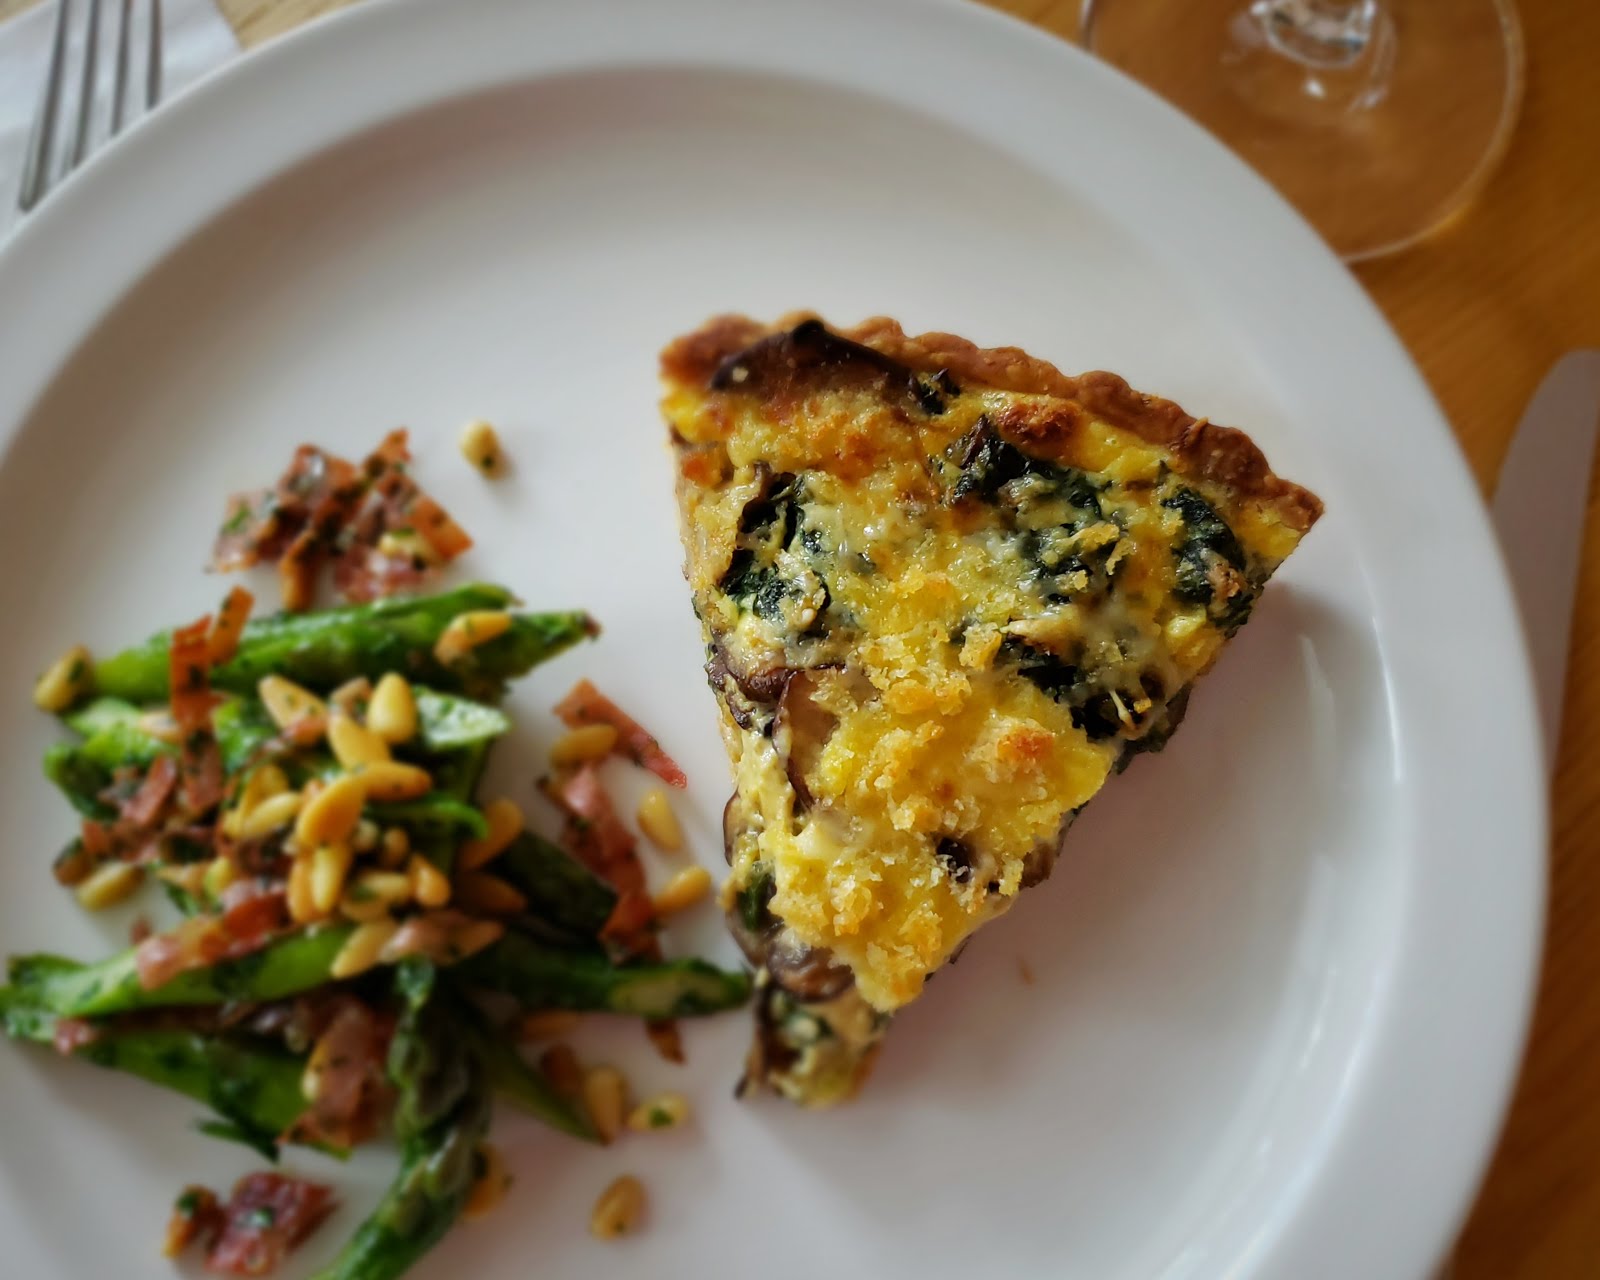
But beyond the tart being a great place to use some of your greens, I had another reason to post this recipe. The glut of beet greens continued until I had another leftover tart shell from a class—a tart shell that was a different shape. The first tart shell was the large, almost flat, pizza style that I tend to favor (it shows off ingredients to great advantage...plus, it has a higher proportion of crust to filling…which I love). The second was a traditional shell (baked in a removable bottom, 9-inch tart pan). I have always told people that these two shells (the 12-inch pizza pan crust and the 9-inch standard crust) held the same amount of filling…but I think this is hard for most people to believe. (They certainly don’t look like they would hold the same amount of filling.) Posting this recipe is my chance to demonstrate that this is in fact true. Both the tarts pictured in the post used exactly the same amount of vegetable filling and custard. You can make it either way. The traditional style will appeal to people who really think tarts are all about the filling. The “pizza style” will appeal to those who—like me—always want more crust.
 |
| The second time I made the tart I didn't really have enough of the beet greens (on the left)... so I supplemented with a handful of spinach and a few chard leaves... Almost any green would be good in this tart. |
But beyond the tart being a great place to use some of your greens, I had another reason to post this recipe. The glut of beet greens continued until I had another leftover tart shell from a class—a tart shell that was a different shape. The first tart shell was the large, almost flat, pizza style that I tend to favor (it shows off ingredients to great advantage...plus, it has a higher proportion of crust to filling…which I love). The second was a traditional shell (baked in a removable bottom, 9-inch tart pan). I have always told people that these two shells (the 12-inch pizza pan crust and the 9-inch standard crust) held the same amount of filling…but I think this is hard for most people to believe. (They certainly don’t look like they would hold the same amount of filling.) Posting this recipe is my chance to demonstrate that this is in fact true. Both the tarts pictured in the post used exactly the same amount of vegetable filling and custard. You can make it either way. The traditional style will appeal to people who really think tarts are all about the filling. The “pizza style” will appeal to those who—like me—always want more crust.
Before I close I want to make a couple of observations
about the ingredients. The first time I
made the tart I used red onion and mature garlic. When I made it the second time I had spring
onions and green garlic in my pantry…so of course I used those! You should use what you have on hand. I have given instructions for both.
And while on the subject of ingredients, I want to
mention the rosemary. I normally don’t
make a big deal about the addition of particular herbs, because I think they fall
into the category of seasoning to your preferences. But for this recipe, if you have it—and you
like it—you should include it. It is delicious
with both mushrooms and greens…and it really adds to the savory and complex
flavor of this tart. I’m sure the tart would
be good without it…but it is exceptional with it.
Finally, you may have noticed in the title of the post
that I have called this recipe a “quiche”…yet I have referred to it as a “tart”
throughout the post. I was going to call
it a tart in the title…because it is
a tart: It’s baked in a tart pan…and the
filling is cradled in a flaky pastry crust.
But it is also a quiche—a
specific class of tarts in which the filling that goes into the crust is
suspended in an egg custard. I bring
this up only because I was asked this very question in a class recently: Was I making a tart? Or a quiche? And, what exactly is it that makes something
a tart or a quiche? I then realized I
had been using the words interchangeably as I taught the class…because the
thing I was making happened to be both.
But of course this is not always the case. As far as I know, all quiches are tarts. But it is not true that all tarts are quiches
since all tarts (savory or sweet filling baked in a pastry crust) don’t necessarily
include custard. So now you know the
difference (if you didn’t before…). In
any case, whatever you choose to call it, I hope you will find it to be as
satisfying and delicious to eat as I have.
And I also hope you will find it to be a useful way to use and enjoy the
greens that are flooding the markets right now.

Beet Greens & Mushroom Quiche
1/2 medium red onion, finely diced, or 2 or 3 spring onions, finely sliced or minced
1 clove garlic, minced, or one stall green garlic, finely sliced or minced
A small sprig of rosemary, picked and minced (to make about 1/2 to 3/4 t. minced)
1/8 t. hot pepper flakes
5 oz. (trimmed weight—no stems or ribs) beet greens, Swiss chard or kale, rinsed in several changes of water
8 oz. crimini mushrooms, sliced 1/4-inch thick
1 12-inch “pizza-style” tart shell or 1 standard 9-inch tart shell, blind baked (see below)
100 gr/3 1/2 oz. Gruyère cheese, finely grated (about a cup)
2 eggs
1 c. heavy cream
1/3 to 1/2 c. coarse, fresh breadcrumbs, tossed with a teaspoon of melted butter
salt & pepper

When the onions are cooked, add the greens. If using beet greens or chard, add them a handful at a time, turning with tongs to coat them in the fat and expose them to the heat and adding more as they begin to collapse. If the greens were recently washed, there should be enough water clinging to them to create steam and help them cook…if they were washed ahead (or spun dry) you may need to add a few tablespoons of water to the pan. Cover the pan and cook until the greens are tender. Uncover and continue to cook until any liquid has evaporated. Season to taste with salt and pepper and set aside in a warm spot.
If using kale, bring a large pot of water to a boil. Add the kale and cook until tender (about 7 minutes). Lift the kale out and spread on a baking sheet to cool. When cool enough to handle, squeeze out the excess water. Add the cooked kale to the onion mixture and cook gently for a few minutes to infuse the greens with the flavor of the onions. Set aside.
While the greens cook, sauté the mushrooms: Depending on the size of your pan, you may need to sauté in batches—don't overcrowd the pan. Heat a sauté pan (non-stick, if you have one) over high heat. Add oil to coat the pan (a tablespoon or so), then add the mushrooms. Cook, shaking the pan occasionally, until the mushrooms are browned, tender and any liquid that they have given off has evaporated. If they seem dry at any time as they cook, drizzle in a bit more oil. Transfer the mushrooms to a plate and season with salt & pepper. When the greens are cooked, add the mushrooms to the greens. Set aside.
Preheat the oven to 375°. Place the baked crust on a baking sheet. Scatter about 2/3 of the cheese over the baked crust. Scatter the greens and mushrooms over all. Whisk together the eggs and the cream. Season with salt and pepper—and a pinch of freshly grated nutmeg if you like.
Slowly pour the custard over the vegetables, jiggling the pan a bit so the custard will be evenly distributed and will penetrate the vegetables. Be careful not to let the custard flow over the edge.

If there are any low places in the edge of your crust, you will not be able to use it all. Scatter the remaining cheese over the tart, followed by the buttered breadcrumbs. Bake the tart until the custard is set—about 20 minutes for the pizza-style tart, 25 for the traditional (a knife inserted in the center will come out clean). Slide the tart under the broiler to brown slightly if you like. Serves 6 as an entrée (with a salad or vegetable side), 8 to 10 as a light first course with a fluff of lightly dressed greens.


Pâte Brisée
(Short Crust Pastry)
1 3/4 c. all-purpose flour (200g)
1/2 t. salt
11 T. cold unsalted butter, cut into pieces (150g)
1/4 to 1/3 c. ice water
For a 9-
to 10-inch tart shell
1 1/3 c. all-purpose flour (150g)
3/8 t. salt
8 T. cold unsalted butter, cut into pieces (113g)
3 to 4 T. ice water
Combine the flour and the salt in a medium-sized
bowl. Rub the butter into the flour
until the butter is in small pea-sized pieces. Drizzle the smaller measure of ice
water over the flour/butter mixture.
Using your hands, fluff the mixture until it begins to clump, adding
more water if necessary. Turn the dough
out onto a counter and form into a mound.
Using the heel of your hand, gradually push all of the dough away from
you in short forward strokes, flattening out the lumps. Continue until all of the dough is flat. Using a bench scraper, scrape the dough off
the counter, forming it into a single clump as you do. Form the finished dough into a thick disk. Chill for at least 30 minutes.
To roll out, let dough warm up for a moment or two. Butter/spray the a pan and set it aside. Roll out the dough on a lightly floured
surface into a circle that is about 1/8- to 1/6–inch thick and with a diameter 2
to 3 inches larger than that of the pan.
Trim any ragged edges. Brush off
the excess flour and fold the dough circle in half. Transfer it to the prepared pan. Unfold the dough and ease it into the pan
being careful not to stretch it. Fold
the edges to form a ½-inch rim of a double thickness of dough for the
pizza-style crust. For the traditional
tart pan, simply press the dough against the sides of the pan (being sure not
to stretch the dough) and cut the dough off flush with the edge of the tart pan. Chill for at least 30 minutes.
To blind bake, line the pastry with aluminum foil or
parchment paper, pressing it into the corners and edges. Add a layer of pie weights or dried
beans. Bake in a 400° to 425° oven for 20
to 25 minutes. When the pastry begins to
color on the edges and is cooked through, remove the foil and weights and
continue baking until the pastry dries out and turns a golden brown (another 5
minutes or so).
Printable Version

No comments:
Post a Comment