Showing posts with label Shallots. Show all posts

Monday, November 5, 2018

A few ideas for Chanterelles season

When I shop for groceries, I’m always on a mission.  I’m just not much of a browser.  And I'm definitely not much of an impulse shopper.  I’m all about speed, efficiency and checking off the items on my list.  (I try not to knock people down in my haste…)  I pretty much save browsing for the farmers’ market.  Occasionally something that isn’t on my list will catch my attention when I'm at the grocery store and I’ll stop to have a look.  Of course this happens most often in the produce section (or maybe the meat or seafood department).  Figs, for example, always catch me off guard.  I wasn’t expecting them…and then there they are.  And suddenly they are on my list.


This happened a few weeks ago at Costco…with chanterelles.  I think Costco has them every fall, but for some reason I have never purchased any.  They are always for sale at a good price, but are still not what one might call inexpensive.  I think I have always thought:  how will two of us consume a pound of chanterelles before they begin to deteriorate?  This is silly of course.  We consume pounds and pounds of all kinds of vegetables all the time and I don’t think anything about it.  The trick is in making a habit out of something. 

I had not thought that far yet a couple of weeks ago when I succumbed to that initial impulse and bought a pound of chanterelles (I really just wanted to eat them).  But I can now happily say I am in the habit.  We have gone through at least three pounds since I first saw them.  I’m pretty sure I will be buying more before the season is over. 

Today I wanted to share a few of the things we have enjoyed…to help get you in the habit too.  Because chanterelles are special…expensive and not always available in my region (even though they have a fairly long season from early fall and into winter)…I like to serve them as simply as possible.  Their savory and aromatic flavor…and meaty-yet-tender texture…should be given center stage without too much competition from other flavors and ingredients.

Chanterelles are supposed to be wonderful when baked, but I have never prepared them that way (I guess I just need to get into the habit…).  To me, cooking chanterelles almost always begins with a sauté in olive oil or butter (see my “how to sauté mushrooms” post for some basic pointers).  From there I like to add shallots…and sometimes some garlic.  After that I add a few herbs (thyme, parsley and chives are my favorite) and more butter…  sometimes a bit of stock…  or some white wine and/or cream. 


With Green Beans, Celery Root Mashed Potatoes and a Sautéed Chicken Breast

Chanterelles started this way can be finished in a myriad of ways:  They can be piled on top of a slab of buttered toast…or a bowl of Leek & Prosciutto Risotto.  They are also delicious floating in a bowl of soup…like Butternut Squash or Celery Root.  (Celery root is a particularly fine companion for chanterelles—the earthy, aromatic and slightly pungent taste of the celeriac brings out the savory and fruity flavors of the chanterelles.)  They are also a delicious accompaniment—all by themselves or combined with another vegetable—to simply prepared beef…or chicken…or fish….  


With Green Beans, Roasted Potatoes and Beef Tenderloin

And if you are looking for ideas for a fall vegetable to add to a frittata or quiche…look no further.  Chanterelles are delicious with eggs.  In fact, the aforementioned toast with chanterelles would be fantastic topped with a nicely poached egg….

One of my favorite vegetable side dishes is green beans tossed with sautéed mushrooms.  Using all chanterelles for the mushroom component makes this simple side even better.  Not only is this dish delicious and elegant—it is easy to prepare for a special dinner or holiday gathering (Thanksgiving, in particular).  Simply have your blanched green beans and sautéed mushrooms ready, then when it’s time to serve, wilt some shallots in some butter, toss in the chanterelles and green beans…and a few herbs…and heat through.  (If you want to gild the lily, top with a shower of toasted pine nuts—or crushed Marcona almonds—and some shaved Parmesan…)


I even used some of my chanterelles on a pizza.  A crust smeared with garlic cream (just use 3 or 4 cloves of peeled garlic—minced or thinly sliced—instead of a head of green garlic) makes a perfect foundation.  Topped with some sautéed chanterelles—and nothing else—this makes a pretty fine pizza.  But you could add julienned prosciutto…or cubed and roasted winter squash…or some wilted leeks…or even cooked bitter greens.  All of these pizzas are particularly nice finished with a bit of Parmesan and some Fontina (whose nutty character compliments the chanterelles very nicely).  The pizza I made included garlic cream, a bunch of Siberian kale, the chanterelles and the aforementioned Parmesan and Fontina.  It was delicious.


Not surprisingly, chanterelles are fantastic on pasta.  You could prepare the pasta with just sautéed chanterelles (the recipe can be found on my basics post).  Or, you could turn your sauté of chanterelles into a mushroom cream sauce before tossing with some fettuccine…  which, in my opinion, is about as good as it gets.


To prepare chanterelles for cooking:  Trim away any visible root.  Wipe away any dirt and debris with a damp cloth…or scrape any particularly impervious detritus with the tip of a paring knife.  Cut away any darkened areas that have become softened, soggy or sponge-y.  Small chanterelles can be cooked whole, but unless they are unusually small, I like to halve, quarter, or slice (about 1/4-inch thick) chanterelles lengthwise.  This helps them to cook through more evenly and provides flat surfaces that take on lovely, golden caramelization during the sautéing process.  While not poisonous, raw chanterelles can apparently be difficult to digest, so make sure you cook them thoroughly.


Haricot Verts with Chanterelles

8 oz. haricot verts/slender green beans, stems trimmed away
1 to 2 T. olive oil
1/2 lb. chanterelles, trimmed, cleaned and sliced or halved/quartered—depending on their size
1 T. butter…plus more as needed
1 medium shallot (about 20 g), peeled and finely diced (about 2 T.)
1 T. minced flat leaf parsley
1 T. minced chives
Salt & pepper


Bring a large pot of water to a boil.  Add salt until the water tastes salty (about a teaspoon per quart).  Add the green beans and cook until just tender.  Drain.  Rinse under cold running water…or spread on kitchen towels…to cool.  (I tend to rinse if I’m working ahead and spread on towels if I’m using right away.)

Heat a sauté pan that is large enough to hold the mushrooms in a snug single layer over high heat.  Film the pan with oil.  Add the chanterelles to the pan.  Sauté the mushrooms until they are tender and nicely caramelized—this will take about 5 minutes.  As they cook, regulating the heat to prevent scorching if necessary, and stirring/tossing occasionally.  Season with salt after the mushrooms have been in the pan for about 2 minutes (they should have some color at this point—the salt will not only season them, but will encourage the mushrooms to release their juices and will slow down the caramelization process).

If serving right away, reduce the heat to medium low.  Push the mushrooms to the perimeter of the pan and add the butter to the center of the pan.  Add the shallots, along with a pinch of salt, to the melting butter and cook, stirring occasionally, until the shallots are softened—a minute or two.  Add the green beans to the pan along with the herbs and heat through, seasoning to taste with salt and pepper and adding more butter if the mushrooms and green beans seem dry.

If working ahead, transfer the mushrooms to a plate.  When ready to serve, warm a sauté pan  that is large enough to hold all of the beans and mushrooms over medium heat.  Add the butter.  When the butter has melted, add the shallots along with a pinch of salt.  Cook until the shallots are tender—about a minute or two.  Add the mushrooms, green beans and herbs to the pan and increase the heat slightly.  Cook until the green beans and mushrooms are hot through, seasoning to taste with salt and pepper and adding more butter if the mushrooms and green beans seem dry.

Serves 2 to 3 as a side dish.

Notes: 
  • This recipe may be multiplied to serve as many as you like.  Increase the size of your sauté pan as necessary to hold all of the cooked mushrooms and green beans.  You may need to sauté the chanterelles in batches so that they will caramelize nicely (don’t pile the mushrooms into the pan…add only as many as will fit in a snug single layer).  Add fresh oil with each batch.
  • When chanterelles aren’t available, this dish may be made with any mix of your favorite mushrooms.


Fettuccine with Chanterelles in a White Wine Cream Sauce

3 to 4 T. olive oil
1 lb. chanterelles, trimmed and sliced
2 to 3 T. unsalted butter
1 large (2 oz.) shallot, finely minced (about 1/3 c.)
1/3 c. white wine
1 lb. fettuccine (or linguine…or bucatini)
1 c. Heavy Cream
2 T. unsalted butter, cut into cubes
Freshly ground black pepper
2 oz. (2/3 c.) finely grated Parmesan, divided
2 T. minced flat leaf parsley

Heat a large sauté pan (large enough to hold a pound of cooked pasta…if you don’t have a pan that large, see notes below) over medium-high to high heat. Add enough oil to coat the pan, then add the chanterelles (if your pan is not large enough to accommodate all of the mushrooms in snug single layer, sauté them in batches). Cook, shaking the pan occasionally, until the chanterelles are browned and tender (this will take about 5 minutes)…add some salt after the mushrooms have been cooking for 2 or 3 minutes and are beginning to brown. When the mushrooms are tender, reduce the heat, push the mushrooms to the perimeter of the pan and add 2 T. of butter.  When the butter has melted, add the shallots along with a pinch of salt. Cook until the shallots are softened and beginning to caramelize…this will take a minute or two.   Add the wine and bring to a simmer, scraping up any caramelized bits off of the bottom of the pan.  Reduce to a glaze.  Add the cream, bring to a simmer and remove the pan from the heat while you cook the pasta.  Taste and correct the seasoning of the sauce with salt & pepper. 

While the sauce is cooking, bring 6 quarts of water to the boil in a large stock/pasta pot.  Add 2 tablespoons of salt (or however much is required for the water to taste salty).  Add the fettuccine and cook until al dente.  Drain, reserving a cup (or more) of the pasta cooking liquid.

Return the sauce to moderate heat and bring back to a simmer.  Remove from the heat, and stir in half of the parmesan.  Toss in the fettuccine, cubed butter and parsley and toss to combine.  If the pasta seems "tight" or sticky (it probably will), add a splash of the pasta water and toss again until the noodles and mushrooms are coated in a light fluid sauce. Remove the pan from the heat, cover and let sit for a minute.   Uncover and toss again to check the consistency, adding more pasta water as necessary—the goal is to serve the pasta when the noodles are coated in a light, fluid, creamy sauce.

Divide among serving plates, top with freshly grated Parmesan and serve. Serves 4 to 6.

Note
  • If your pan is not large enough to accommodate a pound of cooked pasta, cook the mushrooms in batches in a wide sauté pan and prepare the sauce up to the point of adding the cheese in that pan.  After you drain the pasta, return the hot pasta to the pasta pot (along with the cubed butter and parsley) and add the mushroom sauce (scraping the sauté pan well with a rubber spatula—and maybe “rinsing” the pan with some of the pasta water—so you can get every bit of the sauce) to the pot.  Finish saucing the pasta (following the directions in the recipe) in the large pot and serve.   
  • This recipe can be easily divided for smaller households.  Just choose an appropriate sized sauté pan for your needs the amount of pasta and mushrooms that you are cooking.
Printable Version       

Pizza with Garlic Cream, Kale & Chanterelles:  Prepare the crust and garlic cream as directed in the recipe for the Asparagus Pizza with Green Garlic Cream & Mushrooms, using 3 or 4 cloves of peeled and minced or thinly sliced garlic instead of a whole head of green garlic in the garlic cream.  Strip the leaves from a bunch of kale (I used Siberian…but Red Russian or Tuscan would be good too).  Cook in a large pot of boiling salted water until tender—this will take about 5 to 10 minutes.  Drain.  Then spread on a baking sheet to cool.  Squeeze out the excess water and chop coarsely.  Sauté a half pound of chanterelles in some olive oil.  When the mushrooms are tender and caramelized, reduce the heat and season with salt & pepper.  Toss in the kale, drizzling in a bit more olive oil, and cook until the kale is sizzling in the oil with the mushrooms.  Taste and correct the seasoning. Set aside to cool.  To build the pizza, roll/stretch the dough into a 12- to 13-inch circle.  Place the round of dough in a pizza pan or on a semolina dusted peel and smear the garlic cream over the surface, leaving a 1/2-inch border.  Top with the kale and chanterelle mixture followed by a mixture of 2 oz. coarsely grated Fontina and an ounce of finely grated Parmesan.  Bake on a hot stone in a preheated 500° oven until the crust is browned and the cheese is bubbling….about 7 to 15 minutes, depending on your oven.


Thursday, February 15, 2018

Creamy Parsnip Soup with Walnut-Sage Pesto


I don’t think I tasted a parsnip until I was well into adulthood.  This is not to say I would have tasted them (or liked them) had I been served some when I was a child (as I have mentioned many times, I was an extremely picky eater).  For some reason they just never crossed my path.  I think that many Americans would tell a similar story…and that almost as many American adults would say they had still not tasted them.   


Even if I didn’t know of this lack of exposure from my cooking classes, the sad, wax-covered (an attempt to preserve moisture for an overly long stay in the produce aisle) parsnips available in many grocery stores would tell the tale.  But, if the reaction of the people who have attended my classes is any indication, most people will like them when given the chance.   If you have never sampled a parsnip…or if you have only had the old, tired, waxed ones...the parsnip soup I am posting today would be a great starting place to experience just how delicious a parsnip can be.

It is a surprise to me that parsnips aren’t more widely served on American tables.  One of the unfortunate things about our national palate is that Americans gravitate towards sweet flavors…even in savory dishes.  This proclivity should work in the favor of parsnips…they are quite sweet.  So sweet in fact that I find they need a bit of tempering from complimentary flavors.  They go beautifully with pungent turnips and rutabagas (roasted together…baked in a gratin…folded into a purée…).  And they are fantastic with the slightly bitter and musty flavor of the walnut and sage garnish for this soup.


The recipe for this soup is from Alice Waters’ book The Art of Simple Food II.  As is almost always the case, the balance of flavors in her recipe is just about perfect.  I have changed it in only one respect:  Waters serves it as a chunky vegetable soup.  I like to purée it (suggested as a variation in the original recipe).  Parsnips purée into an incredibly velvety soup—and the drizzle of the coarse walnut-sage pesto is beautiful against the off white color of the soup. 


Furthermore, because parsnips aren’t the most popular vegetables on the produce aisle, sometimes the ones I have access to (even though they haven’t been waxed) have hard cores that resist cooking—even after the exterior has been completely broken down by the cooking process.  Puréeing the soup…and then quickly straining it…is a great way to deal with any unyielding, fibrous bits. 

To get good parsnips, go to a grocery store that has a reputation for carrying local produce…or one that sells an abundant variety.  Whole Foods, for example, almost always has them during the cooler months.  If you have a winter farmers' market in your area, one of the growers will probably have them.  As with most fresh vegetables, choose specimens that are heavy for their size (this means they will still be full of moisture) and as unblemished as possible.  And, if it isn’t already clear from my comments, avoid the ones in the grocery story that have been waxed.  You will be disappointed and possibly even disinclined to give them a second chance…which would be a shame. 

On a final technical note, when you make this soup, use the amounts of liquid given in the recipe as a guideline.  As with all puréed soups, err on the side of too little liquid while the soup is cooking (if you have too much, the soup might be too thin after puréeing).  Add just enough liquid so that the vegetables are moving freely and a bit loosely in the stock/water.  You can always add more (and the recipe indicates that you probably will) when you actually purée the soup.  While puréeing, add just enough liquid (water or stock) to allow the soup to move freely in the blender.  After you add the cream, adjust the thickness again (with water or stock).  I mention all of this because it is impossible to give an exactly correct amount of liquid in a recipe.  I have no way of knowing how much liquid will evaporate during the cooking process (you may cook at a higher or lower level of heat…your pot may be wider or narrower than mine…etc.).  Also, we may have different ideas of what constitutes a nice texture. In my opinion, a puréed soup should be on the thin side… Sippable, with a viscosity that is just slightly thicker than heavy cream, is just about perfect.


Cream of Parsnip Soup with Sage & Walnuts

3 to 4 T. unsalted butter
4 large shallots (about 5 to 6 oz.), sliced
1 large leek—white & pale green parts only—trimmed, halved lengthwise, sliced (to obtain 1 to 1 1/4 cups) and rinsed well in several changes of water
1 sage sprig
Salt
1 1/2 lbs. parsnips, trimmed, peeled and cut into 1/4-inch half moons
4 cups chicken (or vegetable) stock

3 1/2 T. olive oil, divided—plus more as desired
12 to 15 sage leaves
1/2 cup walnuts, toasted and chopped medium fine
Salt & pepper
1 large or 2 small cloves of garlic

Water as needed (about 2 cups)
2/3 cup heavy cream

Mise en place tray for class...

In a heavy soup pot set over medium heat, melt 3 T. of the butter.  Add the shallots and cook, stirring occasionally, until soft and translucent—about 10 minutes.  Add the leeks, the sprig of sage and a good pinch of salt.  If the pan seems dry, add the remaining tablespoon of butter.  Continue to cook until the leeks begin to collapse—about 4 to 5 minutes.  Add the parsnips and cook, stirring occasionally, until the parsnips have begun to soften on the surfaces—about 5 to 7 minutes.  


Pour in the stock.  Raise the heat, bring to a boil, then immediately reduce the heat to a simmer and cook until the parsnips are tender—about 12 to 15 minutes. 

While the soup cooks, heat 1 1/2 tablespoons of olive oil in a small sauté pan.  Add the sage leaves and cook until they have crisped and turned translucent.  


Remove the pan from the heat and add the walnuts and stir to coat.  


Season with salt and pepper.  Place the garlic in a mortar and pestle and pound until smooth.  Pound in a pinch of salt.  Pour in the sage and walnut mixture, along with another 2 tablespoons of oil.  Pound lightly.  Taste and correct the seasoning with salt.  Add more olive oil to achieve a consistency that pleases you.  Set aside while you purée the soup. 

When the parsnips are tender, remove the sage sprig.  Purée the soup.  If the soup is too thick to move freely in the blender, add a bit of water.  Strain the soup into a clean pot; add the cream and heat through, adding more water if the soup is too thick.  Taste and correct the seasoning with salt.  Serve with a spoonful of the sage and walnuts drizzled and dolloped over the surface of the soup. 

Makes a scant 2 quarts soup.

(Recipe adapted from The Art of Simple Food II by Alice Waters) 


Thursday, February 8, 2018

Leek & Prosciutto Risotto with Sautéed Oyster Mushrooms


In my previous risotto posts I have made a point of discussing how to achieve differences in flavor and texture by how and when you choose to add the vegetable garnish (cooked vs. raw…at the beginning, middle or end…).  But stirring a vegetable into a risotto isn’t the only way to alter the way in which the dish is perceived.  Just as you can serve risotto topped with a portion of cooked meat or fish, you can also serve a risotto with an attractive portion of a cooked vegetable—making it so that one vegetable becomes the star of the show, rather than just one of many supporting players.


I bring all of this up for a couple of reasons.  The first is that sometimes I like to eat risotto all by itself.  It makes a wonderful starchy side dish…but it is special enough on its own that sometimes that’s how I want to enjoy it: either as a first course for a formal dinner…or as the entrée for a simple and informal supper.  In each of these cases, I always do everything I can to make my bowl of risotto look like something other than a mound of hot breakfast cereal.  I adorn it with a sprig of herbs…some nicely shaved Parmesan…or some other small garnish.  And this approach is just fine, but sometimes you want something more.  Topping the finished risotto with a separately cooked—and attractively arranged—complimentary vegetable is a great way to get that ‘something more.’

I have to admit though that sometimes creating a beautiful plate isn’t at the top of my list for a weeknight meal (neatly and cleanly plated is usually more than sufficient) and I am much more likely to go to this extra step for a client’s dinner.  However, sometimes at my own table find that I have a special and beautiful vegetable that I want to highlight a bit…so it doesn’t get lost in the crowd.  Examples include a few spears of fresh asparagus, just picked from a friend’s field…local fava beans (a rarity indeed in my region)…morel mushrooms that are so expensive I can only justify purchasing a few…etc.  This is a great time to make a risotto with complimentary flavors to act as a bed/background for your perfectly cooked, special item…which then gets perched right on top for all to see.


I used this approach recently to highlight the beautiful oyster mushrooms that a new purveyor has been bringing to the winter farmer’s market.  I used to consider oyster mushrooms a run-of-the-mill grocery store item.  Sadly they have disappeared from my local stores.  Since they are a favorite of mine I was excited when I found out that they would be coming to my farmers’ market…and even more excited when I saw the wide variety on display: Blue oyster, Pearl oyster, Elm oyster, etc.  This winter I have enjoyed these mushrooms in pastas…and on pizzas…and recently on top of this leek and prosciutto risotto.

I made this risotto just because I wanted to show off these wonderful mushrooms.  I could of course have just stirred them into the risotto—and it would have been delicious.  But it wouldn’t have been nearly as beautiful—or as much of a celebration of this wonderful ingredient.


If you are new to risottos…or sautéing mushrooms…before you begin check out some of my previous posts on how to make risotto (where I go into the details of the process and the goal) and on how to sauté mushrooms.  And if you don’t have access to oyster mushrooms, this dish will still be delicious with whatever mushrooms you are able to find—the sweet leeks and salty prosciutto are a wonderful backdrop for the savory mushrooms.

Finally, speaking of “topping” risotto with something special, if you have never formed some leftover risotto into a little cake, fried it in butter, 


and topped it with a softly cooked egg (poached or fried), you are missing out.  Make sure that you make some extra risotto, just so you can have this glorious concoction for lunch the next day.   After tasting it, you will probably find yourself making extra risotto on purpose..


Leek & Prosciutto Risotto with Sautéed Oyster Mushrooms

2 to 3 large leeks, white and pale green parts only
3 T. unsalted butter
1 large or 2 small shallots (about 2 to 3 oz.), finely diced
2 t. minced thyme (optional)
1 1/2 c. Arborio or Carnaroli rice
1/2 to 2/3 c. dry white wine
About 6 c. hot chicken stock
3 oz. thinly sliced prosciutto (about 6 slices), cut crosswise in 1/4-inch strips
2 T. butter
1/2  to 2/3 c. finely grated Parmesan
Salt & Pepper, to taste

8 to 10 oz. (trimmed of tough portions of the stems and weighed after trimming) oyster mushrooms, larger ones torn in half (see note)
Olive oil
2 T. butter
1 1/2 to 2 T. minced Italian flat leaf parsley


Prepare the leeks: Trim away the root and the dark green portion of the leeks.  Cut the white and pale green portion in half lengthwise.  Slice each half thinly crosswise (about 1/4-inch thick).  You should have 3 1/2 to 4 cups of leeks.  Rinse the leeks well in several changes of water to make sure that they are entirely free of soil and sand.

Heat the butter in a heavy medium saucepan (preferably one that is wider than it is deep) over medium heat.  Add the leeks along with the shallots and thyme and sweat until the leeks have wilted and the shallots are soft—about 10 to 15 minutes.  Add another tablespoon of butter if the leeks seem dry as they cook. 


Add the rice and continue to cook for a minute or two until the rice is well coated with the butter and is sizzling a bit.  Add the wine and cook until the pan is nearly dry.  Begin to add the stock.  Add enough so that the stock is at the same level as the rice in the pan—the rice should move freely, but not be ‘swimming’ in the liquid.  Adjust the heat so that the rice cooks at a slow simmer.  Stir occasionally and regularly (this will enhance the creaminess of the final risotto.) When the pan is nearly dry, add more stock and season lightly with salt & pepper.  Continue to stir and cook the rice, adding more stock and seasoning lightly as each addition is absorbed. 


While the risotto cooks, sauté the mushrooms:  As always, when sautéing mushrooms, do not over-crowd the pan.  If necessary, sauté in batches.  Heat a non-stick sauté pan over high heat.  Add a thin film of oil to the pan.  You should see a wisp of smoke if the pan is hot enough.  Add the butter and the mushrooms. Cook, shaking the pan occasionally, until the mushrooms are browned, tender and any liquid that they have given off has evaporated.  Season with salt and pepper.  If sautéing in batches, transfer the mushrooms to a plate and repeat with the next batch.  When all of the mushrooms have been sautéed, return all of the mushroom to the pan and heat through.  Add a splash of the stock to the pan (or use water or white wine if you have used all of the stock for the risotto) and allow it to reduce around the mushrooms.  Toss in the parsley.  Taste and correct the seasoning with salt and pepper.  Set aside until the risotto is done.  Reheat briefly if necessary before serving.


When the rice is al dente—about 18 to 20 minutes from the first addition of stock, stir in the prosciutto.  Remove from the heat and stir in the butter, cheese and parsley….and adding more stock as necessary to achieve a fluid consistency. 


Taste and correct the seasoning and serve immediately topped with the wild mushrooms.  Serves 4 as an entrée

Notes:  

  • If you are unable to find oyster mushrooms, any favorite mushroom (crimini, white button, shiitake, chanterelles, etc.) will work.   For mushrooms other than oysters, trim and slice 1/4-inch thick before sautéing.
  • Pack the left over risotto into an oiled dish, spreading about 3/4-inch thick.  Let cool and then cover with plastic wrap and store in the fridge.  Fry the cold risotto in a cast iron (or other nonstick skillet):  melt some butter over moderate heat.  Cut a portion of the cold risotto and carefully lift it out of dish with a wide spatula.  Place it in the sizzling butter with the top side down.  The top will be dryer than the bottom (which will be a bit gooey) and will be less likely to stick or fall apart.  When the first side is golden brown and crispy, carefully flip the cake and brown the second side.  Serve topped with a poached or fried egg.


Tuesday, February 28, 2017

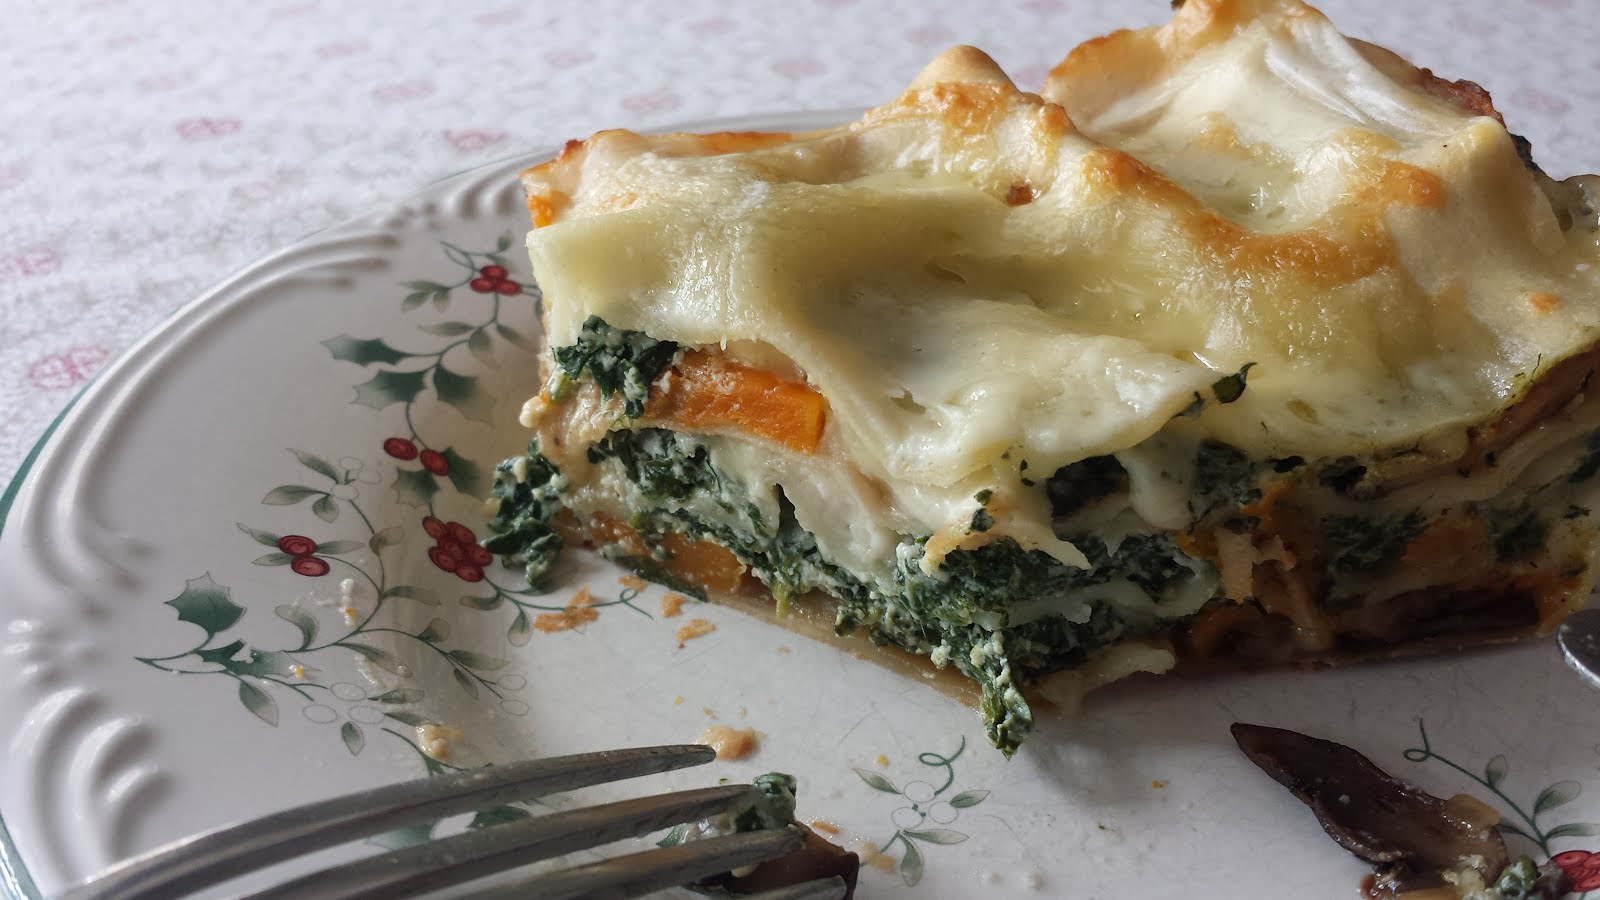
Winter Lasagne...with Spinach, Butternut Squash & Mushrooms


Last July I published a recipe for Summer Lasagne.  "Summer" because the main ingredient was corn—made into a pesto and also folded into some beautiful market chard.  This unusual and tasty lasagne was the serendipitous result of the intersection of an impulse purchase at the grocery store (no-boil noodles) and the bountiful produce of the summer market. 

I haven't been to the farmers' market in a while (for a lot of reasons...but the main one is that the winter market is new and I'm not in the habit of it yet), but the unforeseen contents of my pantry—an extra pound of baby spinach (!), a chunk of winter squash...and an unusual and continuous supply of ricotta (I'm not sure why I keep buying it other than I love it and it is so versatile)—once again provided the inspiration for lasagne. This time I purchased the no-boil lasagne noodles...along with some mushrooms and Fontina cheese...with the definite purpose in mind of a Winter Lasagne—with spinach, butternut squash and mushrooms.  


Although it is not always the case, some of the most delicious meals are the ones I make without a specific "recipe" or a real plan....  the ones where I just walk into the kitchen with an idea and start cooking.  Such was the case with this lasagne.  I had a general idea in mind, but hadn't bothered to plan too much. When you consider that making lasagne is always a project, this probably wasn't the wisest course to take....but in retrospect, I'm glad I did it that way.

I am almost never in my kitchen anymore without a camera.  This makes it so I can write a post if I particularly like something I have made.  Or, it gives me a way of revisiting something I have made if I have forgotten details.  On this particular occasion, about the time I started to build my lasagne, I quit taking pictures.  I was tired.  It was getting dark(er).  And most significantly, I was not happy with the way my lasagne was going together:  the ricotta/spinach mixture seemed a bit stiff....   I felt like I had underestimated the amount of each of the components (especially the béchamel)....  In any case, I was pretty sure I would be going completely back to the drawing board if I ever wanted to make this particular lasagne again. 

Then, a couple of things happened.  First, I got a break from it.  A lasagne takes 40 minutes to an hour to bake and as I cleaned and righted the kitchen, I began to think less about the work and more about dinner.  Then, I cut into it...and it sliced beautifully and evenly.  Then....  I tasted it.  I was astonished by how delicious and flavorful it was.  I even commented about it out loud as I simultaneously felt a bit disgruntled that I had stopped taking pictures.  The next day at lunch, it tasted even better.   Of course, I had to make another...


The second time around was a much better experience.  I knew what to expect, so it went together much more easily.  I'm happy to share that if you organize the succession of your vegetable, cheese and sauce preparation in a thoughtful way, you will probably be sitting down to dinner within two hours of the time you start cooking.  (And since you will be able to use part of that time—while the lasagne bakes—to clean up, it really doesn't seem like an unreasonable amount of time for a lasagne.)

To make your lasagne preparation experience as stream-lined as possible, start by cutting and roasting your squash.  While the squash roasts, collapse/cook the spinach and spread it out too cool.  Slice the mushrooms and dice the shallots and sauté while the spinach cools.  Squeeze out the spinach and mince.  At this point your vegetables should be done.  You can start grating the cheeses while all of this is happening...or wait until the vegetables are all done and then move on to the cheeses.  (Since you will have your microplane grater/zester out to grate the Parmesan, use it to grate the clove of garlic directly into the bowl of ricotta too.)  Finally, since this lasagne uses no-boil noodles (really, a much better product than traditional dried lasagna), all that is left is to make the béchamel and build the lasagne.

Like the summer lasagne, this one is pretty rich and will serve four to six.  I'm certain it could be doubled to serve more.  If you want to make sure that you can serve six with just one, you can make a tossed salad—or a simple blanched green vegetable (like green beans or broccoli)—to serve with it.  I was perfectly content with just the lasagne—not only is it filling, but the flavor is very satisfying.  I found that I preferred to enjoy some fruit afterwards (the Mandarins have been incredible this year).  


And if fruit isn't your favorite thing...or you would really prefer something a bit more decadent—then a little something chocolate would I think provide just the right note to round out your meal. 


Spinach Lasagne with Butternut Squash & Mushrooms

1 to 1 1/4 lb. Butternut squash, peeled, halved lengthwise, seeded and cut cross-wise into 1/4-inch thick slabs
2 T. olive oil, divided
Salt & freshly ground pepper, to taste
3 1/2 T. butter, divided
8 oz. crimini or white mushrooms, sliced 1/4-inch thick
1 medium shallot (about 1 1/2 oz.), peeled and minced
1/4 c. dry white wine
1 lb. baby spinach, washed
1 c. (240 g) whole milk ricotta
1 oz. (1/3 c) finely grated Parmesan
1 clove garlic, finely grated with a microplaner or smashed to a purée with a pinch of salt
Pinch nutmeg 
1 1/3 c. whole milk
2 T. flour 
6 oz. Fontina or Fontal, coarsely grated
8 "no-boil" lasagna (half of an 8 oz. box)


In a large bowl, toss the squash with a tablespoon or so of olive oil (enough to lightly coat all the squash) and season with salt and pepper.  Spread in a single layer on a baking sheet


and roast in a 450° oven until tender and caramelized—about 25 to 30 minutes.  (Flip the squash over about 2/3 of the way through for more even browning.)  Set aside when done.

While the squash roasts, place the spinach in a large stock pot with just the water clinging to the leaves from washing (or—if you have purchased a container of triple washed, add about a quarter inch of water to the pan before adding the spinach). Cover the pot and set over high heat.  When you hear the water begin to boil and steam, uncover and turn the spinach over and over in the pot (using tongs) until it has all collapsed.  This whole process should only take a minute or two.  Dump the contents of the pot into a strainer of colander to get rid of most of the water.  Spread the spinach on a sheet pan and let cool.  When cool, squeeze out the excess water a handful at a time. 


Chop the spinach medium fine.  


You should have 1 1/4 to 1 1/3 cups loosely packed chopped spinach.  Set aside.

While the squash roasts and the spinach cools, melt a tablespoon of butter with a tablespoon of olive oil in a wide sauté pan set over moderately high to high heat.  When the butter stops sputtering and the foam subsides a bit, add the mushrooms.  Sauté the mushrooms (tossing or stirring occasionally) until tender and golden and any liquid released has evaporated. (Season the mushrooms with salt when they have begun to take on some color.)  Reduce the heat under the mushrooms to medium/medium-low.  Push the mushrooms out towards the perimeter of the pan and add another tablespoon of butter to the center of the pan.  When the butter has melted, add the shallots and a pinch of salt and cook until tender and fragrant...this will just take a few minutes.  Add the wine to the pan, increase the heat slightly.  Allow the wine to reduce completely to a buttery glaze, scraping the bottom of the pan occasionally get all of the caramelized mushroom juices.  Taste and correct the seasoning.  Set aside.

Place the ricotta, parmesan, garlic, spinach and a pinch of nutmeg in a medium-sized bowl.  Mix until well combined, seasoning to taste with salt and pepper.

Prepare the béchamel: In a small saucepan, bring the milk to a simmer; keep hot.  (Alternatively, heat the milk in a microwave proof container of some kind.)  In another medium saucepan, melt 1 1/2 T. of butter over medium heat.  When the foam subsides, whisk in the flour.  Cook stirring constantly for a minute or so—the roux will be bubbly and straw yellow.  Remove from the heat and pour in half of the hot milk, whisking constantly until smooth—it will thicken immediately.  Add the remaining milk.  Return to the heat and stir constantly until the sauce returns to a simmer.  Taste and season as desired with salt and pepper.

When you are ready to build the lasagne, oil a square 2-quart baking dish (an 8 1/2- by 8 1/2-inch Pyrex is perfect) and bring a shallow pan of water just to the boil and remove from the heat.  Arrange these two items...along with all the other components—on your workspace so that you have easy access to everything.   


Add two of the noodles to the pan of hot water.  Spread a couple of tablespoons of béchamel in the bottom of the oiled dish.  Lift the noodles out of the pan. (They should not be soft or flexible at this point...you're just giving them a head start by soaking them briefly—less than a minute.)  Let the excess water drip back in to the pan and arrange them in a single layer in the prepared baking dish.  Add a couple more noodles to the pan of hot water (to soak while you build the first layer).  Scatter a third of the mushrooms and a third of the squash over the noodles.  


Daub a third of the ricotta mixture over the vegetables, spreading it out a bit using two forks.  


Drizzle a fourth of the remaining béchamel (about 1/3 cup) over the ricotta-spinach mixture (spreading if a big glob goes all in one place).  Scatter a quarter of the Fontina (1 1/2 oz.) over all.  Beginning with the noodles, repeat this layering two more times.  

Finish with two more (soaked) noodles, the remainder of the béchamel (spreading evenly) and a scattering of the remaining Fontina (1 1/2 oz.).


Cover the pan with a piece of aluminum foil that has been brushed on the underside with olive oil (or sprayed with pan spray), tenting the foil slightly if possible so that it isn't touching the top of the lasagne.  Bake in a 350° oven until the cheese on top has just melted—about 25 to 30 minutes.  Uncover and continue to bake until the lasagne is bubbling around the edges and the top is beginning to brown around the edges...another 10 to 15 minutes.  Let the lasagne rest for 5 to 10 minutes.  Cut with a sharp knife and serve.  Serves 4 to 6.


Notes:
  • The amounts of mushrooms and squash will seem very skimpy as you are building the lasagne. This is as it should be. 
  • The ricotta-spinach mixture may seem very stiff (depending on the moisture in your ricotta). Don't worry if it won't spread into an even layer—it is in fact very likely that it will not. Just daub it evenly over the vegetables and flatten it a bit with a fork. It will spread out—or at least give the impression of having spread out—as it bakes. 
  • I have never made this with frozen spinach, but I imagine that frozen chopped spinach—thawed and squeezed dry and measured to make 1 to 1 1/3 cup would be fine. 
  • Substitute Low-moisture Mozzarella for the Fontina/Fontal if you like. 
  • This makes a tall lasagne...so if you double the lasagne, it would be best to go with a 15- by 11-inch pan rather than a 13- by 9-inch.