Wednesday, January 25, 2023

Creamy Gingered Carrot Soup

As is my habit during the early days of the new year, I have been making and enjoying lots of soup.  It really is the perfect food for January.  Not only is it soothing and warm on a dark, cold…and more often than not, wet…day—it is just the thing after the dietary excesses of the holidays.
 

Not surprisingly, this is also the time of year when I have traditionally taught soup classes.  Most of the recipes that were part of my 
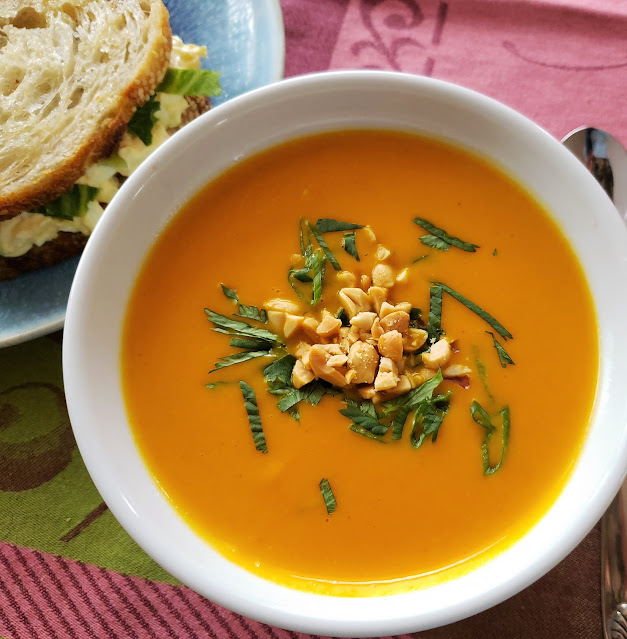
class rotation have already appeared on my blog.  The carrot and ginger soup I’m posting today was always a class favorite.  I’m not sure why I never posted the recipe here.  It might be because the presence of fresh ginger…and lime…and cilantro…put it just outside the reaches of my normal home pantry.  But I have had fresh ginger on hand quite a bit in recent weeks for various things I’ve been working on…and since I always have carrots (and I’ve been in the mood for soup)…the other day I thought of this soup.  I was so glad I did.  The warm color—and tummy soothing ginger—make it a great post holiday/mid-winter soup.
 
I’m sure that in previous posts for puréed soups I have had a lot to say about the process.  But since it’s been a while since I wrote one of those posts, I’ll just repeat a few essentials here:
 
First…make sure you aren’t shortcutting the initial cooking of the onions and carrots in the fat.  This process allows the flavors of these vegetables to infuse the fats and give a deeper flavor to the final soup.  And along those lines, make sure your vegetables are fully cooked before you purée the soup, or you’ll have a coarse purée.  (The cooked vegetables should be tender to the tip of a knife—and you should be able to mash them against a plate with a fork or spoon).

Also, when adding liquid to a soup that is to be puréed, always hold back some—adding just what is necessary to cover the vegetables well and cook them through.  If too much liquid is added at this early stage, the final soup might be way too thin (and I say this as someone who prefers thinner soups).  You can always (and likely will) add more liquid while you are puréeing the soup.  I like the final consistency of my puréed soups to be like thick cream—it shouldn’t mound in the bowl or on the spoon (and should be “sippable”).
 
If you are using a traditional blender, don’t fill it too full with the hot soup (2/3 full is about right).  The pressure build up when you turn on the blender will push the cap up and off and if the blender is too full you’ll have a mess—and possibly a burn. 
 
Finally, I always pass my puréed soups through a fine meshed sieve.  I think it gives the most suave and velvety texture.  But I understand that some find this step to be a bit persnickety…and it also adds to the washing up.  Be assured that the soup will taste just as good without straining out the lingering fibrous bits.  Whether you are straining the soup or not though, take the time to run the blender until the soup is super smooth (you’ll be glad you did!). 
 

If you make this soup, be aware that its flavors are an interplay of strong and subtle…and that they change a bit over time.  On the day it is made, the ginger flavor is strong…and the soup has a warm spiciness.  The next day, the ginger flavor will be much more subtle.   If you like a stronger ginger flavor, simply add a grating of fresh ginger when you are reheating the soup on subsequent days.  If you want to eat it the day you make it…and you don’t like the strong flavor of the ginger, just add the ginger with the stock—its flavor will soften under the longer cooking time.  As far as the lime goes, it is added to balance not only the sweetness of the carrots, but also the honey.  It should not really be seen as the addition of lime flavor (although it will add a little)—but rather as a way to lift and brighten the flavors of the whole soup.  If you want a stronger lime flavor, add a grating of zest to the final soup (or as a garnish). 
 
As I type this post today, I have a lovely view of snow covered trees.  For the most part, people in my area are staying in after last night’s snowfall if they can.  It is just the right kind of day for this soup.  And even if you don’t typically keep fresh ginger in your home pantry, you can still make a carrot soup (without a run to the store) because this soup also happens to be a great template for a basic carrot soup.  Simply omit the honey, lime & ginger and you will have a delicious soup, the makings of which will already be in most home pantries. 


Gingered Carrot Soup
 
2 T. olive oil
1 large onion (8 to 9 oz.), thinly sliced
1 T. unsalted butter
1 lb. carrots, peeled and thinly sliced
1 T. rice (Basmati, Jasmine, Arborio, etc.)
1/2  t. ground coriander
1 t. paprika
1 t. cumin
1 T. honey
3 to 4 c. chicken or vegetable stock
2 T. (18 g.) minced fresh ginger (or more to taste)
1/4 c. heavy cream
1 T. freshly squeezed lime juice (or to taste)
Salt & Pepper
Possible garnishes (alone, or in a combination that pleases you): Fresh Cilantro chiffonade, thinly sliced green onion tops, chopped peanuts, toasted pepitas, lime zest, olive oil, crispy fried shallots
 

In a medium stockpot or large saucepan, heat the olive oil over medium heat.  Add the onion along with a generous pinch of salt and sweat, covered, until the onions are soft and translucent—about 10 to 15 minutes.  


Add the butter and melt.  


Add the carrots another good pinch of salt and cook for 5 to 10 minutes—until carrots are beginning to soften.  


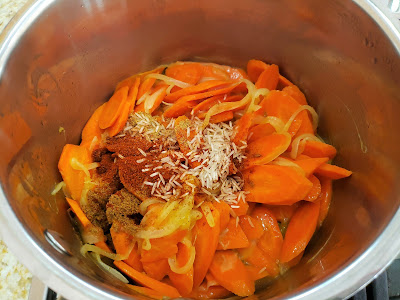
Add the spices and the rice and cook another 2 to 3 minutes to toast the spices and rice.
  Add the honey, stirring and cooking until the 
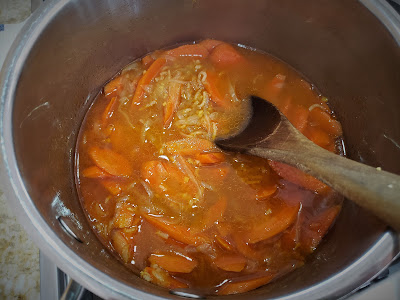
vegetables are coated and everything is sizzling nicely.  Add 3 cups of stock (or whatever you need to cover all the vegetables so that they are moving freely—reserve the remaining stock to add as needed when pureeing the soup).  Bring the soup to a simmer, cover and cook until the carrots are very soft—about 20 to 25 minutes, adding the ginger during the last 5 minutes of cooking.  


Purée the soup (using a traditional blender or an immersion blender), adding more stock as is necessary to produce a smooth, thin purée.  Pass through a fine meshed strainer if you like to achieve an even more suave and velvety texture.
 
Return the soup to the pot and add the cream.  Heat through.  Remove from the heat and add the lime juice to taste.  You may also add more freshly grated ginger if you like.  Correct the seasoning and serve immediately, garnished as you please.  Makes a scant 6 cups.


Sunday, January 15, 2023

Cinnamon Bun Scones


It might surprise people who are familiar with my breakfast preferences to learn that I did not grow up eating cake for breakfast. Or even sweet cereal.
 My mother was into health food long before it was cool.  The only breakfast cereals in our house were things like Shredded Wheat and Grape Nuts…or hot grain-based cereals (oatmeal, Cream of Wheat, etc.).  My favorite breakfast as a child was buttered toast with a soft cooked egg (my mother was ahead of the curve on eggs too: she refused to believe they were bad for you.  Time has of course validated her belief.).  Given all of this, I assume that I inherited my sweet tooth from my father…who, much to my mother’s consternation, preferred sweet things for breakfast (if he even ate breakfast).  When he had cereal (hot or cold), he doused it liberally with sugar.  Most of the time he skipped breakfast altogether—choosing to down a glass of “Carnation Instant Breakfast” instead.  

But occasionally (to make all of us happy), on a Sunday or a holiday morning, my mother would make pancakes or waffles (often with a stealth addition of wheat germ) …or maybe a coffeecake…or cinnamon rolls.
  I don’t have a memory of her making regular yeasted cinnamon rolls.  Rather she made buttermilk biscuit dough and formed that into cinnamon rolls.  They were really good. 

In my restaurant days I occasionally made a version of her biscuit cinnamon rolls for morning staff meal.  Instead of buttermilk biscuit dough, I used the cream biscuit dough we used at the restaurant.  If my mother’s rolls were very good, the cream biscuit version was outstanding.  But that was a long time ago…and as the years passed, those biscuit cinnamon rolls fell off of my radar entirely. 

Then, about a year into the pandemic, as I was trying to come up with things I could sell to my clients that I prepared in my kitchen…and they finished in their kitchen…I remembered those biscuit cinnamon rolls.
  I had already sold regular cinnamon rolls (as well as my scones…and a sweet Danish-style braid).  It occurred to me that the finishing process for a biscuit style cinnamon roll would be easier for my clients to manage than the traditional yeasted style.  (They would just need to pull them out of the freezer and bake…as opposed to having to thaw and prove before baking.)  I decided to make them with my cream scone dough and dubbed them “Cinnamon Bun Scones.”  They turned out to be very popular (several people said they liked them better than regular cinnamon rolls). 


In a serendipitous turn of events, the cinnamon bun scones happen to bake best when they are baked from frozen.  You can of course make them, form them and bake them straight away, but they will not be as neat looking since the outer edge has a tendency to split or crack when the formed buns haven’t had some time to relax (in the fridge or freezer).   

If you have made my cream scones, you already know how easy the dough is to make. When you roll out the dough for the cinnamon buns, instead of pressing the dough into a thick disc as for scones, you will roll it out into a thin square.
  So, to begin, instead of forming the dough into a round, form it into a thick flat square.  This will help you keep the sheet of dough in a square shape during the rolling process.  It is not difficult; if you have ever struggled with yeasted cinnamon roll dough, I think you will find this dough very easy to work with.


When I started up with my blog again a couple of weeks ago, I wasn’t thinking about these cinnamon buns…or even what my next post was going to be.
  I just knew that I missed working on my blog and wanted to find a way to make it a regular part of my life again.  Then, when I opened up the “blog post” file on my computer to work on my Sweet & Spicy Snack Mix for New Year’s Eve, I discovered the beginnings of a post about my Cinnamon Bun Scones…written exactly a year ago.  It was a bit disconcerting to see that I had tried to start up again and failed.  But it also gave me an immediate topic for my next post…which I knew would help get me back into the habit.  So rather than seeing it as a failure, I’m thinking of it as advance planning.  


Cinnamon Bun Scones 

230 g. (2 c.) all-purpose flour
1 T. baking powder
1/2 t. salt
50 g. (1/4 c). sugar
1 1/4 c (290 g.). heavy cream, plus more for brushing

30 g. (2 T.) butter, melted
50 g. (1/4 c. packed) brown sugar
1 T.  cinnamon

Turbinado sugar for sprinkling

Powdered Sugar Glaze (see below)


Combine the flour, baking powder, salt and sugar in a bowl.  Whisk to blend well.  Stir the dry ingredients with a rubber spatula while pouring in the cream, continuing to stir until a soft dough is formed. 

Turn the dough out onto a lightly floured surface, dust lightly with flour, and knead briefly (8 to 10 times).  Roll the dough out into an 11-inch by 11-inch square (it will be about 1/4-inch thick).  Spread the melted butter over the dough, leaving a half inch strip without any butter across the top edge.  Combine the cinnamon and brown sugar in a small bowl.  Spread over the buttered surface of the dough in even layer…making sure to cover the dough right up to the two side edges. 


Starting with the edge nearest you, roll the dough up jellyroll-style. Be careful not to stretch the dough.  It should be just snug.  Pinch along the long seam to seal.


Using a sharp knife, slice the log into 8 or 9 even rolls.   


Place the rolls, cut surfaces up, on a parchment lined baking sheet.  Brush each roll with some cream and sprinkle generously with the raw sugar. 


The rolls may now be baked…or frozen.  To bake right away, place the tray in a preheated 425° oven until golden brown and springy to the touch—about 15 to 18 minutes. (You may also form them and refrigerate them for a few hours before baking. They may take a minute or two longer when baked from a refrigerator temperature...just keep an eye on them.)

To freeze, place the tray of sugared buns in the freezer.  When hard, transfer the buns to a freezer bag.  They may be kept frozen for 4 weeks (after that, the baking powder loses its potency).  When ready to enjoy, place the buns on a parchment lined baking sheet and bake directly from frozen in a 375° oven until golden brown and springy to the touch—about for 25 to 30 minutes.­

Cool the buns briefly and then drizzle with the powdered sugar glaze and serve.   Makes 8 to 9 buns.

Powdered Sugar Glaze
: In a small bowl combine 76 g. (2/3 cup) powdered sugar with 1 T. (15 g.) milk.  You should have a thick glaze that drizzles slowly from a spoon.  Adjust with more sugar or more milk as needed to obtain this consistency.

Printable Version