Monday, September 25, 2023

Late Summer Zucchini & Corn Galette with Tomato & Browned Butter Breadcrumbs


In the early days of the pandemic I started doing curb side pick up dinners. It was a good option for people who wanted to "eat out", but didn’t want to eat in a restaurant filled with people. The dinners were 3 courses and packaged with instructions for any last minute heating/dressing/etc. I enjoyed the change of pace…as well as the additional work…so have continued to do them occasionally—even though there is no longer the same “need” for them.

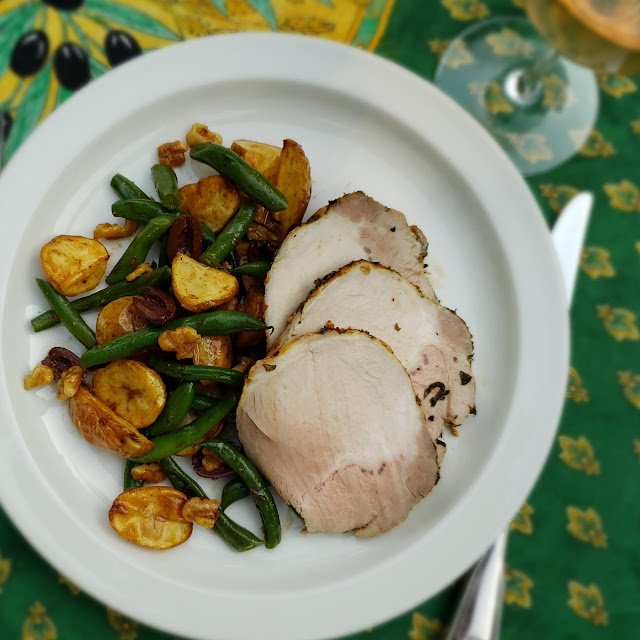
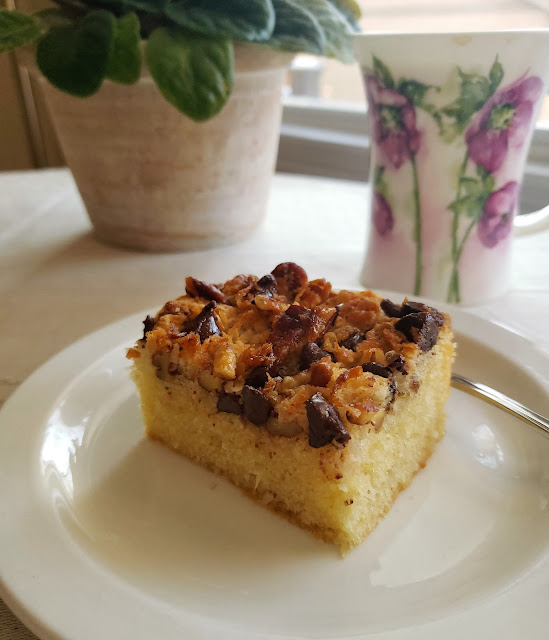
Just as with my private dinner menus I’m sure it comes as no surprise that my menus for these dinners always highlight seasonal ingredients. I usually start with an idea for one course and then create the remaining two courses around it. For the recent September dinner I started with the idea of Applesauce cake. It is still warm where I live so I opted for a room temperature roast pork with green bean and potato “salad” for the entrée. 


This meant I didn’t really want to do a true salad for the first course (it seems repetitive to have a salad in 2 of 3 courses…). Since the dessert was cake, a tart or pizza seemed like a good starter.

As I considered my seasonal options, corn and zucchini…and tomato!...came to mind. These things are at the end of their season. I always feel a nostalgic desire to eat lots of the waning fruits of the season—even as I look forward to the new crops coming in. (The “cusp” seasons are always exciting moments in the culinary year.)


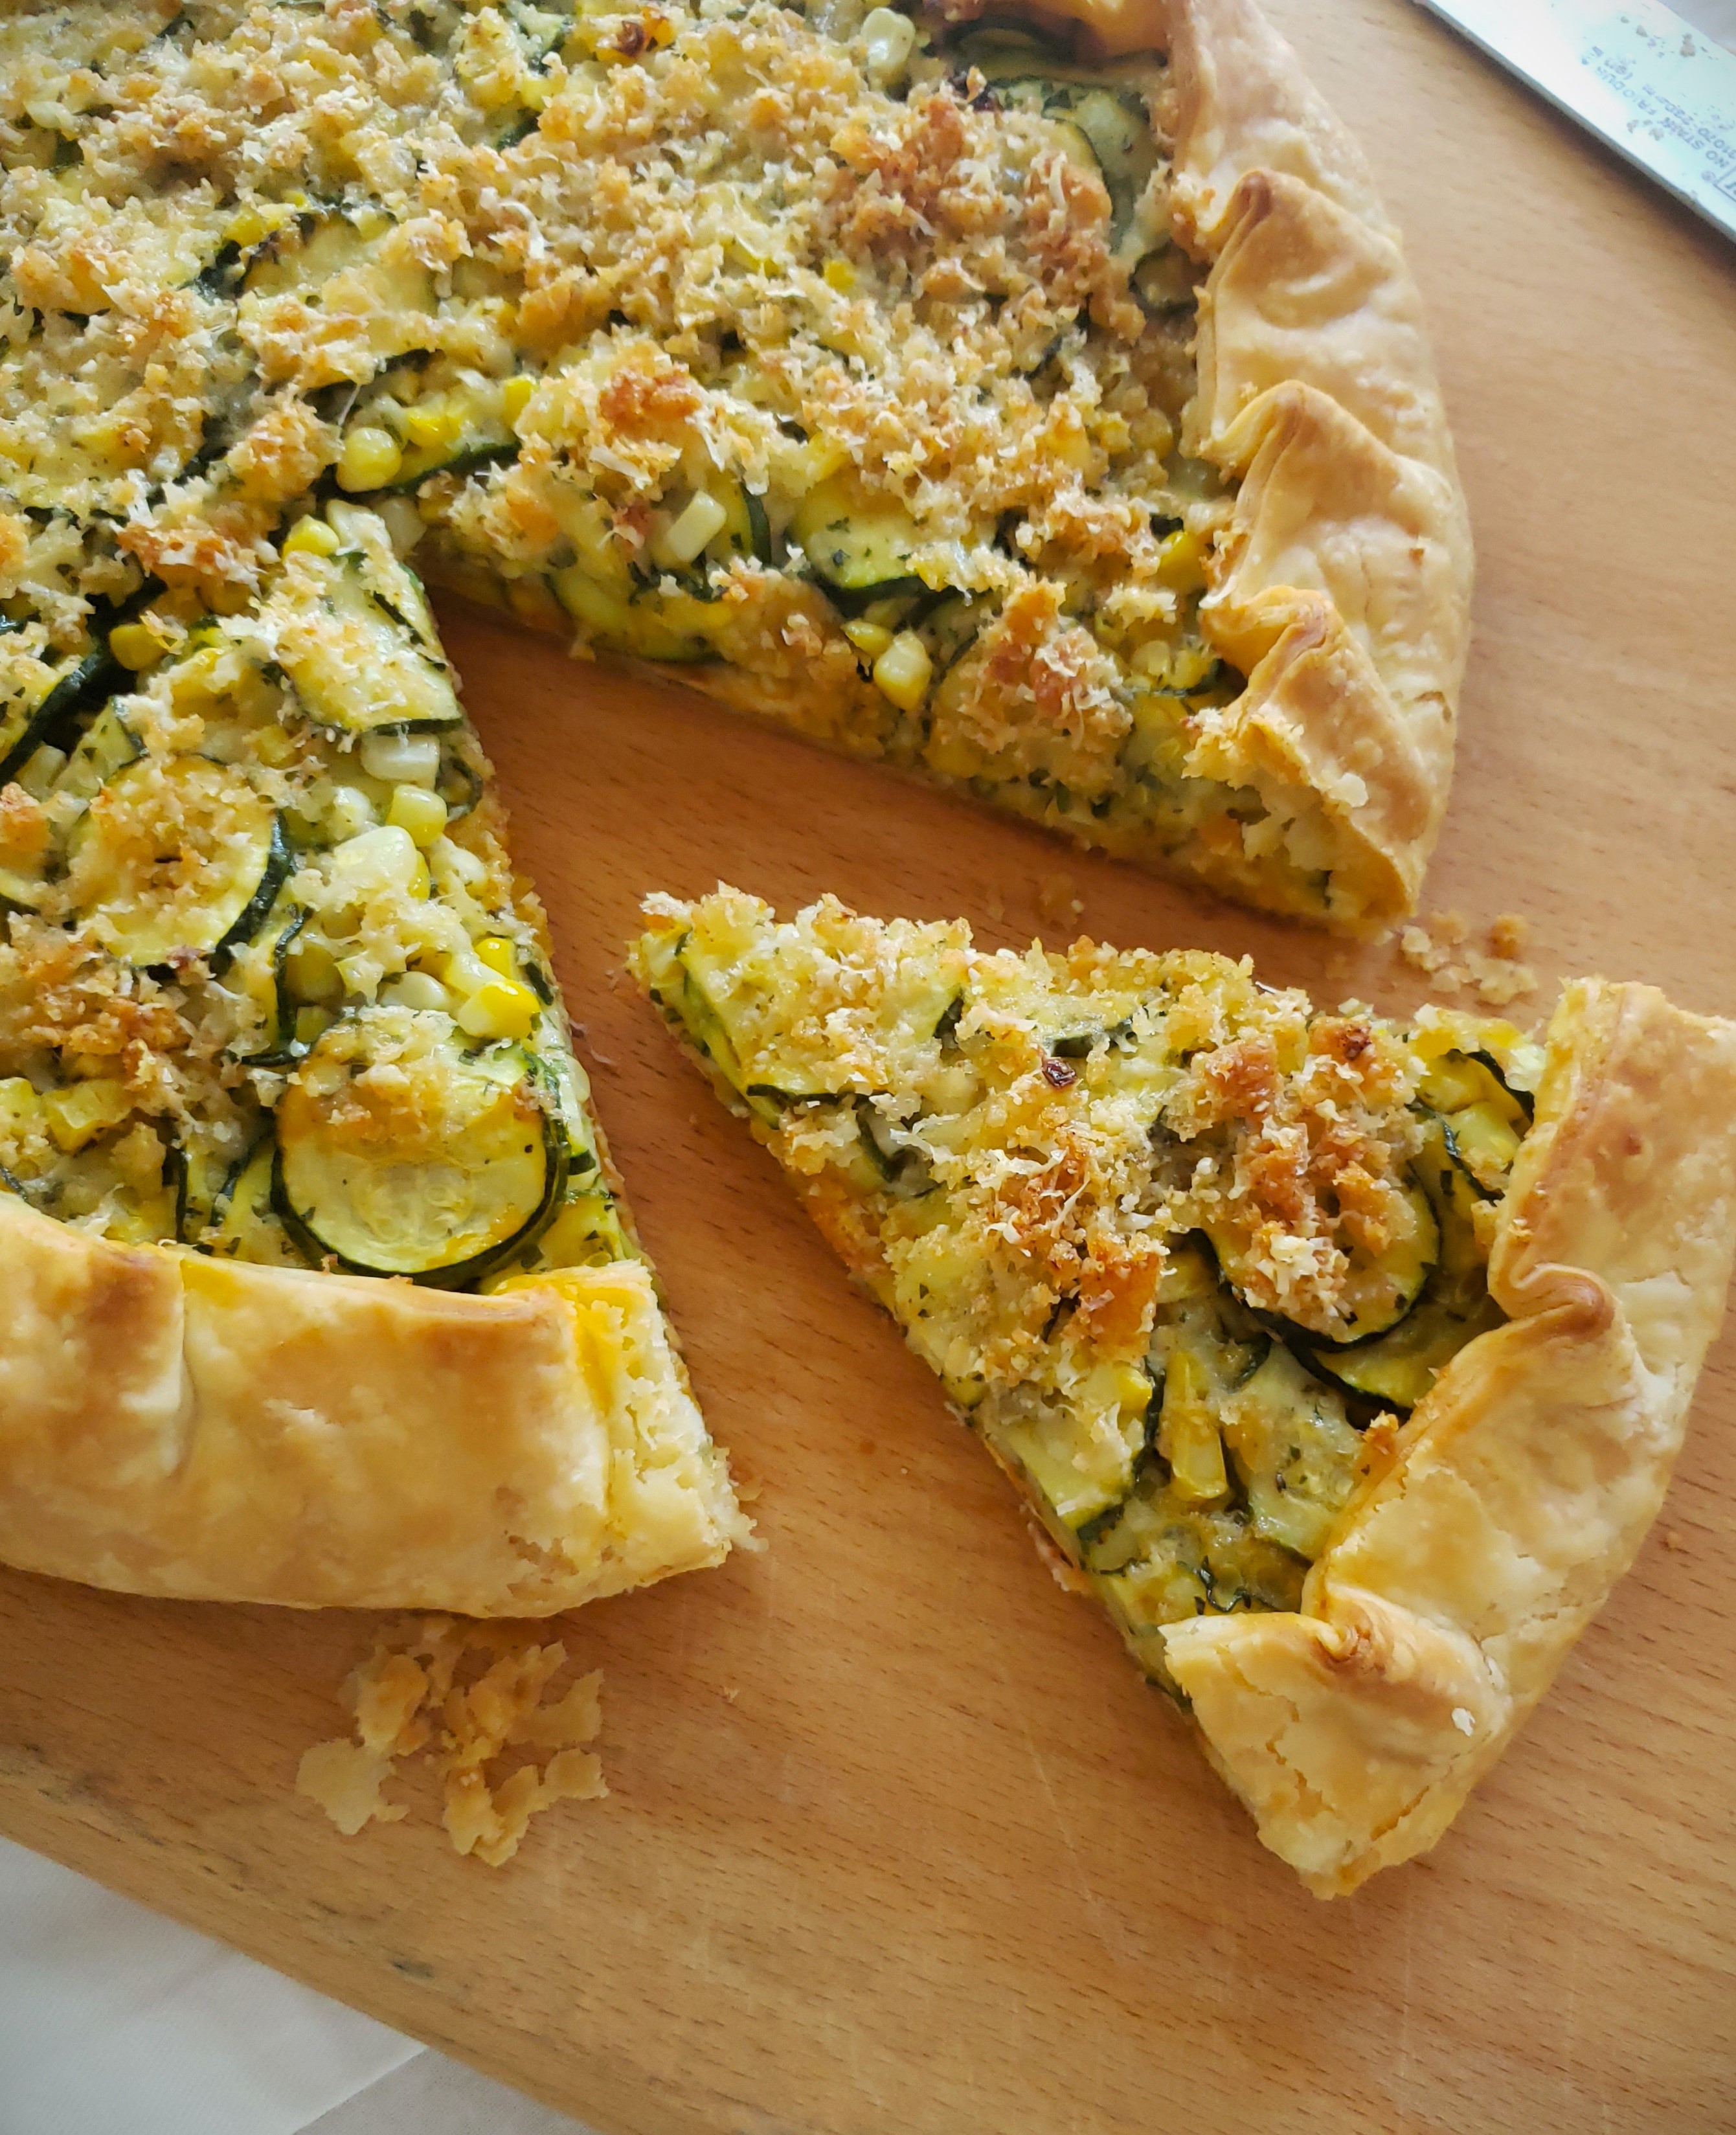
I found a couple of interesting savory tarts on line that included these ingredients. And what I ended up making is a bit of a blending of these two…plus my own style of savory galette (with a creamy ricotta base)…and a favorite summer squash gratin. I was struck by the observation from the creator of one of the tarts I found that her tart was “something in between” a quiche and a gratin. I didn’t want to make a quiche, but the “gratin” part appealed to me and that favorite summer squash gratin came to mind as I was drifting off to sleep one night, noodling on how I was going to build my tart.


There are a lot of component parts to this galette. If you just want to make dinner, it will seem a bit fiddly. But it is actually pretty easy to put together once you have the components (all of which can be made ahead except for the salted squash)—making it perfect for entertaining. If you have your own favorite tomato sauce on hand, you can use it as long as it is very thick (cook it down a bit until it no longer weeps and it mounds on a spoon). You will need about 3/4 cup. The one I use here is my favorite summer tomato sauce—nothing more than vibrant, vine ripened tomatoes (skin, seeds and pulp) cooked down with a generous amount of garlic, pepper flakes and olive oil. You could likely omit the ricotta—the thick tomato sauce providing enough of a barrier to keep the crust from becoming soggy—but I like the richness that it adds. (If you were to omit the ricotta, I would probably increase the Gruyère a bit.) The tomato sauce, on the other hand, should not be skipped. Its tartness adds essential balance and interest to the other mild flavors.

The tart made a great first course for my curbside dinner—a wonderful addition to the end-of-summer theme. I enjoyed the leftovers for lunch…and then a light dinner…along with a nice green salad. I’m only sorry that the season for these vegetables is rapidly coming to a close and it will probably be next year before I make this vibrant tart again. Maybe you will find a way to squeeze it in this year.


Late Summer Zucchini & Corn Galette with Tomato & Browned Butter Breadcrumbs

Pâte Brisée (tutorial):
175 g. all purpose flour (about 1 1/3 c.)
1/2 t. salt
132 g. cold butter (about 9 T.)
50 to 66 g. water (about 3 1/2 to 4 1/2 T)

Combine the flour and the salt in a medium-sized bowl. Rub/cut the butter into the flour until the mixture has the appearance of cornmeal and peas. Drizzle 3 1/2 T. ice water over the flour/butter mixture. Using your hands, fluff the mixture until it begins to clump (if you grab a handful and squeeze it will adhere), adding more water if necessary. Turn the dough out onto a counter and form into a mound. Using the heel of your hand, gradually push all of the dough away from you in short forward strokes, flattening out the lumps. Continue until all of the dough is flat. Using a bench scraper, scrape the dough off the counter, forming it into a single clump as you do. Form the finished dough into a thick disk. Chill for at least 30 minutes (overnight is even better, if you have time).

To roll out the dough, let it warm up for a moment or two at room temperature. Line a baking sheet (preferably rimless) with parchment paper; set aside. Roll out the dough on a lightly floured surface into a circle that is about 1/8-inch thick and is 14 inches across. Brush off the excess flour. Trim any ragged or uneven edges if you like. Transfer the dough to the prepared sheet. Cover loosely with plastic wrap and chill for at least 30 minutes.

Ricotta Base:
150g whole milk ricotta (drained before weighing if very wet)
2 t. olive oil
2 t. flour
Salt & pepper

In a small bowl, combine the ricotta with the olive oil and flour. Season to taste with salt & pepper. Chill until ready to use (can be made a day or two ahead).

Summer Tomato Sauce:
2 1/2 T. olive oil
2 cloves garlic, minced
Pinch hot pepper flakes
340g. vine ripened tomatoes (preferably red or yellow), cored and cut into a rough dice

Place the oil, along with the garlic and pepper flakes in a wide sauté pan and place the pan over moderately high to high heat. When the garlic begins to sizzle enthusiastically and is just on the verge of taking on a bit of color, add the tomatoes (along with all of the juices) to the pan. The tomatoes should immediately begin to simmer rapidly. Allow the tomatoes to cook, shaking the pan back and forth occasionally, stirring at regular intervals and regulating the heat in order to maintain a brisk simmer, until the tomatoes have broken down and the sauce is thickened and emulsified (a path should remain when you draw a spoon across the pan and the sauce should mound on a spoon). You should have a scant 3/4 cup. Taste for seasoning and remove from the heat. Sauce may be made ahead.

Browned Butter Breadcrumbs:
3/4 c./41g. fresh breadcrumbs
1 1/2 T. butter

Place the bread crumbs in a bowl. In a small sauté pan cook the butter over medium heat for a few minutes, whisking occasionally, until it begins to brown and smells nutty. Pour the browned butter over the breadcrumbs, scraping in all of the browned bits. When cool enough to handle, toss to combine. Set aside.

Vegetable and Cheese Filling:
400g (about 2 large) zucchini, sliced 1/8-inch thick (use a mandolin)
1/ 2 t. kosher salt
41 g. (1/2 c.) finely grated Pecorino
100 g. (a scant cup) grated (medium fine) Gruyère
1 T. minced fresh thyme
2 T. minced parsley
2 T. olive oil
1 1/2 c./225g fresh corn kernels (cut from 1 large or 2 small ears)

Cut the squash into 1/8-inch thick rounds (use a mandolin slicer). Toss the squash slices with 1/2 t. kosher salt and place in a colander set over a plate. Let stand 10 minutes. Spread two layers of paper towels on your work surface and transfer the squash to the towels, shaking off as much of the liquid as possible as you do. Blot with another layer or two of paper towels. (The squash does not need to be spread in perfect single layers—you just want to have it spread out so that you can blot away the majority of the liquid).

Combine the pecorino with the buttered breadcrumbs and set aside.

Build the tart: Spread the ricotta mixture in a circle in the center of the chilled pâte brisée, leaving a 2-inch border of dough. Dollop and spread the cooled tomato sauce over the ricotta. Scatter half of the Gruyère over the tomato sauce.


In a large bowl, combine the squash, half of the pecorino/breadcrumb mixture, the remaining Gruyère, the herbs, olive oil and corn. Taste and correct the seasoning. Arrange this mixture on top of the ricotta/tomato/ Gruyère base on the pastry crust. Use your hands to do this, simply grabbing a handful of the mixture at a time and arranging the mixture in and even layer (your hands work best—rather than just dumping it out—because you can make sure you get a nice mix of corn and zucchini with each handful). Spread the remaining pecorino/breadcrumb mixture over all.

Pull up the edges of the crust and gently flip them over the filling to form a rustic edge. Pleat the dough as necessary, pressing lightly into place.

Bake the tart in a 400° oven on the lowest rack (or in the middle with the sheet pan sitting directly on a preheated baking stone). Bake until the filling is bubbling in one or two spots, the breadcrumbs are golden, and the crust is crisp and golden brown—about 30 to 40 minutes. Slide the tart onto a rack and let rest for 15 minutes (or cool until just tepid) before serving. The tart is also delicious made a day ahead. Slice while cold to get beautiful, clean slices and reheat for 15 minutes in a 350° to 375° oven. Tart serves 6 to 8.


Saturday, February 18, 2023

Coconut Coffeecake with Chocolate-Coconut-Pecan Streusel


In my first blog post after my long hiatus I mentioned that much of my personal cooking these days is centered around using things up: ingredients/partial containers left from cooking classes…private events…etc.  But as I pointed out then, anyone who lives and cooks in a small household is familiar with the need to learn to cook with the odds and ends left from previous meals.
 
As I reassemble my career in our post-pandemic world, I have begun to focus on my online cooking classes more and more.  I have been teaching cooking classes for over twenty years, but early in the pandemic it became obvious to me that the kinds of things that had worked well for in-person classes were not the same things that would work well for an online session.  So I’ve been adjusting a bit. 
 
It has occurred to me that the online format is perfect for giving people a peek into the actual workings of a small household kitchen.  I can make the things I actually cook for myself…in the portion sizes I cook them in…basically showing my cooking reality in order to encourage other people who are living the small household life that it is totally possible to cook and eat well when there is “just” one…or two…of you.  As it turns out, those of us living this life are not a small group.  I read the other day that as of 2021, 28% of American households were comprised of single adults.  35% are made up of two adults.  It is clear that small households are the majority of us.  We should be eating well at home!
 
So you might be wondering what all of this has to do with coffeecake.  Well…besides the fact that I regularly make big coffeecakes and cut them into portions for the freezer (and because it’s just me, they are mine…all mine…), this particular coconut streusel coffeecake came about because I had some ingredients leftover from a curbside dinner.  


I had made a Coconut Bavarian Parfait and had an open can of coconut milk, a partial bag of shredded coconut, and extra egg whites.  Not to mention the big container of granola-like (i.e. eminently snack-able) graham cracker-coconut crumb crust that was left in my pantry.

So I created a coffeecake that used all of these ingredients.  At the time I thought it was a one-off…a never-to-be-duplicated treat…because I was unlikely to ever make the crumb crust again just to fill a coffeecake.  But of course the cake doesn’t need a crumb crust middle.  And as I have been getting ready for my first “cooking for a small household” class, I remembered this coffeecake because one of the recipes in the class includes a can of coconut milk.  


The recipe in question is a delicious purée of spicy roasted cauliflower and chickpeas.
  You can make a big batch and use up the whole can (and freeze or share the extra portions of soup).  Or—like me—you can make a small batch….in which case, you’ll have some coconut milk leftover.  You could roll that can of coconut milk into another dinner later in the week (these pork meatballs are fantastic)…or you can make a cake.  I know.  Tough decision.

You’ll notice when you look at the cake recipe that it uses all egg whites.  I almost always have a container of egg whites in my refrigerator.  I frequently make things that use just egg yolks and I save the whites.  They keep well in an airtight container for several weeks (just mark the date so you won’t keep them for six months…).  But if you don’t have egg whites, just use two large eggs instead. 


I have not included the graham cracker-coconut crumb crust filling in the recipe I’m posting.
  But if you would like to add it, the recipe can be found on the post for my Coconut Bavarian Cream Tart.  Just make the crust…toasting the clumps spread out on a baking sheet instead pressed into a pie or tart pan.  Break the clumps up a bit when they are cool.  To add this to the cake, spread half of the batter in the pan, scatter 2/3 to 3/4 cup (or however much you like) of the toasted crumb crust over the batter, dollop the rest of the batter over the crumbs and smooth out.  Top with the streusel and bake.  Increase the baking powder to a tablespoon if you add a layer of crumbs—the cake batter will need a little extra oomph because of the weight of the crumbs. 
 
If you make this coffeecake, you’ll have a little over half a can of coconut milk left.  There are lots of great things you can do with that half can.  But if you happen to see this post before February 28, I hope you’ll consider joining me for my “Cooking for a small Household: a Head of Cauliflower and a Can of Chickpeas” class.  I’ll be making that delicious soup…as well as a couple of other nice dishes using cauliflower and chickpeas.


Coconut Coffeecake with Chocolate-Coconut-Pecan Streusel
 
80 g. (scant 3/4 c.) pecans, lightly toasted and coarsely broken
115 g/4 oz. (2/3 c.) semi-sweet chocolate chips
50 g (1/2 c.) sweetened shredded coconut
25 g. (2 T.) sugar
25 g. (2 T.) melted butter
 
1 3/4 c. all-purpose flour (200 g.)
1/2 t. salt
2 1/2 t. baking powder
10 T. plus 2 t. (150 g.) unsalted butter, at room temperature
1 c. sugar (200 g.)
100 g. egg whites (see notes)
1 1/2 t. vanilla
2/3 c. coconut milk (160 g.)
75 g. (3/4 c.) sweetened shredded coconut
 

Butter a 9x9-inch baking pan.  Line the bottom with parchment.  Butter the parchment.  Flour the pan.  Tap out the excess and set aside.  Preheat the oven to 350°.
 
To make the streusel, place the pecans, chocolate chips, coconut and sugar in a bowl and stir until everything is evenly distributed.  Drizzle the melted butter over all and fold with a rubber spatula until the butter is well distributed.  Set aside.
 
Combine the flour, salt, and baking powder in a small bowl and set aside.  Beat the butter and sugar until smooth.  Increase the speed and cream until fluffy.  Beat in the egg whites in two or three additions.  Beat in the vanilla.  Fold in the flour mixture in three additions, alternating with the coconut milk, beginning and ending with the flour mixture.  Add the coconut with the final addition of the dry ingredients. 
 

Spread the batter in the prepared pan.  Scatter the streusel evenly over all.  


Bake in a 350° oven until golden and a toothpick inserted in the center comes out clean—40 to 45 minutes.  Serve warm.  Serves 9 to 12.
 
Note:  If you don’t have any egg whites on hand, you may replace the 100 grams of egg whites with 2 large eggs.

Wednesday, January 25, 2023

Creamy Gingered Carrot Soup

As is my habit during the early days of the new year, I have been making and enjoying lots of soup.  It really is the perfect food for January.  Not only is it soothing and warm on a dark, cold…and more often than not, wet…day—it is just the thing after the dietary excesses of the holidays.
 

Not surprisingly, this is also the time of year when I have traditionally taught soup classes.  Most of the recipes that were part of my class rotation have already appeared on my blog.  The carrot and ginger soup I’m posting today was always a class favorite.  I’m not sure why I never posted the recipe here.  It might be because the presence of fresh ginger…and lime…and cilantro…put it just outside the reaches of my normal home pantry.  But I have had fresh ginger on hand quite a bit in recent weeks for various things I’ve been working on…and since I always have carrots (and I’ve been in the mood for soup)…the other day I thought of this soup.  I was so glad I did.  The warm color—and tummy soothing ginger—make it a great post holiday/mid-winter soup.
 
I’m sure that in previous posts for puréed soups I have had a lot to say about the process.  But since it’s been a while since I wrote one of those posts, I’ll just repeat a few essentials here:
 
First…make sure you aren’t shortcutting the initial cooking of the onions and carrots in the fat.  This process allows the flavors of these vegetables to infuse the fats and give a deeper flavor to the final soup.  And along those lines, make sure your vegetables are fully cooked before you purée the soup, or you’ll have a coarse purée.  (The cooked vegetables should be tender to the tip of a knife—and you should be able to mash them against a plate with a fork or spoon).

Also, when adding liquid to a soup that is to be puréed, always hold back some—adding just what is necessary to cover the vegetables well and cook them through.  If too much liquid is added at this early stage, the final soup might be way too thin (and I say this as someone who prefers thinner soups).  You can always (and likely will) add more liquid while you are puréeing the soup.  I like the final consistency of my puréed soups to be like thick cream—it shouldn’t mound in the bowl or on the spoon (and should be “sippable”).
 
If you are using a traditional blender, don’t fill it too full with the hot soup (2/3 full is about right).  The pressure build up when you turn on the blender will push the cap up and off and if the blender is too full you’ll have a mess—and possibly a burn. 
 
Finally, I always pass my puréed soups through a fine meshed sieve.  I think it gives the most suave and velvety texture.  But I understand that some find this step to be a bit persnickety…and it also adds to the washing up.  Be assured that the soup will taste just as good without straining out the lingering fibrous bits.  Whether you are straining the soup or not though, take the time to run the blender until the soup is super smooth (you’ll be glad you did!). 
 

If you make this soup, be aware that its flavors are an interplay of strong and subtle…and that they change a bit over time.  On the day it is made, the ginger flavor is strong…and the soup has a warm spiciness.  The next day, the ginger flavor will be much more subtle.   If you like a stronger ginger flavor, simply add a grating of fresh ginger when you are reheating the soup on subsequent days.  If you want to eat it the day you make it…and you don’t like the strong flavor of the ginger, just add the ginger with the stock—its flavor will soften under the longer cooking time.  As far as the lime goes, it is added to balance not only the sweetness of the carrots, but also the honey.  It should not really be seen as the addition of lime flavor (although it will add a little)—but rather as a way to lift and brighten the flavors of the whole soup.  If you want a stronger lime flavor, add a grating of zest to the final soup (or as a garnish). 
 
As I type this post today, I have a lovely view of snow covered trees.  For the most part, people in my area are staying in after last night’s snowfall if they can.  It is just the right kind of day for this soup.  And even if you don’t typically keep fresh ginger in your home pantry, you can still make a carrot soup (without a run to the store) because this soup also happens to be a great template for a basic carrot soup.  Simply omit the honey, lime & ginger and you will have a delicious soup, the makings of which will already be in most home pantries. 


Gingered Carrot Soup
 
2 T. olive oil
1 large onion (8 to 9 oz.), thinly sliced
1 T. unsalted butter
1 lb. carrots, peeled and thinly sliced
1 T. rice (Basmati, Jasmine, Arborio, etc.)
1/2  t. ground coriander
1 t. paprika
1 t. cumin
1 T. honey
3 to 4 c. chicken or vegetable stock
2 T. (18 g.) minced fresh ginger (or more to taste)
1/4 c. heavy cream
1 T. freshly squeezed lime juice (or to taste)
Salt & Pepper
Possible garnishes (alone, or in a combination that pleases you): Fresh Cilantro chiffonade, thinly sliced green onion tops, chopped peanuts, toasted pepitas, lime zest, olive oil, crispy fried shallots
 

In a medium stockpot or large saucepan, heat the olive oil over medium heat.  Add the onion along with a generous pinch of salt and sweat, covered, until the onions are soft and translucent—about 10 to 15 minutes.  


Add the butter and melt.  


Add the carrots another good pinch of salt and cook for 5 to 10 minutes—until carrots are beginning to soften.  


Add the spices and the rice and cook another 2 to 3 minutes to toast the spices and rice.
  Add the honey, stirring and cooking until the vegetables are coated and everything is sizzling nicely.  Add 3 cups of stock (or whatever you need to cover all the vegetables so that they are moving freely—reserve the remaining stock to add as needed when pureeing the soup).  Bring the soup to a simmer, cover and cook until the carrots are very soft—about 20 to 25 minutes, adding the ginger during the last 5 minutes of cooking.  


Purée the soup (using a traditional blender or an immersion blender), adding more stock as is necessary to produce a smooth, thin purée.  Pass through a fine meshed strainer if you like to achieve an even more suave and velvety texture.
 
Return the soup to the pot and add the cream.  Heat through.  Remove from the heat and add the lime juice to taste.  You may also add more freshly grated ginger if you like.  Correct the seasoning and serve immediately, garnished as you please.  Makes a scant 6 cups.


Sunday, January 15, 2023

Cinnamon Bun Scones


It might surprise people who are familiar with my breakfast preferences to learn that I did not grow up eating cake for breakfast. Or even sweet cereal.
 My mother was into health food long before it was cool.  The only breakfast cereals in our house were things like Shredded Wheat and Grape Nuts…or hot grain-based cereals (oatmeal, Cream of Wheat, etc.).  My favorite breakfast as a child was buttered toast with a soft cooked egg (my mother was ahead of the curve on eggs too: she refused to believe they were bad for you.  Time has of course validated her belief.).  Given all of this, I assume that I inherited my sweet tooth from my father…who, much to my mother’s consternation, preferred sweet things for breakfast (if he even ate breakfast).  When he had cereal (hot or cold), he doused it liberally with sugar.  Most of the time he skipped breakfast altogether—choosing to down a glass of “Carnation Instant Breakfast” instead.  

But occasionally (to make all of us happy), on a Sunday or a holiday morning, my mother would make pancakes or waffles (often with a stealth addition of wheat germ) …or maybe a coffeecake…or cinnamon rolls.
  I don’t have a memory of her making regular yeasted cinnamon rolls.  Rather she made buttermilk biscuit dough and formed that into cinnamon rolls.  They were really good. 

In my restaurant days I occasionally made a version of her biscuit cinnamon rolls for morning staff meal.  Instead of buttermilk biscuit dough, I used the cream biscuit dough we used at the restaurant.  If my mother’s rolls were very good, the cream biscuit version was outstanding.  But that was a long time ago…and as the years passed, those biscuit cinnamon rolls fell off of my radar entirely. 

Then, about a year into the pandemic, as I was trying to come up with things I could sell to my clients that I prepared in my kitchen…and they finished in their kitchen…I remembered those biscuit cinnamon rolls.
  I had already sold regular cinnamon rolls (as well as my scones…and a sweet Danish-style braid).  It occurred to me that the finishing process for a biscuit style cinnamon roll would be easier for my clients to manage than the traditional yeasted style.  (They would just need to pull them out of the freezer and bake…as opposed to having to thaw and prove before baking.)  I decided to make them with my cream scone dough and dubbed them “Cinnamon Bun Scones.”  They turned out to be very popular (several people said they liked them better than regular cinnamon rolls). 


In a serendipitous turn of events, the cinnamon bun scones happen to bake best when they are baked from frozen.  You can of course make them, form them and bake them straight away, but they will not be as neat looking since the outer edge has a tendency to split or crack when the formed buns haven’t had some time to relax (in the fridge or freezer).   

If you have made my cream scones, you already know how easy the dough is to make. When you roll out the dough for the cinnamon buns, instead of pressing the dough into a thick disc as for scones, you will roll it out into a thin square.
  So, to begin, instead of forming the dough into a round, form it into a thick flat square.  This will help you keep the sheet of dough in a square shape during the rolling process.  It is not difficult; if you have ever struggled with yeasted cinnamon roll dough, I think you will find this dough very easy to work with.


When I started up with my blog again a couple of weeks ago, I wasn’t thinking about these cinnamon buns…or even what my next post was going to be.
  I just knew that I missed working on my blog and wanted to find a way to make it a regular part of my life again.  Then, when I opened up the “blog post” file on my computer to work on my Sweet & Spicy Snack Mix for New Year’s Eve, I discovered the beginnings of a post about my Cinnamon Bun Scones…written exactly a year ago.  It was a bit disconcerting to see that I had tried to start up again and failed.  But it also gave me an immediate topic for my next post…which I knew would help get me back into the habit.  So rather than seeing it as a failure, I’m thinking of it as advance planning.  


Cinnamon Bun Scones 

230 g. (2 c.) all-purpose flour
1 T. baking powder
1/2 t. salt
50 g. (1/4 c). sugar
1 1/4 c (290 g.). heavy cream, plus more for brushing

30 g. (2 T.) butter, melted
50 g. (1/4 c. packed) brown sugar
1 T.  cinnamon

Turbinado sugar for sprinkling

Powdered Sugar Glaze (see below)


Combine the flour, baking powder, salt and sugar in a bowl.  Whisk to blend well.  Stir the dry ingredients with a rubber spatula while pouring in the cream, continuing to stir until a soft dough is formed. 

Turn the dough out onto a lightly floured surface, dust lightly with flour, and knead briefly (8 to 10 times).  Roll the dough out into an 11-inch by 11-inch square (it will be about 1/4-inch thick).  Spread the melted butter over the dough, leaving a half inch strip without any butter across the top edge.  Combine the cinnamon and brown sugar in a small bowl.  Spread over the buttered surface of the dough in even layer…making sure to cover the dough right up to the two side edges. 


Starting with the edge nearest you, roll the dough up jellyroll-style. Be careful not to stretch the dough.  It should be just snug.  Pinch along the long seam to seal.


Using a sharp knife, slice the log into 8 or 9 even rolls.   


Place the rolls, cut surfaces up, on a parchment lined baking sheet.  Brush each roll with some cream and sprinkle generously with the raw sugar. 


The rolls may now be baked…or frozen.  To bake right away, place the tray in a preheated 425° oven until golden brown and springy to the touch—about 15 to 18 minutes. (You may also form them and refrigerate them for a few hours before baking. They may take a minute or two longer when baked from a refrigerator temperature...just keep an eye on them.)

To freeze, place the tray of sugared buns in the freezer.  When hard, transfer the buns to a freezer bag.  They may be kept frozen for 4 weeks (after that, the baking powder loses its potency).  When ready to enjoy, place the buns on a parchment lined baking sheet and bake directly from frozen in a 375° oven until golden brown and springy to the touch—about for 25 to 30 minutes.­

Cool the buns briefly and then drizzle with the powdered sugar glaze and serve.   Makes 8 to 9 buns.

Powdered Sugar Glaze
: In a small bowl combine 76 g. (2/3 cup) powdered sugar with 1 T. (15 g.) milk.  You should have a thick glaze that drizzles slowly from a spoon.  Adjust with more sugar or more milk as needed to obtain this consistency.

Printable Version