Showing posts with label Plums. Show all posts

Monday, July 30, 2018

Plum Upside Down Cake


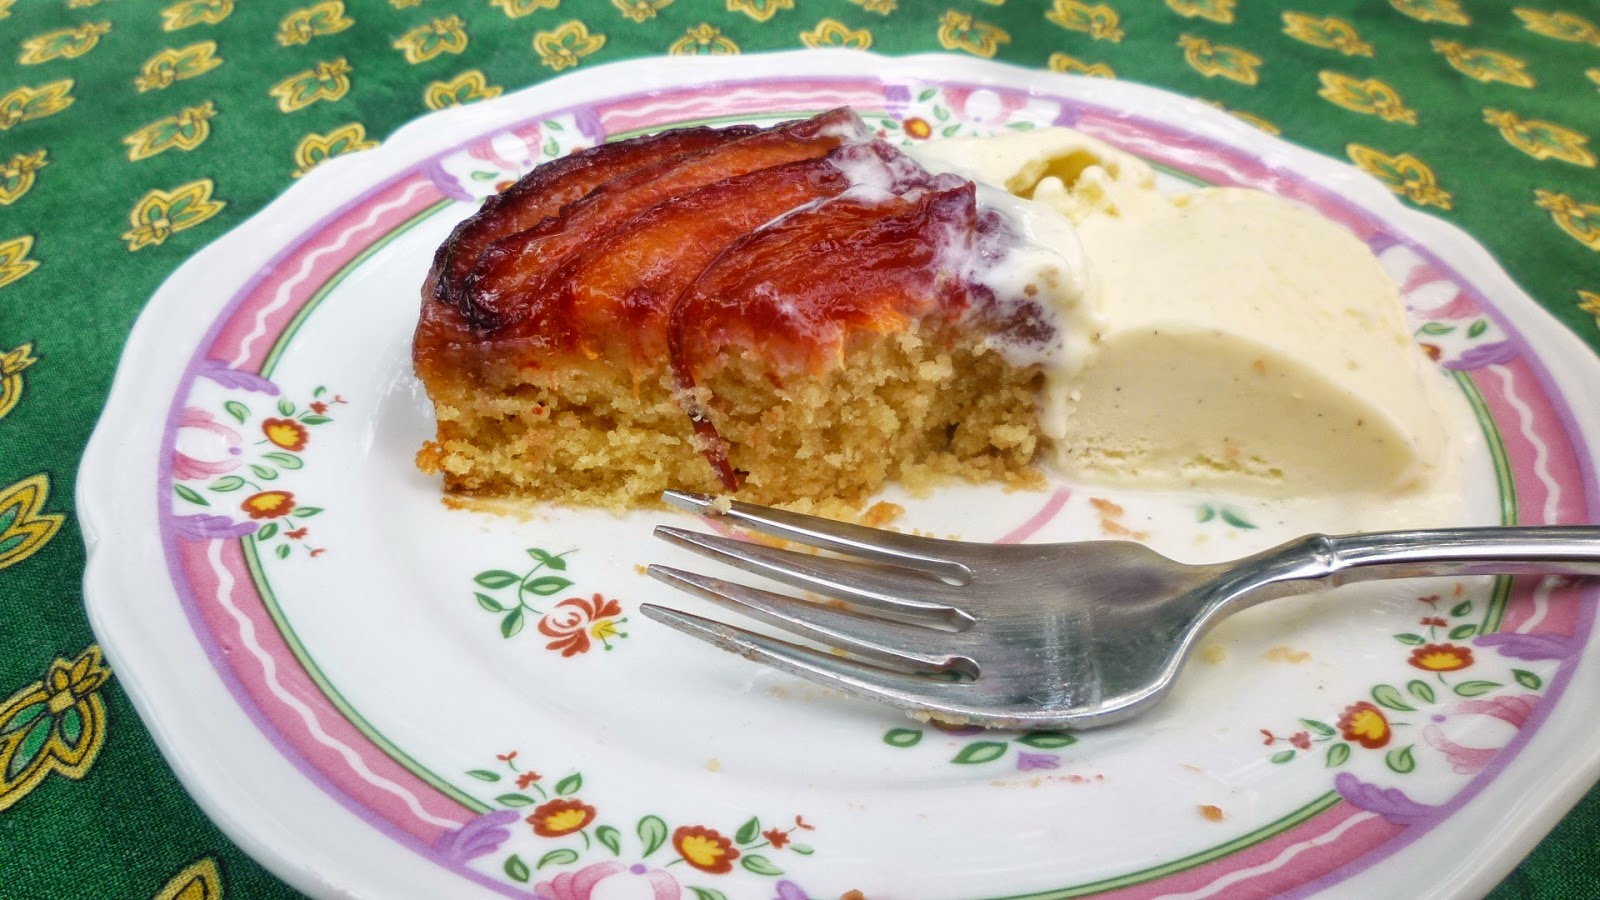
When I decided to teach a plum upside down cake in a recent class, I didn’t think I would write a blog post about it.  There are loads of recipes for plum upside down cakes on line.  Beyond that, I had already posted a recipe for individual plum upside down cakes a few years ago.  There just didn’t seem to be much to add to the conversation.  But when I started testing recipes, I discovered that the way I think one should put plums on top of an upside down cake is entirely different from what everyone else seems to be doing. 

If you look at my recipe for individual plum upside down cakes, you will notice that the top is covered with thin, shingled slices of plums. The fanned look of the arcs of the dark skins of the plums is gorgeous.  For this reason alone I expected that this was the way most people would do it on a large cake as well.  Instead, I found that most recipes simply direct you to cut the plum into wedges…and to lay them in the pan in concentric circles…sometimes directing you to overlap the wedges slightly…sometimes not.  


The first time I made my cake, I decided to follow suit (surely everyone couldn’t be wrong…) and cut wedges.  Because I already knew how beautiful the top of the cake could be if the edges of the skins were visible on the finished cake, I tried to shingle my wedges by overlapping the inner edge on top of the out edge as I placed each successive wedge.  As should have been obvious, this was almost impossible to execute.  I was only moderately successful at placing them…and the result was a cake that was so unstable that the outer circle of plums slid off the cake when I turned it over.  (There are mercifully no pictures to record this disaster.)


The second time, I tried wedges again and just arranged them in slightly overlapping circles in the most natural manner—with the fat edge/skin side of the wedge resting on top of the inner edge of the previous plum.  This of course looks beautiful in the pan but is not especially beautiful on the reverse side—which is of course what you see when the cake is flipped.  


It is not unattractive…  And it doesn’t fall apart when flipped…  But I think there is a better way.

So in my third and last run at the recipe, I did what I thought I should have done from the start:   cut the plums into thin, half circle slices.  


These can be successfully shingled so that the beautiful arcs of the skin are visible when the cake is flipped.  Furthermore, since the slices are thin, you can lay them in quite snuggly, which in the end, not only creates a lovely fanned plum effect, it results in a solid layer of cooked plum on top—rather than discrete wedges of plum surrounded by cake. 

Laying the slices of plum in this way is not intuitive if you have difficulty visualizing things spatially…and in reverse.  If this is you, then work it out with a real plum on your cutting board.  


Lay a plum half cut side down and slice it thinly. Then, fan it on the counter the way you want it to look on the cake (on the right, in the picture above).  Slide a spatula underneath the fanned plum and gently flip it over (on the left, in the picture).  The way it looks when flipped is how it should be placed in the pan.  Basically you will be placing each successive slice with the inner edge (where the pit was) on top of the outer edge (the skin side) of the previous slice.  It will not look nearly as attractive as the concentric circles of wedges in the pan—but when the cake is finished…and served upside down…it will be spectacular.    


Plum Upside Down Cake

4 1/2 T. (64 g.) unsalted butter
3/4 c. (150 g.) packed brown sugar
4 plums (about 1 lb.), halved and pitted

1 1/2 c. sifted cake flour (150 g.)
3/4 t. baking powder
1/4 t. baking soda
1/2 t. salt
9 T. (125 g.) unsalted butter, softened
3/4 c. (150 g.) sugar
1 egg plus 1 yolk (70 g.), at room temperature
1 t. vanilla
1/2 c. (120 g.) sour cream

Preheat the oven to 350°.  Butter the sides of a 9-inch round cake pan with 2-inch high sides.

Place the plum halves cut surfaces down on a cutting board.  Slice the halves thinly (about 3/16-inch) and evenly lengthwise.  Discard the “end” pieces of each half.  (You should be able to get about 10 slices out of each half, excluding the little end bits.)

Melt the butter and brown sugar in a sauté pan/iron skillet set over medium-low heat.  When the sugar has dissolved, increase the heat and simmer, stirring constantly, until the mixture comes together in a thick, smooth sauce.  Scrape the mixture into the prepared pan.  Tilt the pan and spread as necessary so that the bottom of the pan is covered with the sugar mixture.  Arrange the plums in overlapping concentric circles on top of the butter/sugar mixture (see note).  Set aside. 

Whisk together the cake flour, baking powder, baking soda, and salt.  Set aside. 

Cream the butter with the sugar until light and fluffy—this will take 3 to 5 minutes at medium-high speed using the paddle attachment.  Stop the mixer once or twice to scrape down the sides.  Whisk together the egg, yolk and vanilla.  Add this mixture in two or three additions, beating after each addition and scraping down the sides of the bowl as necessary.  When all of the egg has been added, beat briefly to restore the creamed mixture to fluffiness.  Fold in the dry ingredients in 2 additions alternately with the sour cream, beginning and ending with the dry ingredients.

Spread the batter evenly over the plums in the prepared pan. Bake in a 350° oven until the cake is springy to the touch, has begun to pull away from the sides of the pan and a toothpick inserted in the center comes out clean—about 40 to 50 minutes.  Let the cake rest for 25 to 30 minutes in the pan.  Run a knife around the inside edge of the pan.  Place a cake plate upside down on top of the skillet and holding the cake plate firmly to the skillet, quickly flip the cake over.  Leave the pan over the cake for a minute or two and then carefully lift up and away.  Allow the cake to cool for a couple of hours before serving.  Use a thin sharp knife, with a gentle back and forth sawing motion to cut through the plums and down into the cake. 

Serve the cake warm with whipped cream or ice cream.  Serves 10.

Note:  When building the fruit portion of an upside down cake you have to remember that you are working in reverse.  To get the look you want, you may need to shingle a few slices of the fruit on your cutting board and then use a wide spatula to flip it over so you can see how it will look on the finished cake.  For plums my experience is that the top looks best if the outer curve, or the skin side, of the plum (not the pit side) is what is visible.  So, when laying in the plums, lay down the first slice and then lay the next slice with the “pit side” of the plum shingled over the “skin side” of the first one…and then repeat this pattern for each successive slice, creating a spiral effect with the skins on the side you can’t see now…but which will be visible when the cake is turned out. 


Thursday, July 31, 2014

Individual Plum Upside Down Cakes


I mentioned in my last post that I had a small amount of honey ice cream left over after a recent class.  In the class the honey ice cream had been prepared to accompany a Plum Galette.  I over-purchased a bit on the plums, so in addition to the ice cream I brought home a few extra plums.  If this had been almost any other fruit, I would have just eaten it...I love fresh fruit.  But I'm not crazy about fresh plums.  I wrote about this at some length when I posted a recipe for Plum Sorbet a few years ago, so I won't belabor it here.  As I pointed out then, while I may not enjoy plums raw, I love them when they have been cooked in some way...baked, roasted, poached, etc.  Since I hate to waste food and I didn't have enough to make a pie...or a crisp....I began looking for a way to cook these few remaining plums before they were past their prime.      

Two of the plums made their way into a variation of the Sweet Cherry and Almond Scones I posted earlier this month.  Since these scones were also delicious when made with apricots (paired with pistachios), I mentioned on my Facebook page that I had probably misnamed them.  I should have called them Summer Stone Fruit Scones.  If you want to give the plum version a try, just substitute a couple of plums (about 6 oz.)—halved, pitted and cut into 1/2-inch pieces—for the cherries, a teaspoon of vanilla for the almond extract and hazelnuts (very lightly toasted, skinned and chopped—you'll need about 3 oz. to get 2/3 cup) for the almonds.


After making the scones, I still had a couple of plums left.  As I was thinking about what to do with them I remembered a summer dessert I prepared for a client several years ago—individual plum upside down cakes.  They were delicious—I'm not quite sure why I have waited so long to make them again.  Since each little cake only uses half a plum, you can make a small batch of them even if you only have two or three plums.

Except for a few details, these little cakes are made just like a large upside down cake.  Instead of using a large pan, you will need five or six 6 ounce ramekins.  And, instead of melting the butter and brown sugar for the topping together and dividing the resulting "goop" among the ramekins (a bit of a messy proposition), just smear the bottom of the ramekin with a generous amount of butter (making sure to slick a thin film on the sides as you do) 


and top with a thick, even layer of brown sugar.  


The butter and sugar combine with the plum juices as the cakes bake, forming that traditional, gooey and delicious upside down cake topping. 


To make these plum upside down cakes look their best, it's important to remember as you arrange the fruit that you are looking at the back/wrong side of the topping.  When you invert the cake you will want to see the ribbon-like arcs of the skin—not the interior of the plum that was next to the pit—uniformly fanned on top of the cakes.  The best way to teach yourself how to arrange the plums so you will get this result is to simply fan a thinly sliced plum half (you may not need all of one half for each cake) on your work surface in such a way that it looks the way you want it to when it is on top of the cake.  Then, take a wide spatula, carefully slide it underneath the fanned plum and turn it over.  What you see at that point is what you should recreate in the bottom of each ramekin.

I really like these cakes.  As I noted in my Pineapple Upside Down Cake post earlier this year, a good candidate for an upside down cake needs to be slightly dense...with a tender, yet firm texture...in order to stand up to the substance of the fruit on top.  This cake fills the bill perfectly.  The cake also has a mild tang from the presence of brown sugar and yogurt that is delicious with the plums.  All in all, these little cakes turned out to be just the thing for using up those last few plums.  But...they are so good that it would certainly be worth making a run to the store to purchase a few more plums. 


Individual Plum Upside Down Cakes

3 T. softened unsalted butter (41 g.)
6 T. packed golden brown sugar (75 g.)
3 plums

1 c. less 2 T. all-purpose flour (100 g.)
1/4 t. salt
1 t. baking powder
5 T. plus 1 t. (75 g.) unsalted butter, at room temperature
1/2 c. packed golden brown sugar (100 g.)
2 T. sugar (25 g.)
1 egg, at room temperature
1/2 t. vanilla
1/3 c. plain yogurt (80 g.)


To prepare the ramekins: Butter five or six 6-oz ramekins (see note).  Use a half tablespoon (7 grams) of butter per ramekin and concentrate on getting most of the butter onto the bottom of each dish...the sides only need a thin film.  Add a tablespoon of brown sugar (12 grams) to each and spread out into an even layer.  Halve and pit the plums and slice thinly.  Shingle the plums in on top of the brown sugar, arranging them so that the attractive side will be on top when the cakes are turned out.  You will need about half a plum for each pan (maybe a little less), depending on the size of the plums. Set aside.

Combine the flour, salt and baking powder in a small bowl and set aside.  Cream the butter and sugars until light and fluffy.  Beat in the egg.  Beat in the vanilla.  Fold in half of the flour mixture, followed by the yogurt, followed by the remaining dry ingredients.    

Using an ice cream scoop, divide the batter among the prepared ramekins.  Spread the batter evenly. 


Place the ramekins on a baking sheet and transfer to a 350°.  Bake until golden and a toothpick inserted in the center comes out clean—25 to 30 minutes.  Serve warm.  Serves 5 or 6.

Notes:
  • You may make five or six cakes. If you like a higher portion of cake to fruit, make five cakes. You will only need 2 1/2 T. of butter and 5 T. of brown sugar for the topping. I prefer to make 6 cakes. 
  • The recipe is easily doubled to make 10 to 12 cakes. 
Printable Recipe


Sunday, September 9, 2012

The Pleasure of Fresh Figs and an Oven-Roasted Fruit Compote


I have been particularly taken with figs this year. It started with the slightly early arrival of fresh figs at one of my favorite stalls at the farmers' market. I was so surprised to see them...and then when I got them home I was struck by how fine they were...soft, juicy and very sweet.


When I saw some at the grocery store a few days later, they too looked very good, so I purchased some more. Maybe it is a good year for figs...I really don't know....but I have been enjoying them almost every day now for the past few weeks. They are of course wonderful raw—as a snack or as part of my breakfast bowl of fruit and yogurt. But they are also very good when they are cooked—responding well to grilling/broiling or roasting.

I wasn't introduced to fresh figs until later in life. I grew up on dried figs and Fig Newtons. I don't remember the first time I ever tasted a fresh fig, but I do remember where I first had a truly good fig. It was in Provence. The place I worked there had three huge fig trees, and I was fortunate enough to be there right in the middle of fig season. The figs were delicious...one of my favorite memories of my time there. So to celebrate the wonderful figs that I have been enjoying this year, I thought I would post a recipe for oven-roasted fruit that comes from Provence.


The recipe I'm sharing is my adaptation of one I found in Ina Garten's Barefoot Contessa Parties! She learned how to make it while visiting a friend in Provence. Her version doesn't happen to include figs, but she mentions that this simple dessert is adaptable to all kinds of soft fruits. For some reason it is always late summer or early fall when I think to make this dessert—right in the height of fig season. I always include figs—along with raspberries (a match made in heaven).

If you have never tasted fresh figs, I encourage you to seek them out sometime during the next week or two. When you purchase them, look for figs that are smooth, plump, heavy for their size and quite soft. If they are firm, they aren't ripe. If they are light for their size, they will be dry. If they are blemished, they will rot rapidly (if they aren't already rotten). You will find figs in a wide range of colors...from green to dark purple...


with browns and mauves mottled with green in between. Part of what I love about figs is how beautiful they are to look at. When you purchase them, make sure you purchase enough so that after you have tasted them fresh you can include some in an oven-roasted fruit compote.

As for the recipe, although I am including it in detail at the end of the post, you really don't need it. It is the method that is important. You can choose any mix of fruit and pretty much any quantity fruit. (For the pictures in this post I used a quarter pound of figs, a quarter pound of prune plums, a heaped tablespoon of sugar, most of the juice of half an orange and a third cup of raspberries.) The method is appropriate for all of the stone fruits (plums, peaches, nectarines, apricots and cherries) as well as figs. The chosen fruits should be cut into large, even chunks and the dish you use should be a gratin or shallow casserole that is just large enough to hold the fruit in a snug single layer. Fill the dish with the fruit (arranged cut side up).


Drizzle enough liquid (water, wine, orange juice...) over the fruit to coat the bottom of the pan and then sprinkle the cut surfaces of the fruit with sugar to taste—about 2 to 4 tablespoons per pound of fruit, depending on the sweetness of the fruit.


Transfer the dish to the upper third of a hot oven and bake. The goal is syrup-y, tender, caramelized fruit.


The compote can be served in many ways. It is delicious warm or room temperature...even cold. I like it with cake (it is particularly good with a toasted slice of Amor Polenta) or ice cream, but it would also be good simply garnished with whipped mascarpone or crème fraiche...with maybe some cookies on the side. If there happens to be some left over, it is excellent with yogurt for breakfast.


Oven-Roasted Figs with Raspberries

1 1/2 lb. medium sized figs, stemmed and halved
1/4 c. sugar, or to taste
about 1/3 c. water, orange juice or white wine (or a combination)
1 c. raspberries

Place the figs cut side up in a snug single layer in a glass or ceramic baking dish. Add enough liquid to just coat the bottom of the pan. Sprinkle the figs evenly with sugar. Bake in the top third of a preheated 425° to 450° oven until the edges of the figs are beginning to caramelize—about 15 to 20 minutes. Scatter the raspberries over the figs and return the pan to the oven for another 5 minutes to warm the raspberries through (or place under the broiler for deeper caramelization of the figs). Serve warm or at room temperature spooned over Lavender honey or vanilla ice cream or pound cake. Serves 4 to 6.

Variation: Substitute medium plums and/or medium peaches for half (or all) of the weight of the figs. The plums should be quartered (prune plums should be halved) and the peaches cut into sixths or eighths.

Note: If at any time the pan appears to be dry or the juices look like they might be reducing too much, simply drizzle in a bit of water.

(Recipe adapted from Ina Garten's Barefoot Contessa Parties!)

Friday, July 27, 2012

Summer Fruit Kuchen


A couple of weeks ago I posted about the many different things one could possibly mean when using the word cobbler. I shared a recipe for a biscuit-topped cobbler—which is what I mean when I say "cobbler"—but this of course doesn't mean that I don't eat and enjoy the many other kinds of things that can be identified as a cobbler (I just call them something else).

Several years ago a good friend rounded out an early summer dinner with a wonderful little cake that was loaded with summer fruit. I liked it so much that I asked for the recipe. When I sat down to look at it I was surprised to see that it was called "Fresh Fruit Cobbler". The recipe is from the book The Art of Quick Breads and the author, Beth Hensperger, readily admits in her description of the recipe that it really is much more like the beloved kuchens (or cakes) of German, Swiss and Austrian Baking. Whatever one chooses to call it (I prefer kuchen), it is delicious.

A few years later, I ran across a surprisingly simple recipe at the back of The French Laundry Cookbook for Cranberry and Apple Kuchen. The recipe is very similar to Hensperger's "cobbler". I have made both recipes and prefer the cake portion in the French Laundry version and the topping in Hensperger's. The recipe I am posting today is my combination of the two.


This versatile and simple dessert can be made with just about any fruit—or combination of fruits—you like. The French Laundry version uses 1/4-inch thick slices of apples and whole fresh cranberries or blueberries. Beth Hensperger suggests sweet cherries (halved and pitted), raspberries, or any of the summer stone fruits (apricots, plums, nectarines, peeled peaches)—halved, pitted and sliced 1/2-inch thick, chunks of rhubarb or slices of pear...even sliced bananas. In the early autumn I have made it with nothing but pitted and quartered Italian Prune plums.


My favorite summer variation is 1 1/2 cups of raspberries (a 6 oz. box) with 3 cups of sliced apricots or plums (or a combination of the two).


The fruits may be scattered casually over the surface of the cake, or arranged in spirals or concentric circles.

When I include berries in the mix, I don't toss them with the lemon juice...I scatter them separately over the cake.  I toss the remaining sliced fruits with the lemon juice before spreading over the cake.  If you are making an all berry kuchen, just drizzle the lemon juice over the berry topped batter...tossing berries with lemon juice—particularly raspberries and blackberries—will cause them to break apart.


When you build the cake you will look at the quantity of fruit to be spread over the batter and probably think that it is too much—particularly when compared to the measly looking amount of batter in the bottom of the pan. But when you are eating the cake you will discover that the ratio of cake to fruit is just right.


This kuchen is best served the day it is made. I think it is at its peak a few hours after it has been removed from the oven. At that point it will have had time to cool down, making it possible to really taste the fruit. Also, the kuchen will have begun to absorb the fruit juices, making for a soft, tender and moist cake infused with fruit flavor. On the second day, the cake portion will have absorbed more moisture and depending on the fruit—and the person eating the cake—it could be described as a bit soggy. In this state it is in fact a bit more cobbler-like (for those who think of cobbler as a cakey concoction), and is still quite tasty. In reality, it is unlikely that there will be any kuchen left after the first day...but, if there are leftovers, this dessert then becomes what I would call a perfect breakfast.


Summer Fruit Kuchen

1 1/2 c. all purpose flour
2 t. baking powder
1/4 t. salt
1/4 t. ground nutmeg
6 T. unsalted butter, room temperature
3/4 c. granulated sugar
1 large egg
1 1/2 t. vanilla
1/2 c. milk
4 to 4 1/2 c. prepared fruit (see notes)
1 T. freshly squeezed lemon juice
1/4 c. sugar
1/2 t. cinnamon


Preheat an oven to 350ºF. Adjust rack so it is in the lower third of the oven (see notes). Butter a 10-inch round cake pan. Line the bottom with a round of parchment, butter the parchment and flour the pan. Set aside.

Combine the first four ingredients in a small bowl and set aside.

Cream the butter and sugar until light and fluffy. Beat in the egg. Combine the milk and vanilla. Fold in the dry ingredients in three additions, alternately with the milk mixture in two additions.

Spread the batter in the prepared pan. Toss the fruit with the lemon juice and spread evenly over the batter (drizzle any juices remaining in the bowl over the fruit). Combine the sugar and cinnamon and sprinkle in an even layer over the fruit. Bake until a wooden toothpick inserted in the center of the cake comes out clean, 40 to 50 minutes. Serves 8 to 10.

Notes:
• Fruit may be any combination of whole berries, halved and pitted cherries, pitted and sliced (1/2-inch thick) plums, apricots, or nectarines, peeled, pitted and sliced (1/2-inch thick) peaches, pitted and quartered prune plums, chunks of rhubarb, or 1/4-inch thick wedges of peeled apple or pear.
• In my oven, this cake bakes best if placed in the lower third of the oven. Bake in the middle of the oven if you have an oven with very strong bottom heat.

(Recipe adapted from The French Laundry Cookbook by Thomas Keller and The Art of Quick Breads by Beth Hensperger)

Printable Version

Thursday, August 4, 2011

Plum Sorbet and a Formula for Making Any Fruit into a Sorbet


The hallmark of a fine fruit sorbet is that it tastes just like the fruit it was made from...only more so. I was thinking about this recently because I had made a batch of plum sorbet while preparing for a class. I occasionally teach plum sorbet in my classes as a means of teaching the basics of fruit sorbets. It is particularly good for this purpose because the final result is so spectacular. Plums produce a sorbet that has an astonishingly vibrant color.  And it tastes so very good—far better actually than any plum I have ever eaten.


One of the reasons I think plum sorbet tastes so much better than fresh plums is that my experience of fresh plums has been a bit disappointing.  The flesh is extremely sweet while the skin is excessively sour. Eating one becomes a focused exercise in making sure that you have the right amount of flesh and skin in your mouth at the same time so you can enjoy the fruit as I would imagine it was intended to be enjoyed—as a harmonious blending of the sweet and the tart. But inevitably with each mouthful, you end up chewing on that last mouth-puckering piece of skin...all by itself...without the mitigating presence of the flesh. It's just too much work...for an unsatisfactory return. I suppose it's technically possible to peel a plum...but I'm not sure I would want to since the flesh without the skin would be almost too sweet. The depth of flavor added by the sour skin would be missed.

Cooking a plum seems to remedy all of these problems. Through the cooking process there is a magical blending of the sour skin and sugary sweet flesh. The taste of cooked plums is complex—intensely flavorful and almost spicy—with a wonderful sweet-tart balance. I love fruit desserts made with plums...pies & tarts, crisps, cobblers, crostatas...even ice cream served with a simple topping of sugared and roasted plums. My "problem" with fresh plums may simply be that I have never eaten a properly ripened one. But whether or not this is the case, plum sorbet—which is made with plums that have been poached in a sugar syrup—tastes like that fresh, perfectly ripened plum of my imaginings.

In general, one of the reasons a fruit sorbet tastes so purely of fruit is that there is really nothing in it to get in the way of the flavor of the fruit. Besides sugar, the only other addition is usually a little lemon juice. And the lemon juice is only there to enhance the fruit flavor. Lemon is often used in this way in the pastry kitchen. Just as salt is not typically added to make a dish salty, lemon is not always added to make something lemony. Rather, it is added to make something (primarily fruit) taste even more like itself. Sometimes sorbets will include a liqueur or a fortified wine...but like the lemon these are added to amplify, not alter, the flavor.

Any fruit sorbet can be made by following a very simple formula. I have been using the same formula (from my favorite guru of all things technical—Madeleine Kamman) for as long as I have been making sorbets. It is simple, requires no special equipment (other than an ice cream maker), and has never failed me.  If you can make a simple syrup, you can make a sorbet. And anyone can make a simple syrup: just combine equal weights of sugar and water in a sauce pan, bring to a boil and simmer for a minute. Store any extra in the refrigerator and use for mixed drinks, fruit compotes...anyplace a little liquid sweetness is wanted.

To make the sorbet, first measure the chopped (or puréed) fruit.


If making an uncooked fruit sorbet (berry or melon, for example), simply combine the puréed fruit with one third of its volume in simple syrup. If making a cooked fruit sorbet (stone fruits or apples/pears, for example), gently poach the fruit in one third of its volume of simple syrup until just tender and then purée.


For both cooked and uncooked fruits, strain the purée if you like. This will insure that the resulting sorbet is silken smooth and free of any remaining bits of skin and fibers—a nice result, but not strictly necessary. Chill the base deeply and just before churning add lemon juice (about 1 1/2 T. per quart of base—but this will vary depending on the fruit).

Before churning, check the sugar density of the base using the "egg test". Place the sorbet base in a tall, deep container. Wash a raw egg well and dry carefully. Drop the raw egg (in the shell) into the sorbet base. Push the egg down so it is submerged and then wait—jiggle the container a bit if you don't begin to see the egg appear on the surface of the mixture. If the sugar saturation of the base is where it should be, the egg will float so that a dime- to quarter-sized portion of the shell is visible on the surface of the sorbet base.


If an area larger than a quarter is visible, add water. If the egg is not visible at all, or the area that is visible is smaller than a dime, add simple syrup. Sorbets that have too high a density of sugar will not set up properly. Conversely, a sorbet with a sugar density that is too low will be hard and frosty. The goal is a well-set sorbet that is smooth and creamy.


This smooth, creamy texture, coupled with the cool and refreshing character of sorbet, may have something to do with the fact that I like plum sorbet better than fresh plums.  Perhaps someday I will taste a plum that will alter my opinion.  But on a recent hot and steamy day, as I worked my way to the bottom of the bowl, I found it hard to believe that there was a plum out there that I would find any more satisfying. 


 Plum Sorbet

2 c. water (1 lb.)
2 1/4 c. sugar (l lb.)
1 1/3 lb. ripe plums
about 1 1/2 T. fresh lemon juice

Make the simple syrup: Place the water and sugar in a saucepan and bring to a boil. Boil for one minute. Set aside to cool. You will have about 2 2/3 cup simple syrup, which will keep indefinitely, covered tightly, in the refrigerator.

Halve and pit the plums and cut into 1/2-inch thick slices.


Place the slices in a wide pan and add 1 1/3 cup of simple syrup. Bring to a simmer and simmer gently until the plums are tender—5 to 10 minutes. Using a slotted spoon, transfer the cooked plums to the blender. Purée the plums, adding only enough of the poaching syrup to allow the plum purée to move freely in the blender. Transfer the plum purée to a narrow and deep container and stir in the remaining poaching syrup; chill.

When the base mixture is cold, add lemon juice to taste and test the sugar density using a raw egg (see post text). Freeze according to the manufacturer’s instructions on your ice cream freezer. Transfer to an airtight container and place in the freezer. Makes about 3 cups sorbet.

Thursday, September 16, 2010

Plum Pie and the Pursuit of a "Perfectly" Set Fruit Pie

I taught a class this week about pies and tarts. It's a class that I have taught several times before, so there were no new recipes that had to be tested in order to prepare for it. I say "had to be tested" because I always have the feeling that things can be better (see my blog subtitle).  Often, even when I have a recipe that  produces consistent, good results, I continue to tinker away at it.


My victim this time around was my recipe for plum pie. I had a vague memory of tasting the pie the morning after I taught this class the last time (fruit pie makes an excellent breakfast) and thinking that the filling was a bit firmer than I would like. It wasn't gummy, it just didn't have that slight "droop" to the thickened fruit juices that one looks for in a perfect slice of fruit pie. Of course, being just a tad too firm is much preferable to being so runny that the juices run out of the sliced pie.

My original recipe called for two pounds of plums, or six cups of sliced fruit, thickened with two tablespoons each of cornstarch and tapioca. I occasionally make a mixed berry pie that uses these same ratios and I have always been happy with the consistency of the berry filling. Since berries tend to be juicier than plums I felt pretty safe decreasing the thickener to two tablespoons cornstarch and one tablespoon tapioca when I retested the plum pie.

When I cut into the pie about four hours after it came out of the oven, the juices were fairly liquid—the empty place in the pie plate, where the first two slices had been, quickly filled up with the juices from the adjoining slices. I was amazed at the difference one tablespoon of thickener had made. Because I knew that the starches would continue to set up over a twenty four hour period, the next day I cut a slice from the opposite side of the pie. It was perfectly set—soft fruit suspended in thickened, soft-set juices. Now I knew why my original recipe, that produced a pie that sliced perfectly for serving three or four hours after it was done baking, was too firm the next day.

As a last test, I made the pie again with two tablespoons cornstarch and one and one half tablespoons tapioca. At four hours after baking it had a fair amount of flow—but it didn't flood the plate. Some people might call this a perfect slice of pie.


At six hours, it was set well enough that only a little of the thickened juices oozed out—exactly what I was aiming for.


I suppose the lesson here is that the recipe was fine the way it was...unless you are a person like me who is a bit overly obsessed with getting things just right. But I have learned something about how thickeners work in fruit pies—learned by experience, not just from reading about it—and this is valuable to me. I have also learned that if I know when I am going to serve a pie, I can adjust the thickener to get the best results. Now I just have to lose the weight I gained from eating two pies....


Not everyone has tasted plum pie (or even heard of it), so it is a fun pie to teach. If you have never had plum pie, I hope you will give this one a try. If you like fruit pies, I think you will like plum pie. As in the plum crisp, the plums cook into a beautiful jewel-toned reddish purple. Also, because plums have a pleasant sweet-tart character the resulting pie is not too sweet and is very fruity tasting—just what a fruit pie should be.

Plum Pie

1 recipe Basic Pie Dough, rolled out as described for a double crust pie
3/4 c. sugar
1/2 t. allspice
pinch of salt
2 T. cornstarch plus 1 to 2 T. Tapioca (or 3 to 4 T. cornstarch)
2 lbs. plums, pitted, quartered and sliced cross-wise 1/2-inch thick (to make 6 cups fruit)—if using prune plums, simply pit and quarter
1 t. lemon juice
1 T. unsalted butter, cut into 8 pieces
Milk or half & half for brushing
Sugar for sprinkling (preferably coarse sugar)

Preheat the oven to 425°. Combine all of the dry ingredients in a small bowl. In a large bowl, combine the plums with the lemon juice and the dry ingredients. Immediately turn the fruit into the chilled crust, sprinkling any of the dry ingredients in the bottom of the bowl evenly over the fruit. “Dot” the pie with the butter.


Moisten the rim of the crust with water and top with the top crust. Crimp the edge, making sure the two crusts are well sealed. Cut several decorative slits to allow steam to escape. Brush the crust with milk and sprinkle with sugar.


Place the pie on the lowest rack of the oven. Bake the pie at 425° for 20 minutes. Turn the temperature down to 375° and bake for 20 minutes. If the edges are browning too quickly, cover them with a foil ring. Turn the temperature down to 325° and bake until the pie is golden and the juices are bubbling thickly in the center of the pie—another 25 to 35 minutes. Allow the pie to cool to room temperature before cutting (this allows the juices to “firm up”). If desired, re-warm the pie briefly just before cutting.  Serves 8.

Notes:

• Unfortunately pie baking is not an exact science. Your results are dependent upon your oven—so you need to get to know your oven. The goal is to have a fully cooked filling, a fully cooked bottom crust and a well browned top crust. Runny fillings and soggy bottoms are not inevitable. The regular temperature adjustments in this recipe are intended to maximize the likelihood that you will have success. But you must watch the pie as it bakes and adjust these temperatures and the timing of the temperature changes to fit your oven. The signal for the first reduction in temperature is when the crimped edge is golden brown and the bottom crust is beginning to show color—this will probably happen in the 15 to 25 minute range. In the next ten minutes or so, the crimped edge will probably begin to darken pretty quickly. I usually cover it with a foil ring as that begins to happen. If the juices begin to bubble over, slide a cookie sheet under the pie—but don't do this unless you need to since it will deflect heat away from the bottom crust. Finally, even if the juices are bubbling thickly (indicating that the filling is fully cooked and thickened) if the bottom crust is not golden brown (I use Pyrex pie plates so I can see if the crust is baked), keep the pie in the oven and turn the temperature back up to 375° to 425° until the bottom crust is done—this should only take another 5 to 10 minutes, but watch carefully to make sure the pie doesn't burn.

• This plum pie recipe is a “blue print” for any double crust fruit pie. Follow the same method—simply substitute 6 cups of berries, prepared stone fruit (pitted and cut into chunks or sliced), sliced apples or pears, or rhubarb for the plums; adjust seasoning (spices, citrus zest, extracts) and sugar (anywhere from 1/2 to 1 cup) to your taste. For berries and other very juicy fruits, use 4 T. thickener. For apples, use only 1 to 1 1/2 tablespoons of cornstarch (or substitute 2 to 3 T. of flour for the cornstarch).

Pâte Brisée (Basic Pie Dough)

2 1/2 c. all-purpose flour (300g)
3/4 t. salt
16 T. cold unsalted butter, cut into pieces (227g) )—for a more American-style crust, replace 4 T. of the butter with vegetable shortening
¼ to ½ c. ice water

Combine the flour and the salt in a medium-sized bowl. Rub the butter into the flour until the butter is in small pea-sized pieces. If you are using part vegetable shortening, rub the butter in first, then quickly rub in the shortening. Drizzle 4 T. ice water over the flour/butter mixture. Using your hands, fluff the mixture until it begins to clump, adding more water if necessary. If, when you squeeze some of the mixture it holds together, the dough is finished. Turn the dough out onto a counter and form into a mound. Using the heel of your hand, gradually push all of the dough away from you in short forward strokes, flattening out the lumps. Continue until all of the dough is flat. Using a bench scraper, scrape the dough off the counter, forming it into a single clump as you do. Divide the clump of dough into two pieces, and wrap each piece in plastic wrap, pressing the dough into a thick disk. Chill for at least 30 minutes.

To roll out a bottom crust, let one of the disks of dough warm up for a moment or two. Butter and flour a 9-inch pie plate and set it aside. Flour the work surface and the rolling pin. Begin rolling from the center of the dough outward. After each stroke, rotate the dough a quarter turn—always making sure that there is sufficient flour to keep the dough from sticking. Keep rolling and turning until you have a round of dough that is about 1/8 to 1/6 –inch in thickness. Using a lid or an upside-down bowl, trim the dough to form a 12-inch circle. Brush off the excess flour and fold the dough circle in half. Slide the outspread fingers of both hands under the dough and gently lift it and transfer it to the prepared pie plate. Unfold the dough and ease it into the pan being careful not to stretch it. Chill the pie shell for at least 1/2 hour.


Roll out the top crust. Trim the dough as for the bottom crust. Chill on a cookie sheet for at least 1/2 hour.