Showing posts with label Green Garlic. Show all posts

Sunday, June 28, 2020

Corn, Kohlrabi & Pancetta Sauté

One morning last week I received a message from an old friend of my family’s.  Her husband had been trout fishing over the weekend and they had a lot of fresh trout.  She offered me some.  I had plans for the day…and meeting her would require driving a bit…but fresh trout!  My plans could be changed.


As I thought about cooking it I mentally ran through the list of vegetables in my pantry.  I always lean toward the classics, but classic trout preparations focus more on the preparation of the fish…not on the vegetables.  Usually the trout is quickly sautéed—just long enough to crisp the skin—then finished with salty and tangy/mildly acidic ingredients: browned butter with almonds…lemon and capers…bacon/pancetta, garlic and toasted breadcrumbs…and always including aromatic parsley.  Since the fish itself is pretty mild, I focused on the flavors at play in these traditional accompaniments as I considered my vegetables.

I like corn with fish of all kinds and I had recently purchased some of my first ears of the summer, so I thought I would start there.  The combo of pancetta, garlic and parsley from Madeleine Kamman’s trout dish from the Aveyron had initially appealed to me…and I knew these ingredients would go well with the corn.  


Pancetta, garlic and parsley also made me think of a kohlrabi-sauced pasta I had made for dinner a few days prior.  The kohlrabi in this dish is diced small—about the size of a kernel of corn.  And corn and kohlrabi are delicious together. Suddenly there it was…a simple sauté of corn, kohlrabi and pancetta (with garlic, spring onions and parsley).  I knew it would be delicious.

The corn I used in my dish had already been roasted.  I have been in the habit for several years now of keeping a container of roasted corn in the fridge all through summer corn season.  Having it on hand makes it easy to quickly prepare the roasted corn salads I love (with tomatoes…avocado…summer squash…shell beans and roasted peppers…).  But if you don’t have any roasted corn on hand…and you don’t feel like heating up your kitchen just to roast an ear of corn, you could just add the corn to the sauté in its raw state.  Add it with the spring onions. 

I have written the recipe as I made it:  for one person.  But it is easily multiplied for as many as you will be serving.   Simply choose a sauté pan that is just large enough to hold all the vegetables in a snug single layer. 

My trout dish really was delicious.  But you don’t have to have trout to make this corn and kohlrabi sauté.  A few days after I made it with the trout, I prepared it again (so I could write down the recipe), but I used halibut instead of trout.  I think any kind of mild fish would be great.  Simply sauté the fish and finish it with a generous squeeze of lemon after you remove it from the pan.  And even though I conceived of the recipe as an accompaniment to fish, if you don’t like fish I’m sure it would make a fine accompaniment for a pork chop…or even a pan seared chicken breast.  And if you have never tasted kohlrabi, this dish would be a great way to try it out.


Corn, Kohlrabi, & Pancetta Sauté

For each serving you will need:
1 t. butter
1/2 oz. pancetta, minced or diced
1 small kohlrabi, peeled and cut in a 1/4-inch dice—you’ll have about 1/2 cup or 2 oz.
Olive oil
1 small spring onion (or scallion), white and equal quantity of green, thinly sliced
1 clove green garlic (or a small clove regular garlic), minced
1/3 to 1/2 cup roasted corn kernels (about 2 oz.)—see notes
2 to 3 t. minced flat leaf parsley


Choose a sauté pan that is large enough to hold the corn and kohlrabi in a snug single layer.  Place the pan over moderate heat and add half of the butter.  When the butter has melted, add the pancetta.  When it has rendered and begun to turn golden (2 to 3 minutes), transfer it to a plate using a slotted spoon.   The pancetta should still be slightly soft and chewy (not crisp).


If the pan seems dry (there should be enough fat in the pan to coat the kohlrabi), add a little olive oil.  Add the kohlrabi to the pan along with a pinch of salt.  Let the kohlrabi sizzle gently, stirring occasionally, until it is mostly tender—perhaps five minutes or so.  Add the remaining butter along with the onions and garlic.  


Cook until the onions are beginning to soften and everything is fragrant—about 2 minutes.  If at this point the kohlrabi isn’t tender enough for your liking, add a splash of water and simmer gently until it is, replenishing the water as necessary.  You should not need to cook it too much longer.  When the kohlrabi is tender, allow the water to reduce/evaporate until the kohlrabi is once again gently sizzling in the fat.  Add the corn along with the cooked pancetta and heat through.  Toss in the parsley.  Taste and correct the seasoning with salt and freshly ground pepper.  Serve hot.

Notes: 
  • To roast corn, preheat the oven to 375° (or thereabout). Place the corn, in the husk, directly on the oven rack and bake for 20 minutes. Remove the corn from the oven. As soon as you are able to handle the corn, peel the husks and silks back so that the corn won't continue to cook. Cut the corn kernels away from the cob and enjoy...or use in a recipe. A typical ear of Midwestern summer corn yields about a cup of kernels.
  • If you don't have roasted corn on hand (I keep it on hand during the summer for salads, pilafs, etc.) and don't want to turn your oven on I'm sure you could use fresh corn kernels in this recipe. Add with the spring onions. You may need to add a bit more butter or olive oil to the pan.

Sunday, June 30, 2019

Kohlrabi: in a Sauce for Pasta…with Green Garlic, Pancetta & Cream


Kohlrabi must grow unusually well…with few of the typical pests and other problems encountered with other crops…in the Midwestern United States.  I say this because it is widely grown by the growers who supply CSAs and the stalls of our local farmers’ markets.  This, despite the fact that it seems to be a hard sell.  Google searches for “What can I make with kohlrabi?” probably surge during June as CSA shares begin to include this alien looking member of the Brassicas.  Shoppers at the local markets often bypass it altogether. 

But growers persist in planting kohlrabi.  And for good reason:  it is delicious.  If you have sampled kohlrabi from the grocery store you might not have been impressed.  You can get good kohlrabi at the grocery store…but often their stock is a bit old...and hence fibrous and tough.  But once you taste a freshly harvested kohlrabi, you will begin to look for it at the late spring and early summer markets.

Kohlrabi ...with its leaves trimmed away

Kohlrabi is the same species (Brassica oleracea) as cabbage, turnips (it’s sometimes called a cabbage turnip…or a German turnip), kale, Brussels sprouts, broccoli and cauliflower.  It is most often compared to turnip…but I find it to be much milder than all but the mildest, white-topped salad turnips.  If I were to compare it to anything on this list of Brassicas, I would say it is most like a broccoli stem.  But if you happen to get your hands on a particularly fine kohlrabi, you will find it to be much sweeter, crisper and juicier than a broccoli stem. 

Peeled and diced...and ready for pasta...

Kohlrabi is delicious in soups and vegetable ragouts.  I posted a lovely vegetable and farro soup that included kohlrabi several years ago.  And my chef friend Nancy makes a delicious Ganth Gobi Aloo/Kohlrabi & Potato Curry with the kohlrabi that arrives in her CSA share.  Most often you will find kohlrabi shredded or julienned and included in raw vegetable salads or slaws.  It is truly delicious this way.  I have posted a couple of recipes that use it raw…and if you never do anything other than make salad and slaw with your kohlrabi, you will come up with lots of delicious ways to use and enjoy it. 


Recently as I was considering what to do with some kohlrabies I had purchased at the market I decided that I really wanted to cook it.  So I turned, as I often do, to pasta.  As I considered how to treat it, I remembered how delicious other Brassicas are with cream, garlic and bacon (or ham).   My pasta pretty much fell together from there.  If you have never tried cooked kohlrabi, you could do worse than this simple pasta.  And if pasta and carbs aren’t really your thing (you probably haven’t made it this far in the post), this manner of preparing the kohlrabi would make a fantastic side dish.  Simply cut the kohlrabi into a larger dice…or maybe thin slices...instead.


A couple of final notes about my recipe:  Green garlic season is almost over.  Please don’t skip this pasta for that reason.  Just use regular garlic…maybe one small clove, minced.  

As you read through this post you might have noticed that some of the pictures include a sprinkling of parsley over the finished pasta.  I did this to add a bit of color…and it does that.  But it also, of course, adds a flavor component.  It tastes fine with the parsley, but I actually like it better without.  So…as is almost always the case with herbs…add to taste, if you like.

Lastly, I prefer light cream sauces for my pasta—opting to extend the sauce with pasta water rather than more cream if there doesn’t seem to be enough sauce to coat the noodles in a light fluid sauce.  But if you prefer a richer/creamier sauce, by all means, add a bit more cream.  More cream is almost never a bad thing.


Fettuccine with Kohlrabi, Green Garlic & Pancetta
in a White Wine Cream Sauce

1 T. butter
1 1/2 oz. pancetta, minced
2 or 3 cloves green garlic (or half a small stalk), minced
10 to 12 oz. kohlrabi, peeled and cut in a 1/4-inch dice (to make 1 1/2 c.)
2 to 3 T. dry white wine
water
1/2 to 2/3 c. heavy cream
4 or 5 T. (about 1 oz.) finely grated Parmesan or Pecorino (or a mix)
180 g. (6 to 7 oz.) Fettuccine

Melt the butter in a medium sauté pan set over moderate heat.  Add the pancetta.  


When the pancetta begins to turn golden and sizzle (after 2 or 3 minutes), add the green garlic.  Cook gently until the pancetta is beginning to crisp and the garlic is fragrant.


Add the kohlrabi to the pan along with a pinch of salt and continue to cook for a minute or two—sizzling gently.  It should not be caramelizing.    


Increase the heat and add the white wine.  Reduce to a glaze.  Add enough water to barely cover the kohlrabi.  Season with salt.  Cover and simmer gently until the kohlrabi is tender.  This will generally take about 20 minutes, but kohlrabi varies greatly in tenderness, so begin checking at 10 minutes and be prepared to cook for 25 minutes or so, if necessary.  The kohlrabi should be tender, not crunchy, when cooked.  Add more water as necessary to maintain a very small amount of liquid in the pan.

When the kohlrabi is tender, drop the pasta into a large pot of rapidly boiling, salted water. Stir occasionally and cook until the pasta is al dente. Drain, reserving some of the pasta water.


While the pasta is cooking, add the cream to the kohlrabi and bring to a simmer.  When the sauce has come to a brisk simmer, remove the pan from the heat. 

Add the drained pasta to the sauce and toss to coat.  If the pasta seems dry, add some of the pasta water…you might need as much as a half cup of pasta water.  Add a couple tablespoons of the cheese and toss again, once again adjusting the consistency of the sauce with the pasta water if necessary.  Season to taste with salt & pepper.  Serve with more cheese on top.  Serves 2


Saturday, May 11, 2019

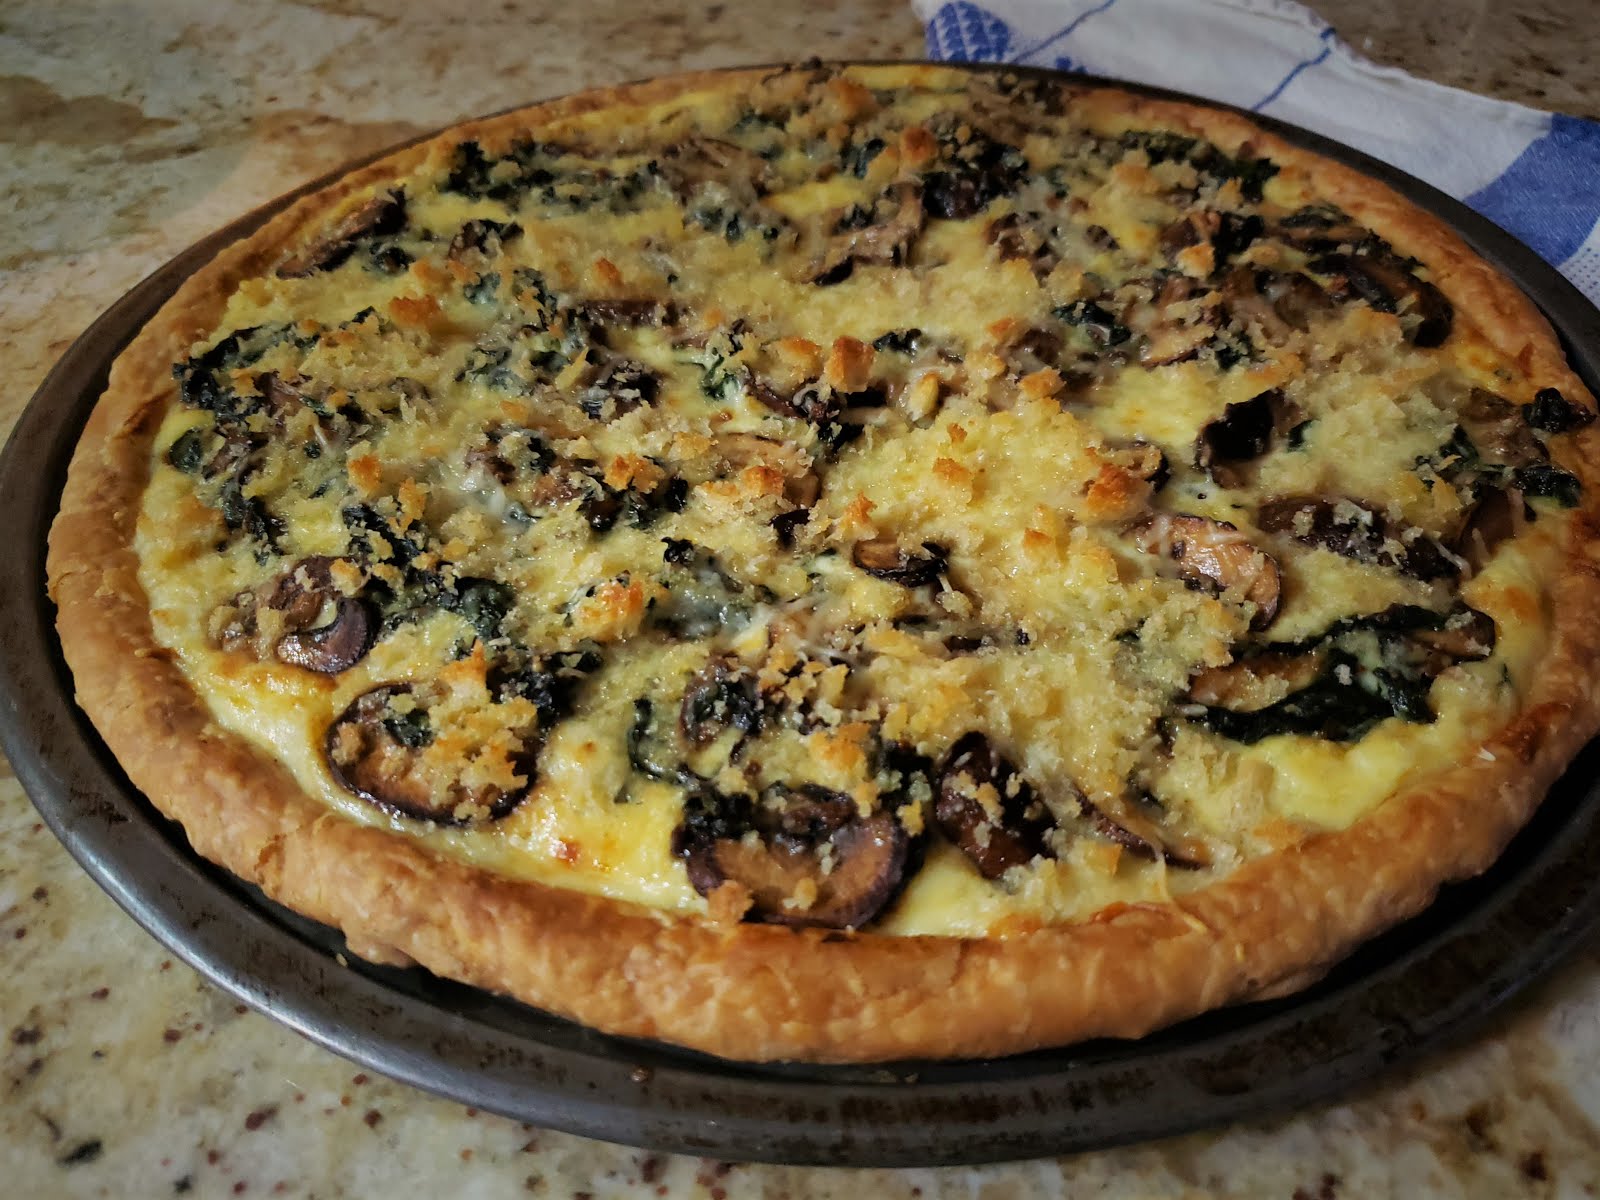
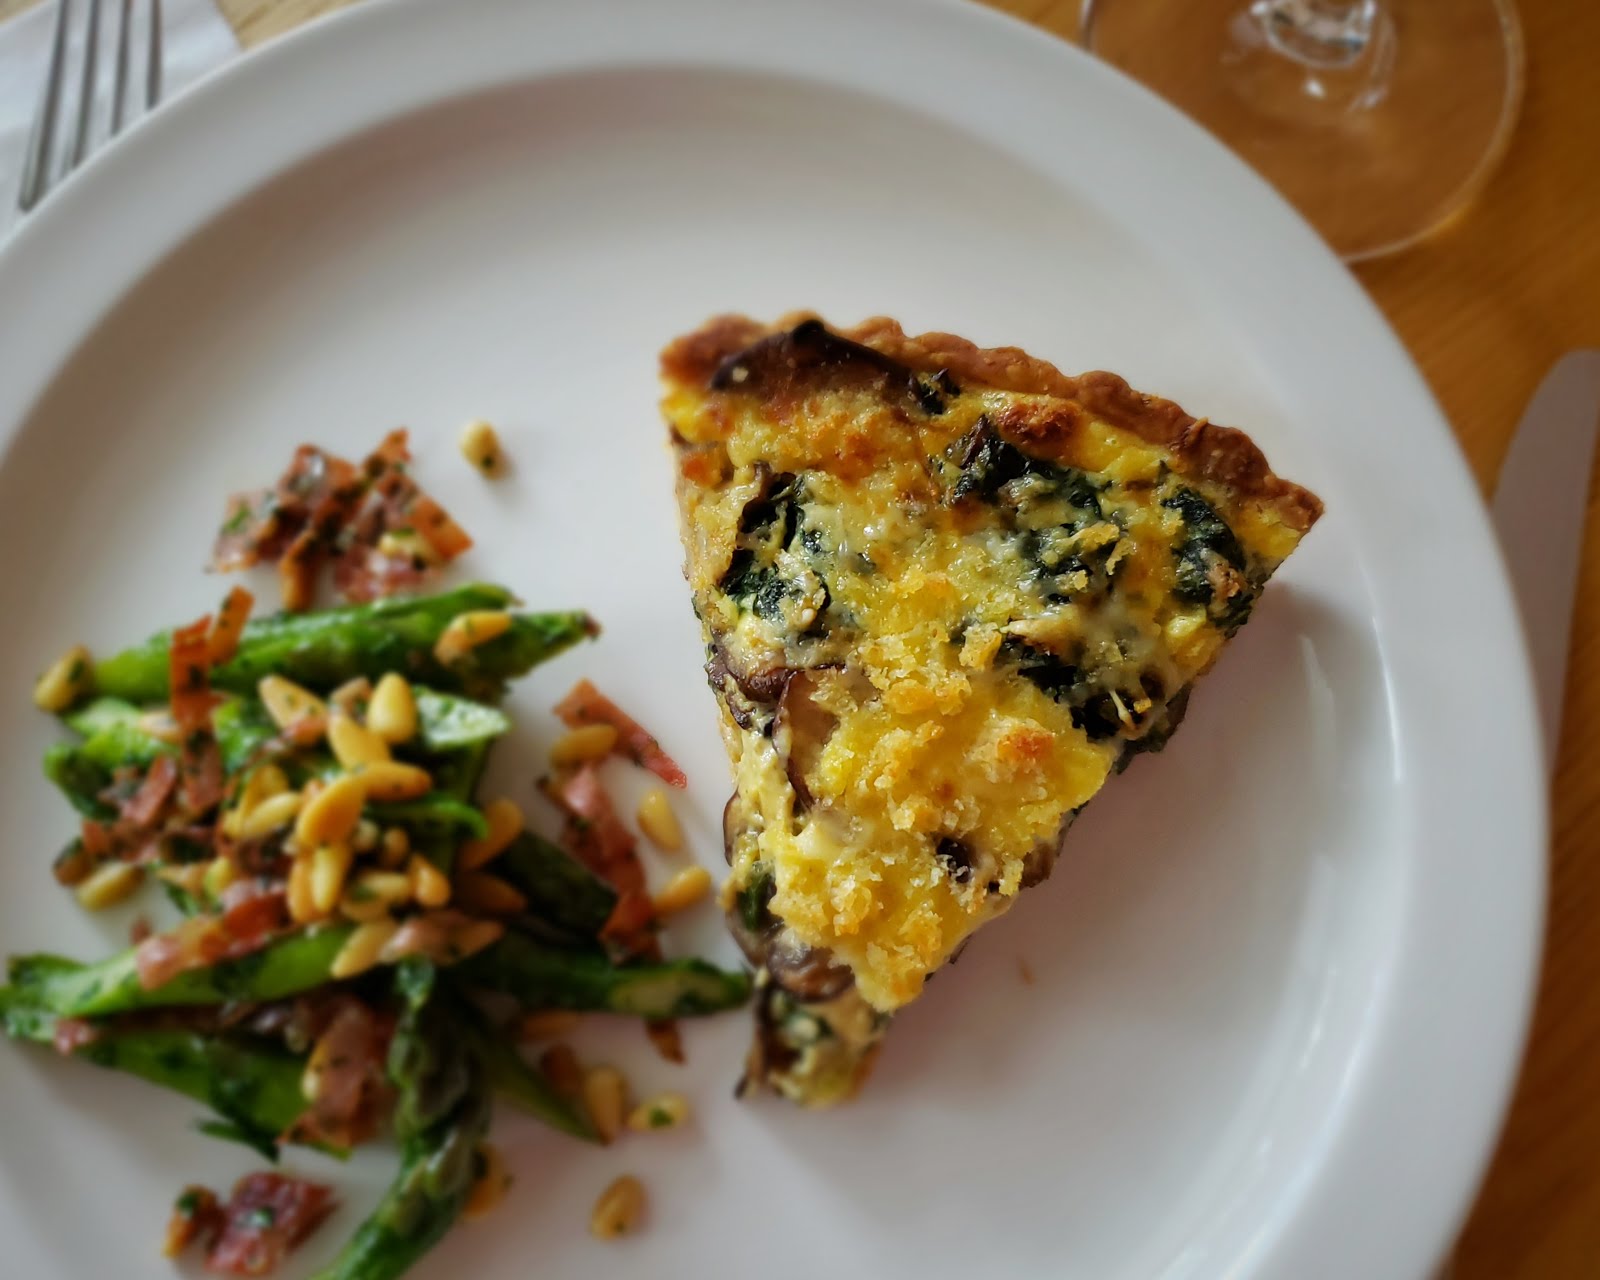
Savory Beet Greens & Mushroom Quiche...two ways...


This spring has been for me a season of beet greens.  It started when I saw some beautiful beets at the store and suddenly realized I hadn’t had beets in a while and that I was really hungry for them.  These particular beets had beautiful tops…so I saved them and added them to a pasta (or perhaps a grain pilaf…the exact preparation escapes me now).  Then suddenly I had a couple private dinners in a row that included roasted beet salads.  So I had more beet greens—because when you buy nice beets you almost always get the greens too…which basically makes them free.  So I made more pastas and pilafs…and a fantastic soup (with pasta) that I hadn’t had in a while… 
 
And still there were more.  So when I came home from a class with a pastry shell left from the demonstration, I decided to make a beet greens tart.  Greens of all kinds make fantastic fillings for tarts, so a tart of nothing but the greens…shrouded in a custard and enhanced with a little onion and garlic…or bacon or sausage…would have been delicious.  But at the time I happened to have some mushrooms on hand.  I remembered a good pasta I made a year or two ago with mushrooms, greens and bread crumbs.  So I decided to turn that pasta into a tart. 


I hadn’t planned on posting the recipe—there are after all, many, many tart recipes on my blog—but this tart was the thing I decided to make again when I ended up with another windfall of beet greens.  Anytime I like something so much that I make it twice in a short span of time, it’s usually a good indication that I should post the recipe—if for no other reason than I know I will be glad I did when at some point down the road I want to make a well-liked dish again and I can’t find my notes.

Aside from selfish reasons, I thought the post would be instructive.  It is the season of greens at the markets…and people are always looking for ways to use this abundance.  This tart is a great way to do this.  Even if you don’t have beet greens:  You can of course replace the beet greens with spinach or chard…even kale (just remember to blanch kale before adding it to the pan with the onions).

The second time I made the tart I didn't really have enough of the beet greens (on the left)...
so I supplemented with a handful of spinach and a few chard leaves... 
Almost any green would be good in this tart.

But beyond the tart being a great place to use some of your greens, I had another reason to post this recipe.  The glut of beet greens continued until I had another leftover tart shell from a class—a tart shell that was a different shape.  The first tart shell was the large, almost flat, pizza style that I tend to favor (it shows off ingredients to great advantage...plus, it has a higher proportion of crust to filling…which I love).  The second was a traditional shell (baked in a removable bottom, 9-inch tart pan).  I have always told people that these two shells (the 12-inch pizza pan crust and the 9-inch standard crust) held the same amount of filling…but I think this is hard for most people to believe.  (They certainly don’t look like they would hold the same amount of filling.)  Posting this recipe is my chance to demonstrate that this is in fact true.  Both the tarts pictured in the post used exactly the same amount of vegetable filling and custard.  You can make it either way.  The traditional style will appeal to people who really think tarts are all about the filling.  The “pizza style” will appeal to those who—like me—always want more crust.


Before I close I want to make a couple of observations about the ingredients.  The first time I made the tart I used red onion and mature garlic.  When I made it the second time I had spring onions and green garlic in my pantry…so of course I used those!  You should use what you have on hand.  I have given instructions for both.   

And while on the subject of ingredients, I want to mention the rosemary.  I normally don’t make a big deal about the addition of particular herbs, because I think they fall into the category of seasoning to your preferences.  But for this recipe, if you have it—and you like it—you should include it.  It is delicious with both mushrooms and greens…and it really adds to the savory and complex flavor of this tart.  I’m sure the tart would be good without it…but it is exceptional with it.

Finally, you may have noticed in the title of the post that I have called this recipe a “quiche”…yet I have referred to it as a “tart” throughout the post.  I was going to call it a tart in the title…because it is a tart:  It’s baked in a tart pan…and the filling is cradled in a flaky pastry crust.    But it is also a quiche—a specific class of tarts in which the filling that goes into the crust is suspended in an egg custard.  I bring this up only because I was asked this very question in a class recently:  Was I making a tart? Or a quiche?  And, what exactly is it that makes something a tart or a quiche?  I then realized I had been using the words interchangeably as I taught the class…because the thing I was making happened to be both.  But of course this is not always the case.  As far as I know, all quiches are tarts.  But it is not true that all tarts are quiches since all tarts (savory or sweet filling baked in a pastry crust) don’t necessarily include custard.  So now you know the difference (if you didn’t before…).  In any case, whatever you choose to call it, I hope you will find it to be as satisfying and delicious to eat as I have.  And I also hope you will find it to be a useful way to use and enjoy the greens that are flooding the markets right now.


Beet Greens & Mushroom Quiche

Olive oil
1/2 medium red onion, finely diced, or 2 or 3 spring onions, finely sliced or minced
1 clove garlic, minced, or one stall green garlic, finely sliced or minced
A small sprig of rosemary, picked and minced (to make about 1/2 to 3/4 t. minced)
1/8 t. hot pepper flakes
5 oz. (trimmed weight—no stems or ribs) beet greens, Swiss chard or kale, rinsed in several changes of water
8 oz. crimini mushrooms, sliced 1/4-inch thick
1 12-inch “pizza-style” tart shell or 1 standard 9-inch tart shell, blind baked (see below)
100 gr/3 1/2 oz. Gruyère cheese, finely grated (about a cup)
2 eggs
1 c. heavy cream
1/3 to 1/2 c. coarse, fresh breadcrumbs, tossed with a teaspoon of melted butter
salt & pepper


Film a wide sauté pan set over moderate heat with olive oil. If you using red onions and mature garlic, add the onions along with a pinch of salt and cook, stirring occasionally until the onions are tender and beginning to become golden at the edges. Add the garlic, rosemary and pepper flakes and cook until fragrant. If using spring onions and green garlic, add the onions and garlic to the pan along with a pinch of salt and cook until tender and translucent. Add the pepper flakes and rosemary and cook until fragrant. The red onion base will probably take about 15 minutes…the spring onion base will take less time—perhaps 5 minutes or so. For both kinds of onions, regulate the heat as necessary to allow the mixtures to sizzle gently, reducing the heat if the onions threaten to scorch. If the pan ever looks dry, drizzle in a bit more oil.

When the onions are cooked, add the greens. If using beet greens or chard, add them a handful at a time, turning with tongs to coat them in the fat and expose them to the heat and adding more as they begin to collapse. If the greens were recently washed, there should be enough water clinging to them to create steam and help them cook…if they were washed ahead (or spun dry) you may need to add a few tablespoons of water to the pan. Cover the pan and cook until the greens are tender. Uncover and continue to cook until any liquid has evaporated. Season to taste with salt and pepper and set aside in a warm spot. 

If using kale, bring a large pot of water to a boil. Add the kale and cook until tender (about 7 minutes). Lift the kale out and spread on a baking sheet to cool. When cool enough to handle, squeeze out the excess water. Add the cooked kale to the onion mixture and cook gently for a few minutes to infuse the greens with the flavor of the onions. Set aside.

While the greens cook, sauté the mushrooms: Depending on the size of your pan, you may need to sauté in batches—don't overcrowd the pan. Heat a sauté pan (non-stick, if you have one) over high heat. Add oil to coat the pan (a tablespoon or so), then add the mushrooms. Cook, shaking the pan occasionally, until the mushrooms are browned, tender and any liquid that they have given off has evaporated. If they seem dry at any time as they cook, drizzle in a bit more oil. Transfer the mushrooms to a plate and season with salt & pepper. When the greens are cooked, add the mushrooms to the greens. Set aside.

Preheat the oven to 375°. Place the baked crust on a baking sheet. Scatter about 2/3 of the cheese over the baked crust. Scatter the greens and mushrooms over all. Whisk together the eggs and the cream. Season with salt and pepper—and a pinch of freshly grated nutmeg if you like.

Slowly pour the custard over the vegetables, jiggling the pan a bit so the custard will be evenly distributed and will penetrate the vegetables. Be careful not to let the custard flow over the edge.


If there are any low places in the edge of your crust, you will not be able to use it all. Scatter the remaining cheese over the tart, followed by the buttered breadcrumbs. Bake the tart until the custard is set—about 20 minutes for the pizza-style tart, 25 for the traditional (a knife inserted in the center will come out clean). Slide the tart under the broiler to brown slightly if you like. Serves 6 as an entrée (with a salad or vegetable side), 8 to 10 as a light first course with a fluff of lightly dressed greens.


Pâte Brisée
(Short Crust Pastry)

For a 12- to 13-inch “pizza-style” crust
1 3/4 c. all-purpose flour (200g)
1/2 t. salt
11 T. cold unsalted butter, cut into pieces (150g)
1/4 to 1/3 c. ice water

For a 9- to 10-inch tart shell

1 1/3 c. all-purpose flour (150g)
3/8 t. salt
8 T. cold unsalted butter, cut into pieces (113g)
3 to 4 T. ice water

Combine the flour and the salt in a medium-sized bowl.  Rub the butter into the flour until the butter is in small pea-sized pieces. Drizzle the smaller measure of ice water over the flour/butter mixture.  Using your hands, fluff the mixture until it begins to clump, adding more water if necessary.  Turn the dough out onto a counter and form into a mound.  Using the heel of your hand, gradually push all of the dough away from you in short forward strokes, flattening out the lumps.  Continue until all of the dough is flat.  Using a bench scraper, scrape the dough off the counter, forming it into a single clump as you do.  Form the finished dough into a thick disk.  Chill for at least 30 minutes.

To roll out, let dough warm up for a moment or two.  Butter/spray the a pan and set it aside.  Roll out the dough on a lightly floured surface into a circle that is about 1/8- to 1/6–inch thick and with a diameter 2 to 3 inches larger than that of the pan.  Trim any ragged edges.  Brush off the excess flour and fold the dough circle in half.  Transfer it to the prepared pan.  Unfold the dough and ease it into the pan being careful not to stretch it.  Fold the edges to form a ½-inch rim of a double thickness of dough for the pizza-style crust.  For the traditional tart pan, simply press the dough against the sides of the pan (being sure not to stretch the dough) and cut the dough off flush with the edge of the tart pan.  Chill for at least 30 minutes.

To blind bake, line the pastry with aluminum foil or parchment paper, pressing it into the corners and edges.  Add a layer of pie weights or dried beans.  Bake in a 400° to 425° oven for 20 to 25 minutes.  When the pastry begins to color on the edges and is cooked through, remove the foil and weights and continue baking until the pastry dries out and turns a golden brown (another 5 minutes or so).

Printable Version


Tuesday, May 16, 2017

Pizza with Green Garlic Cream, Asparagus & Mushrooms...and an Announcement

Way back during my first year of blogging, as I posted yet another seasonal pasta recipe, I made the observation that I had probably misnamed my blog—that if I were telling the truth about my own personal eating habits I would have dubbed my blog "Pasta & Cake....Every Day".   I thought of that post this week as I contemplated today's post because I am sharing yet another pizza recipe.  I eat a lot of homemade pizza too (pizza and pasta are both fantastic vehicles for whatever the season and the market brings)—and so far this year it looks like my blog could have been subtitled "Pizza...it's what's for dinner".  If my math is correct, almost a quarter of my posts this year (including this one) have been for pizza....


But I have two very good reasons for posting this particular pizza.  The first has to do with the sauce.  Long time readers will know that I am not in the habit of putting tomato sauce on my pizzas.  I wrote a post on this very topic a few years back.  It isn't that I don't like tomato sauce...it's just that it can be somewhat limiting.  There are so many other interesting options—almost all of which have appeared on my blog:  a simple smear of plain or infused olive oil....ricotta cheese...vegetable purées...and most recently, a mixture of crème fraiche and fresh cheese.  Recently I discovered (via two different pizzas at two different restaurants) another delicious option—reduced cream.  


Reduced cream (heavy cream simmered until it is thickened and reduced in volume by 1/3 to 1/2) makes an amazing sauce.  It is silky...and surprisingly ethereal.  It may be used plain (just put a quarter to a third cup of heavy cream in a small saucepan and simmer until it is thickened and reduced) or combined with a bit of pureed roasted garlic...or, as in my recipe today, mixed with a whole head/stalk of softened green garlic.  When I build a pizza, I typically spread 2 to 2 1/2 ounces of cheese on top of the crust before adding other toppings and then more cheese.  When you sauce your pizza with reduced cream you can dispense with that bottom layer of cheese. 


The green garlic version of the reduced cream is the second reason that I wanted to share this particular pizza.  Not only is it fantastic with the asparagus that is pouring into the market at the moment (if you've never had asparagus on a pizza before, you are in for a treat...I posted another one a few years ago), it would also be wonderful topped with the greens that have just begun to fill the stalls (kale, spinach, chard...).  Furthermore, the reduced cream sauce makes an excellent vehicle for the green garlic itself and posting the recipe gives me a chance to talk a little bit about green garlic. 

I have been bringing green garlic home with me from the farmers' market every week for the past three weeks.  I have used green garlic before (even featured it in a post), but I have never paid very special attention to it at the farmers' market...possibly because it wasn't that abundant at my old market.  But at the market I have been shopping at since last June (The Brookside Farmers' Market in Kansas City), it is abundant...and it is truly a special treat.

Green (or new) garlic is to garlic what spring onions are to the onion family:  the early, young version of what eventually becomes the storage garlic (and onions) that we see in the grocery store.  For years now spring onions have completely replaced regular onions in my kitchen during late spring and early summer.  I am guessing that I will in the future be using new/green garlic in the same way. 

Like spring onions, after trimming away the root, you may use not only the white (or rose) portion...but also the green.  The very first green garlic to come into the market will not even have begun to form cloves or a head...it looks very much like a slender leek.  You can tell it is garlic by taking a sniff....the stalk will smell like garlic.  Later, the heads will begin to swell with the forming cloves.  You may still use the whole thing, but as the season progresses, the sheath that protects the cloves will begin to toughen a bit and you might want to slip it off and discard it (depending on what you will be using the garlic for).  The darker portion of the green also becomes tougher as the season progresses...and again, depending on use, you might want to use only the white and pale green portions.


In general, you can use green garlic everywhere you would use regular garlic...you can just use more.  You will get the wonderful taste and aroma of garlic, without the heat and strength of storage garlic. Suzanne Goin makes the observation in her book Sunday Suppers at Lucques that when green garlic season comes to an end she feels bereft.  I imagine I will feel the same.

Before I end my post today I wanted to make an exciting announcement.  I have been asked by the growers of the Brookside Farmers' Market to be their official Market Chef!  For the moment this means that I will be developing recipes for them with the beautiful ingredients I find at the Brookside Market.  The recipes will appear on my blog in the normal fashion (as part of a normal post).  Additionally, I have set up a separate Brookside Market page (tab at top) where all of these recipes will be cataloged...and if the specific grower of the featured ingredients hasn't been mentioned in the post, they will be acknowledged on the market page.


Green garlic from Ki Koko Farms
Asparagus from Urbavore Urban Farms
Every now and then an opportunity comes your way that just feels like a perfect fit...and for me, this is one of those.  As anyone who reads my blog already knows, the farmers' market is one of my favorite haunts.  I look forward to the opening in the spring...and am at a loss when it closes in the late fall. People often ask me what is my favorite thing to cook...and I never know quite what to say...I love to cook (and bake!) a lot of things.  But it occurs to me that what I truly love best is cooking from the ever changing palette of the seasons.   I hope that this new partnership with the Brookside Market will encourage even more people to get out, explore their local market...and bring home something fresh and beautiful to cook for their family and friends.  


Asparagus & Mushroom Pizza with Green Garlic Cream

1 T. unsalted butter
1 stalk/head of green garlic—white/ivory and pale green parts—finely sliced
salt & pepper
1 T. white wine (see notes)
1/4 c. heavy cream

1 T. olive oil
3 1/2 to 4 oz. crimini mushrooms, sliced a scant 1/4-inch thick
1 T. unsalted butter
1 medium spring onion, white and an equal amount of the green, trimmed, halved and thinly sliced

4 to 4 1/2 oz. asparagus, trimmed, rinsed and cut very thinly—1/8-inch thick or less—on a long bias (about 2 to 2 1/4 oz. trimmed weight)—see notes
1/2 t. olive oil
1 oz. finely grated Parmesan
2 to 2 1/2 oz. coarsely grated Fontina or low-moisture mozzarella
1 ball of pizza dough (see below), rested


Preheat the oven and pizza stone to 500°F an hour before you plan to bake the pizza. If you made the dough ahead, pull it out of the refrigerator when you turn on the oven.

Place a tablespoon of butter along with a tablespoon of water in a small sauce pan and set over moderately low heat. When the butter has melted, add the green garlic along with a good pinch of salt.  Gently stew the garlic until it is softened and the water has evaporated/been absorbed and the garlic has softened (about 5 minutes).  


Add the white wine and continue to simmer until the wine is reduced and the garlic is sizzling gently in the butter again.  Add the cream and simmer until thickened and reduced by one third to one half.  Taste and season with salt and pepper; set aside. 

Heat a tablespoon of oil in a medium sauté pan set over medium high heat.  Add the mushrooms and sauté until tender and caramelized.  If you like, add a splash of water, or white wine, to deglaze the pan...continue to cook until the water/wine has evaporated.  Transfer to a plate and season the mushrooms with salt and pepper.  Let the pan cool briefly before returning to moderate heat.  Add a tablespoon of butter.  When the butter is melted, add the spring onions along with a pinch of salt and cook until soft and tender (five minutes or so).  Return the mushrooms to the pan, toss to combine and continue to cook for a minute or two to blend the flavors.  Taste and correct the seasoning.  Set aside. 

In a medium-sized bowl, drizzle the olive oil over the asparagus and season with salt & pepper. Toss to coat. Add the cheeses and toss to combine.


To build the pizza: On a lightly floured surface, roll or stretch the dough out into a 12- to 13-inch circle. Transfer the dough to a pizza pan, baking sheet or peel that has been lightly dusted with semolina, fine cornmeal, or rice flour.

Spread the garlic cream over the crust, leaving a half inch border around the edges bare.  


Scatter the mushroom/spring onion mixture over the cream, followed by the asparagus/cheese mixture.


If using a pizza pan or baking sheet, place the pizza in its pan on the pizza stone in the pre-heated oven. Bake until the crust is golden brown on the bottom and the cheese is bubbling, about 8 to 10 minutes. To insure a crisp crust, after the crust has set (5 to 6 minutes), slide the pizza off of the pan to finish cooking directly on the pizza stone.
If you are using a pizza peel, slide the pizza directly onto the hot stone and bake until browned and bubbling (about 8 minutes).

When the pizza is done, transfer to a cutting board and cut into wedges and serve.  If not serving immediately (if making a second pizza, for example), transfer to a wire rack so that the crust won't get soggy.

Note:  
  • If you don't have an open bottle of wine on hand, simply start with 2 T. of water and cook the garlic until soft and sizzling in the butter.
  • It is very important to cut the asparagus on a long bias, thus exposing as much of the interior of the spear as possible.


Asparagus that is cut straight across (even if it is very skinny) will not cook properly in the amount of time the pizza will be in the oven. Furthermore, the asparagus will not be able to release its fragrance (which will essentially be sealed in by the skin) into the other ingredients and the pizza will not taste like asparagus.


(Garlic Cream adapted from Food & Wine)

Pizza Dough:
1/2 cup warm water (100º-110º)
1 1/8 t. (1/2 package) active dry yeast
1 1/4 to 1 1/2 cups unbleached all-purpose flour
1 T. olive oil
1/2 t. salt

Combine the water, yeast, and 3/4 cup of the flour in a large bowl. Whisk until smooth. Add the oil, salt and another half cup of the flour. Stir with a wooden spoon to form a soft dough that holds its shape. Sprinkle some of the remaining quarter cup of flour on a smooth surface. Scrape the dough out of the bowl and sprinkle with a bit more flour. Knead the dough, adding just enough flour to keep the dough from sticking, until the dough is smooth and springs back when pressed lightly with a finger—about 5 to 10 minutes. Transfer the dough to a lightly oiled bowl and cover the bowl with plastic wrap. Let the dough rise until it has doubled in size—about 1 hour. Punch down the dough. At this point you may use the dough immediately or cover the bowl again with plastic wrap and refrigerate it for 12 to 24 hours. Pull the dough out of the refrigerator to let it warm up a bit, about an hour before baking the pizza.

When ready to make the pizza, turn the dough out onto a lightly floured surface. Roll the dough into a ball. Cover with a towel and let rest for 10 to 20 minutes. The dough is now ready to be shaped, topped and baked.

(Crust adapted from The New Basics Cookbook by Julee Rosso & Sheila Lukins)

Food Processor Method:  Place the water and yeast in a small bowl and let sit until the yeast has dissolved.  Place 1 1/4 cups plus 2 T. of the flour and salt in the food processor fitted with the metal blade and pulse to blend.  Add the oil and yeast/water mixture and pulse until the dough is homogenous.  Begin to run the mixture in long pulses until the dough is smooth and elastic—it shouldn't take more than a minute.  If the dough seems wet and sticky, add some of the remaining 2 T. of flour a bit at a time, pulsing after each addition.  Turn the dough out onto a lightly floured counter and give it a few kneads by hand.