Showing posts with label Ricotta. Show all posts

Monday, September 25, 2023

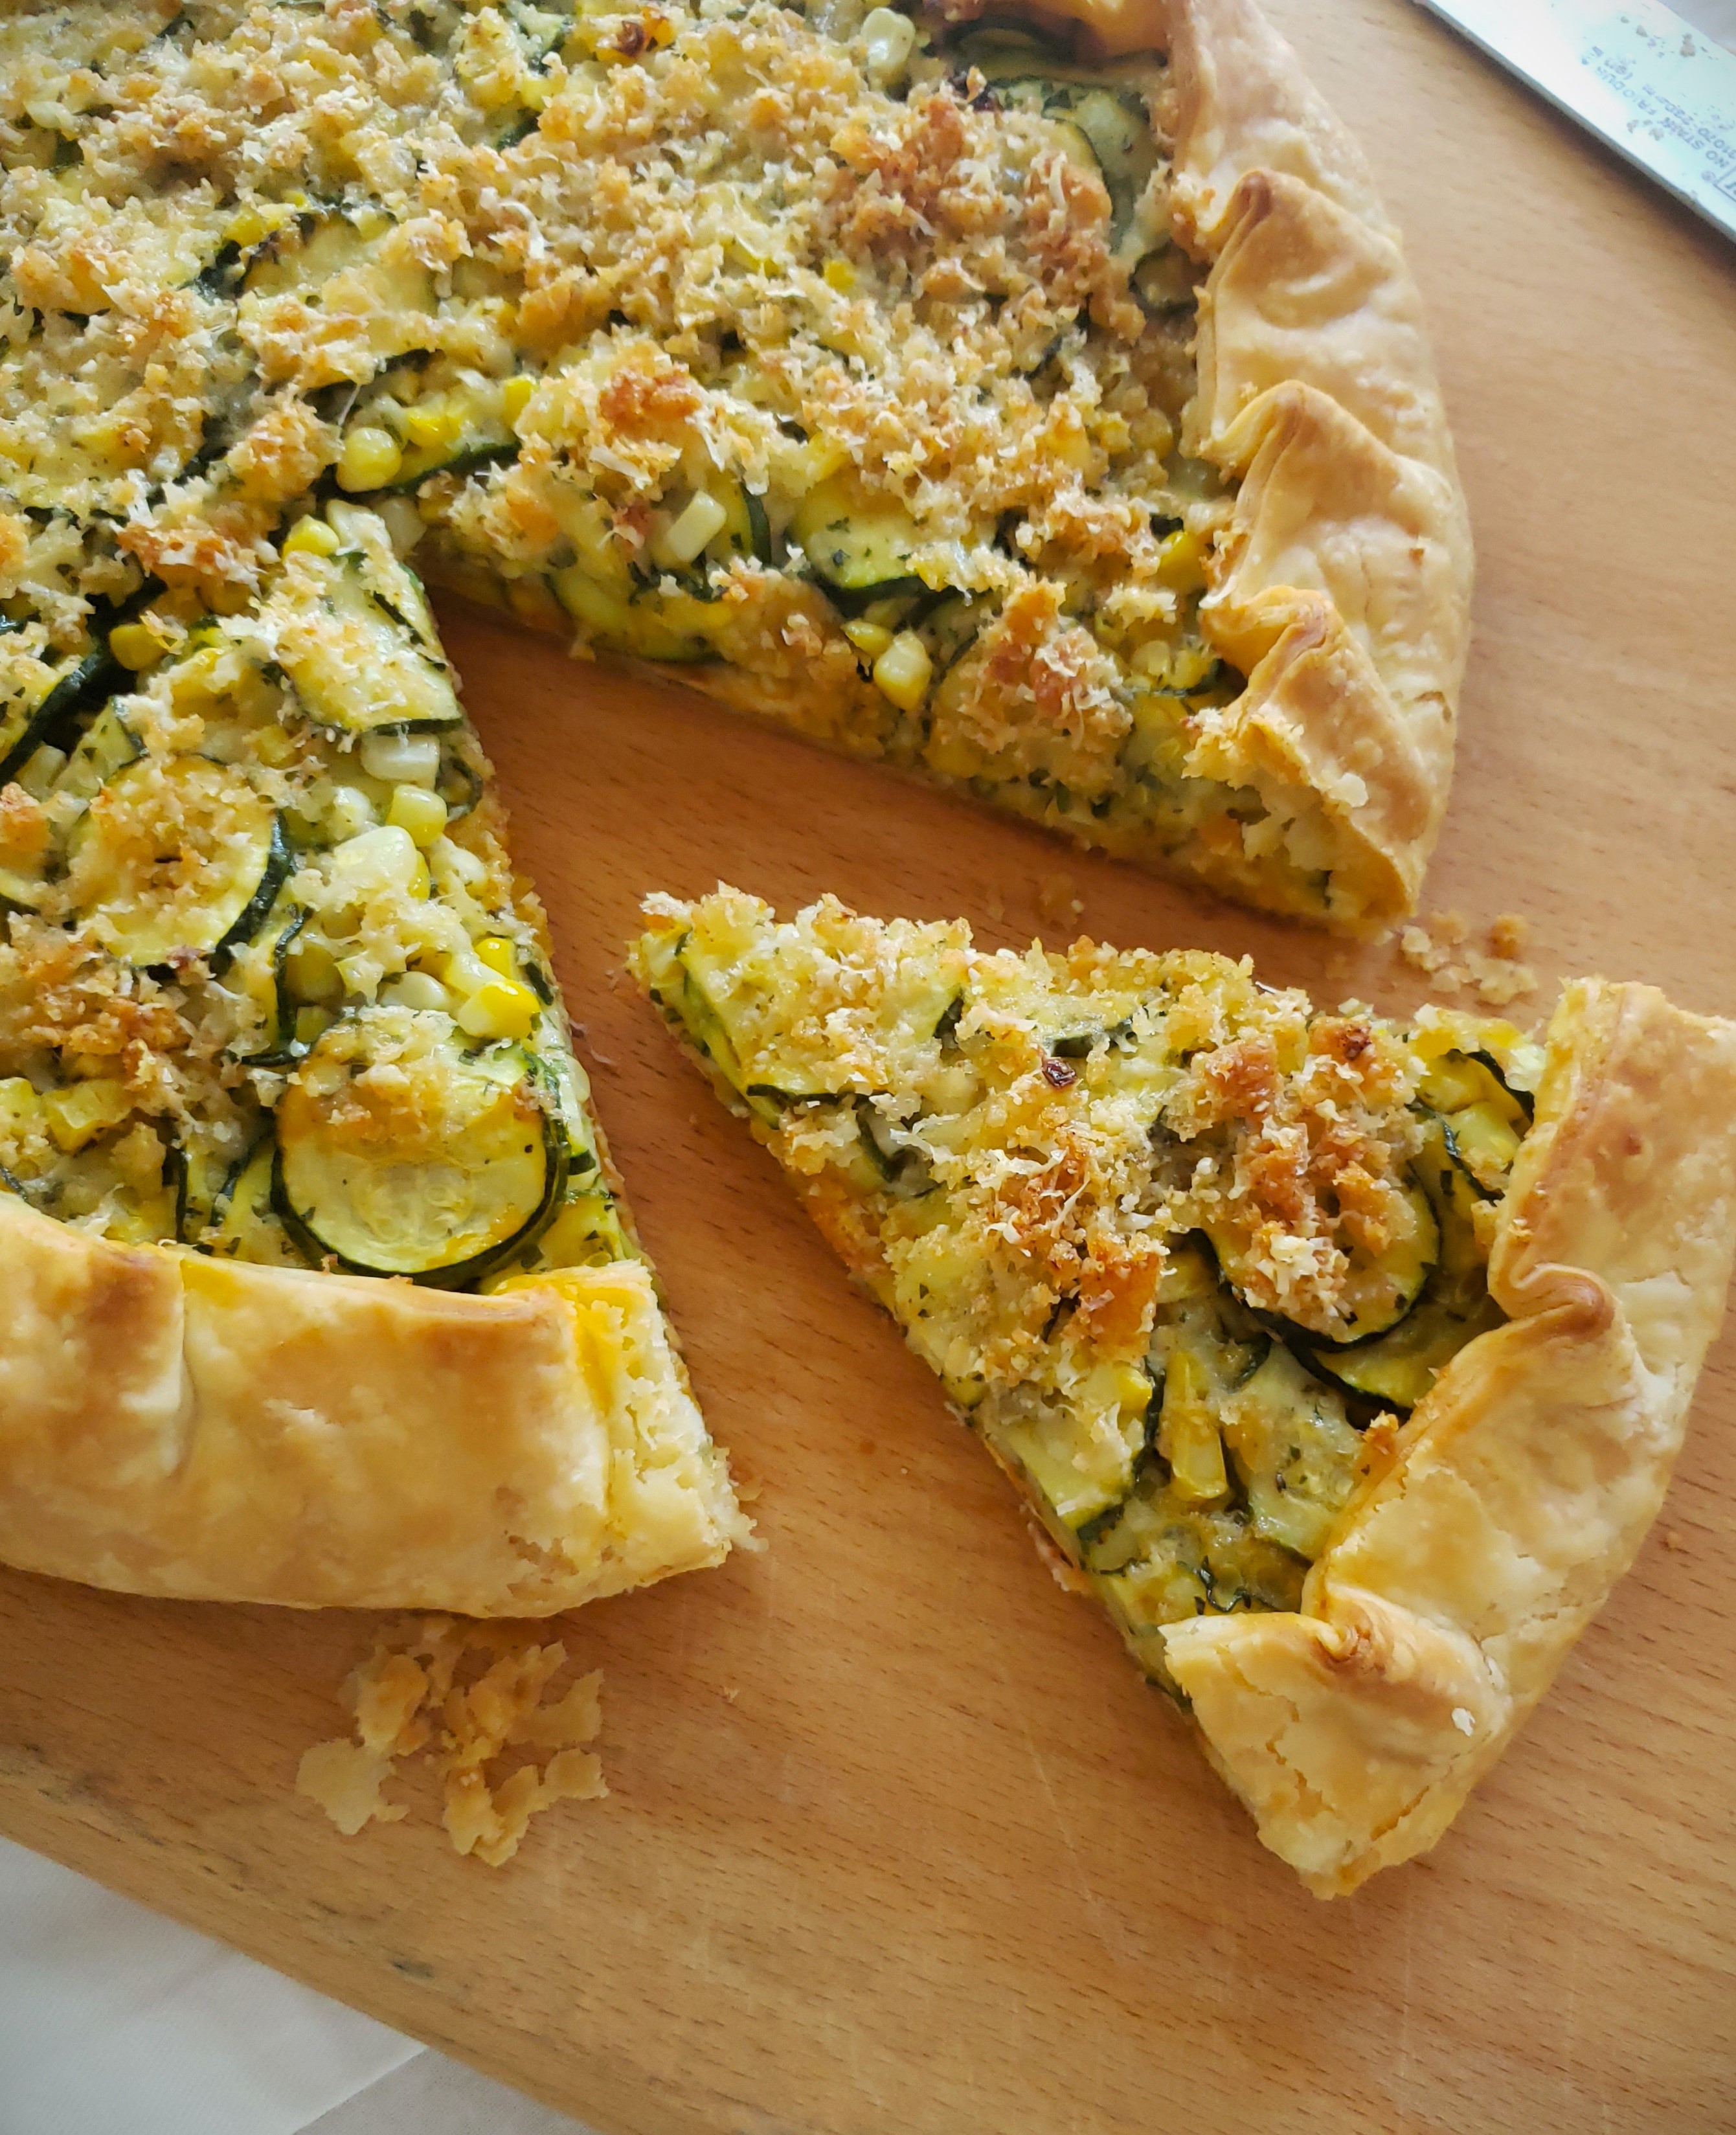
Late Summer Zucchini & Corn Galette with Tomato & Browned Butter Breadcrumbs


In the early days of the pandemic I started doing curb side pick up dinners. It was a good option for people who wanted to "eat out", but didn’t want to eat in a restaurant filled with people. The dinners were 3 courses and packaged with instructions for any last minute heating/dressing/etc. I enjoyed the change of pace…as well as the additional work…so have continued to do them occasionally—even though there is no longer the same “need” for them.

Just as with my private dinner menus I’m sure it comes as no surprise that my menus for these dinners always highlight seasonal ingredients. I usually start with an idea for one course and then create the remaining two courses around it. For the recent September dinner I started with the idea of Applesauce cake. It is still warm where I live so I opted for a room temperature roast pork with green bean and potato “salad” for the entrée. 
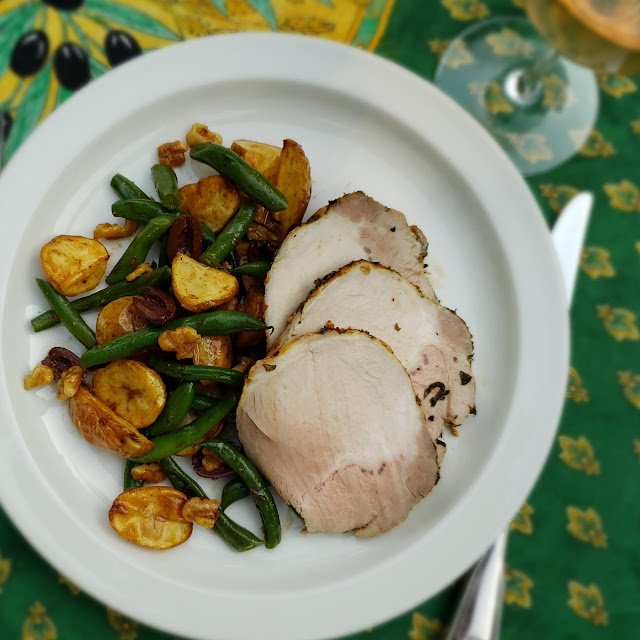

This meant I didn’t really want to do a true salad for the first course (it seems repetitive to have a salad in 2 of 3 courses…). Since the dessert was cake, a tart or pizza seemed like a good starter.

As I considered my seasonal options, corn and zucchini…and tomato!...came to mind. These things are at the end of their season. I always feel a nostalgic desire to eat lots of the waning fruits of the season—even as I look forward to the new crops coming in. (The “cusp” seasons are always exciting moments in the culinary year.)


I found a couple of interesting savory tarts on line that included these ingredients. And what I ended up making is a bit of a blending of these two…plus my own style of savory galette (with a creamy ricotta base)…and a favorite summer squash gratin. I was struck by the observation from the creator of one of the tarts I found that her tart was “something in between” a quiche and a gratin. I didn’t want to make a quiche, but the “gratin” part appealed to me and that favorite summer squash gratin came to mind as I was drifting off to sleep one night, noodling on how I was going to build my tart.


There are a lot of component parts to this galette. If you just want to make dinner, it will seem a bit fiddly. But it is actually pretty easy to put together once you have the components (all of which can be made ahead except for the salted squash)—making it perfect for entertaining. If you have your own favorite tomato sauce on hand, you can use it as long as it is very thick (cook it down a bit until it no longer weeps and it mounds on a spoon). You will need about 3/4 cup. The one I use here is my favorite summer tomato sauce—nothing more than vibrant, vine ripened tomatoes (skin, seeds and pulp) cooked down with a generous amount of garlic, pepper flakes and olive oil. You could likely omit the ricotta—the thick tomato sauce providing enough of a barrier to keep the crust from becoming soggy—but I like the richness that it adds. (If you were to omit the ricotta, I would probably increase the Gruyère a bit.) The tomato sauce, on the other hand, should not be skipped. Its tartness adds essential balance and interest to the other mild flavors.

The tart made a great first course for my curbside dinner—a wonderful addition to the end-of-summer theme. I enjoyed the leftovers for lunch…and then a light dinner…along with a nice green salad. I’m only sorry that the season for these vegetables is rapidly coming to a close and it will probably be next year before I make this vibrant tart again. Maybe you will find a way to squeeze it in this year.


Late Summer Zucchini & Corn Galette with Tomato & Browned Butter Breadcrumbs

Pâte Brisée (tutorial):
175 g. all purpose flour (about 1 1/3 c.)
1/2 t. salt
132 g. cold butter (about 9 T.)
50 to 66 g. water (about 3 1/2 to 4 1/2 T)

Combine the flour and the salt in a medium-sized bowl. Rub/cut the butter into the flour until the mixture has the appearance of cornmeal and peas. Drizzle 3 1/2 T. ice water over the flour/butter mixture. Using your hands, fluff the mixture until it begins to clump (if you grab a handful and squeeze it will adhere), adding more water if necessary. Turn the dough out onto a counter and form into a mound. Using the heel of your hand, gradually push all of the dough away from you in short forward strokes, flattening out the lumps. Continue until all of the dough is flat. Using a bench scraper, scrape the dough off the counter, forming it into a single clump as you do. Form the finished dough into a thick disk. Chill for at least 30 minutes (overnight is even better, if you have time).

To roll out the dough, let it warm up for a moment or two at room temperature. Line a baking sheet (preferably rimless) with parchment paper; set aside. Roll out the dough on a lightly floured surface into a circle that is about 1/8-inch thick and is 14 inches across. Brush off the excess flour. Trim any ragged or uneven edges if you like. Transfer the dough to the prepared sheet. Cover loosely with plastic wrap and chill for at least 30 minutes.

Ricotta Base:
150g whole milk ricotta (drained before weighing if very wet)
2 t. olive oil
2 t. flour
Salt & pepper

In a small bowl, combine the ricotta with the olive oil and flour. Season to taste with salt & pepper. Chill until ready to use (can be made a day or two ahead).

Summer Tomato Sauce:
2 1/2 T. olive oil
2 cloves garlic, minced
Pinch hot pepper flakes
340g. vine ripened tomatoes (preferably red or yellow), cored and cut into a rough dice

Place the oil, along with the garlic and pepper flakes in a wide sauté pan and place the pan over moderately high to high heat. When the garlic begins to sizzle enthusiastically and is just on the verge of taking on a bit of color, add the tomatoes (along with all of the juices) to the pan. The tomatoes should immediately begin to simmer rapidly. Allow the tomatoes to cook, shaking the pan back and forth occasionally, stirring at regular intervals and regulating the heat in order to maintain a brisk simmer, until the tomatoes have broken down and the sauce is thickened and emulsified (a path should remain when you draw a spoon across the pan and the sauce should mound on a spoon). You should have a scant 3/4 cup. Taste for seasoning and remove from the heat. Sauce may be made ahead.

Browned Butter Breadcrumbs:
3/4 c./41g. fresh breadcrumbs
1 1/2 T. butter

Place the bread crumbs in a bowl. In a small sauté pan cook the butter over medium heat for a few minutes, whisking occasionally, until it begins to brown and smells nutty. Pour the browned butter over the breadcrumbs, scraping in all of the browned bits. When cool enough to handle, toss to combine. Set aside.

Vegetable and Cheese Filling:
400g (about 2 large) zucchini, sliced 1/8-inch thick (use a mandolin)
1/ 2 t. kosher salt
41 g. (1/2 c.) finely grated Pecorino
100 g. (a scant cup) grated (medium fine) Gruyère
1 T. minced fresh thyme
2 T. minced parsley
2 T. olive oil
1 1/2 c./225g fresh corn kernels (cut from 1 large or 2 small ears)

Cut the squash into 1/8-inch thick rounds (use a mandolin slicer). Toss the squash slices with 1/2 t. kosher salt and place in a colander set over a plate. Let stand 10 minutes. Spread two layers of paper towels on your work surface and transfer the squash to the towels, shaking off as much of the liquid as possible as you do. Blot with another layer or two of paper towels. (The squash does not need to be spread in perfect single layers—you just want to have it spread out so that you can blot away the majority of the liquid).

Combine the pecorino with the buttered breadcrumbs and set aside.

Build the tart: Spread the ricotta mixture in a circle in the center of the chilled pâte brisée, leaving a 2-inch border of dough. Dollop and spread the cooled tomato sauce over the ricotta. Scatter half of the Gruyère over the tomato sauce.


In a large bowl, combine the squash, half of the pecorino/breadcrumb mixture, the remaining Gruyère, the herbs, olive oil and corn. Taste and correct the seasoning. Arrange this mixture on top of the ricotta/tomato/ Gruyère base on the pastry crust. Use your hands to do this, simply grabbing a handful of the mixture at a time and arranging the mixture in and even layer (your hands work best—rather than just dumping it out—because you can make sure you get a nice mix of corn and zucchini with each handful). Spread the remaining pecorino/breadcrumb mixture over all.

Pull up the edges of the crust and gently flip them over the filling to form a rustic edge. Pleat the dough as necessary, pressing lightly into place.

Bake the tart in a 400° oven on the lowest rack (or in the middle with the sheet pan sitting directly on a preheated baking stone). Bake until the filling is bubbling in one or two spots, the breadcrumbs are golden, and the crust is crisp and golden brown—about 30 to 40 minutes. Slide the tart onto a rack and let rest for 15 minutes (or cool until just tepid) before serving. The tart is also delicious made a day ahead. Slice while cold to get beautiful, clean slices and reheat for 15 minutes in a 350° to 375° oven. Tart serves 6 to 8.


Sunday, May 23, 2021

Spring Empanadas...Ricotta with Spinach, Peas & Spring Onions

The empanada recipe I’m sharing today is technically season-less.  All of the ingredients are not only available year round…but they can almost always be found of good quality.  Baby spinach (in little 5 oz. “clamshells”) is ubiquitous….as are frozen peas and scallions/green onions.  But nothing is truly season-less.  Everything has a moment during the natural growing seasons when it is at its happiest and most abundant.  For these three ingredients, that moment is mid to late spring.


Spinach is always one of the first greens to show up at the farmers markets. Like most leafy greens, it disappears from the market stalls as the temperatures begin to go up.
  But I always look forward to that first local crop and enjoy it in tarts, pastas, pilafs, etc. before it vanishes until autumn.

Spring onions too are one of the first things to appear.
  I’ve always called scallions “spring onion wannabes” … because once you’ve tasted them and cooked with them, you know that scallions are nice (and like the clamshells of spinach, I’m grateful to be able to get them year round), but they lack the vibrancy and flavor of the local, in-season specimens. 


A
nd fresh peas….  They are so fleeting…and so special.  Sadly, unless you grow them yourself, the fresh ones can be starchy.  They are worth buying a bunch to freeze yourself if you come across some young and particularly sweet ones.  I may have mentioned before that one of the few things that I like from Trader Joe’s is their fresh peas.  They have them from about March through June.  They are delicious…sweet…and keep for quite a while (I’m mystified as to why).

This spring when I was trying to round out a multi-course menu for a family who wanted to eat mostly vegetarian food, an appetizer course featuring spinach and ricotta empanadillas came to mind.
  Peas and spring onions seemed like natural additions.  As it turns out, the peas are what really make these turnovers special—adding texture and giving an overall lighter result.


When I was testing the recipe I made some large (entrée sized) along with the appetizer sized ones.
  Both are good, but I loved the larger size.  One made a perfect spring dinner…along with a few crunchy radishes and an asparagus salad.  (I think any crunchy vegetable—as opposed to leafy—salad would be good.  Grated carrot salad comes to mind….)

The smaller ones are good too...but they tend to open up and ooze a bit in the oven.
  Not to worry though, it’s pretty easy to use a small spoon to push the filling back inside the turnover through the fissure from which it escaped.  No one to whom they are served will ever know.

The large and small ones both can be served with a sauce—labneh, plain or herbed sour cream, or green goddess dip/sauce are all good options.
  I tend to like sauces with savory turnovers, but as I was enjoying these, I discovered they were pretty tasty all on their own…so the sauce is definitely optional.


Spinach, Pea & Ricotta Empanadas

1 recipe Short Crust Pastry, divided into 4 equal
pieces
5 oz. stemmed spinach, washed
1 T. unsalted butter
2/3 c. sliced spring onions or scallions (white portions, plus a few inches of the green)
1 clove garlic, minced
1 t. picked thyme, minced
1/2 c. (130 g.) whole milk ricotta
1/2 oz. finely grated pecorino
3 oz. coarsely grated whole milk, low-moisture Mozzarella
2/3 c. frozen peas, thawed (or fresh, blanched)
Salt & pepper
1 egg beaten with 1 T. water to make egg wash


Roll each chunk of dough into a thin round and trim to make a 7-inch round.  

Place the finished rounds on a parchment lined baking sheet, cover with plastic wrap and chill until ready to use.

Cook the spinach in the water clinging to the leaves in a covered pan.  When the leaves are wilted and tender, remove from the heat and cool.  Squeeze out the excess liquid and chop.

Melt the butter in a medium-sized sauté pan with a lid (you may use the same pan in which the spinach was cooked).
  Add the spring onions and garlic and a generous pinch of salt.  Stir to coat the spring onions in the butter.  Cover and reduce the heat and cook until the onions are tender—8 to 10 minutes.  Stir in the thyme. Let cool.


In a medium-sized bowl, combine the cooled spring onions, the spinach and the ricotta and mix until smooth.
  Work in the pecorino, mozzarella and peas (it’s ok if some of the peas get crushed).  Season the mixture with a quarter teaspoon of kosher salt and several grindings of pepper.  Taste and correct the seasoning.  


Spread the rounds of dough on the work surface.  Place a fourth of the filling (about 100g) on one side of each round of dough in an even thickness, leaving a one inch border.


Brush the edges with egg wash, fold the dough over and seal—you may do this with a fork, or fold the edges over and crimp.  


Spread the empanadas on a parchment lined baking sheet.
  If time, chill.  When ready to bake, brush them with the egg wash.  With a sharp knife, cut 2 or 3 vents in the top of each empanada.

Transfer to a 400° oven and bake until golden brown and crisp and a few bubbles are visible at the steam vents—about 25 to 30 minutes.  Let cool briefly before serving.  Serve with sour cream, Labneh or Green Goddess dip.


Miniature, hors d'oeuvres-sized empanadas (empanadillas)
:

Make 1 1/2 times the short crust pastry recipe (225g/8oz flour, 1/2 t. salt, 170g/6oz butter, 85g/5 to 6 T. ice water) and form into one large disc for chilling.  When ready to make the empanadas, roll out 1/4 to 1/3 of the dough on lightly floured surface to 1/8-inch thickness.  Cut dough into generous 3-inch rounds.  Place a scant tablespoon of filling (12 g.) in the center of each round.  


Paint edges with egg, fold dough over filling and pinch to seal.


Gather the scraps and combine them with the next piece of fresh dough, rolling out and cutting as before.


Continue to roll out and cut in this manner, always incorporating some of the scraps into the fresh dough.  When done, spread the empanadas on parchment lined baking sheets and brush with more egg wash.  If time, chill.  Transfer to room temperature, parchment lined sheet pans before baking.  

Bake at 450° until golden brown—about 12 to 15 minutes.  Makes 32. (For a few pointers on rolling out small appetizer-sized empanadas, check out this post.)

Short Crust Pastry:
150 g. (about 1 1/3 c.) all-purpose flour
3/8 t. salt
114 g. (1 stick) cold unsalted butter, sliced a scant 1/4-inch thick
3 to 4 T. ice water

Combine the flour and the salt in a medium-sized bowl.  Rub the butter into the flour until the butter is in small pea-sized pieces. Drizzle 3 T.. ice water over the flour/butter mixture.  Using your hands, fluff the mixture until it begins to clump, adding more water if necessary.  Turn the dough out onto a counter and form into a mound.  Using the heel of your hand, gradually push all of the dough away from you in short forward strokes, flattening out the lumps.  Continue until all of the dough is flat.  Using a bench scraper, scrape the dough off the counter, forming it into a single clump as you do.  Wrap and chill for at least 30 minutes. 

Printable Version


Monday, December 2, 2019

Savory Braided Loaf…Filled with Spinach, Mushrooms & Cambozola

One of the things I enjoy the most about my cooking classes is the fact that people feel free to ask questions.  Good questions make me think more carefully about almost every aspect of cooking (methods, flavors, ingredients, culture, etc.).  This serves to make me a better cook…and a better teacher…and often it gives me great ideas for new recipes.


During my last class—Cooking for Holiday House Guests—I demonstrated the recipe for a Jam and Cheese-filled Yeasted Coffee Braid.  Because I love sweet breakfast breads—for breakfast, brunch, coffee or a late night snack (basically all the time)—that’s what was filling my mind as I discussed the recipe.  Suddenly someone asked if they could use the dough and method for a savory filled braid.  My initial reaction was: of course not…this is a sweet dough.  But then it immediately dawned on me that of course you could make a savory bread…as long as you reduced the sugar in the dough just a bit (although, not too much…the dough actually isn’t that sweet).

Over the next few days I continued to think about all the possibilities of a savory braid.  Then the following week I decided to make one to serve as a snack for a gathering of friends.  I filled that first attempt with a garlic and herb flavored ricotta (in place of the sweetened cream cheese in the sweet version), prosciutto, sundried tomatoes, sautéed mushrooms and goat cheese  It tasted good, but I didn’t use nearly enough of the filling ingredients. 

My mistake was that I still had the requirements of the sweet braid in my head.  One of these requirements is to not use too much jam.  Besides the fact that too much jam filling oozes out all over the baking sheet, a generous amount of bread is what I expect in a breakfast pastry.  This isn’t the case with the savory version. I wouldn’t want to go on record as saying that you can’t have too much filling in the savory braid….but in this version, the filling is the star.  The bread is just a convenient and beautiful vehicle.


Since the recipe makes enough dough for two braids, I had the opportunity to make a second pass at getting the quantity of filling right.  Of course it would have made sense (from a recipe-testing, compare and contrast perspective) to just increase the quantity of all the filling ingredients that I had used the first time. But when I finally got around to making the second braid (one of the nice things about this dough is that it will keep for 3 or 4 days in the refrigerator) I was more interested in making dinner than testing a recipe.  In any case, I had some other ingredients in my pantry that I wanted to use and that I thought would make a nice filling…so I used those instead.  The second braid was delicious.  And the balance of dough to filling was perfect.

When I made the second braid, I still had half of the herbed ricotta left from when I made the first braid, so I went ahead and used it.  Not only does this cheese mixture taste good, it provides a nice base for the other fillings.  But I’m certain that you could use seasoned cream cheese or goat cheese…or maybe Boursin…or even a simple herbed sour cream.  I still had mushrooms, so I repeated the sautéed mushrooms too.  But for the second version I doubled the quantity. 


The biggest change I made for the second braid was that I added some cooked spinach.  And I think the spinach was the key to the success of the second braid.  Even when cooked to the point where the excess liquid has evaporated (which you must do to keep the loaf from being soggy and damp), greens are still inherently moist.  So not only do they add nice flavor, they keep the filling from seeming dry.  Other greens (kale, chard, beet greens, etc) would work too…as long as you cook them in the manner appropriate for your chosen green.  Kale, for example, will need to be blanched and squeezed dry before it is added to the pan of mushrooms.  And while it isn’t a leafy green, it occurred to me that cooked leeks would behave in a similar manner (and would be delicious!). 

I replaced the crumbled goat cheese with some sliced Cambozola (a German, Brie-style, triple cream blue cheese).  I’m very partial to the Cambozola…but it isn’t something I typically keep on hand.  I wouldn’t hesitate to substitute another flavorful melting cheese.  (But if you are shopping for the other ingredients, you should definitely pick up the Cambozola!)

Finally, if you decide to improvise with your savory fillings, I think it’s important to include ingredients that are strongly flavored.  In my braid, mushrooms and blue cheese fill the bill in this regard.  Cured meats (ham/prosciutto, cooked sausage and bacon) would be good.  Brined/salt preserved foods like olives or capers…or anchovies…would pack a nice flavorful punch.   Other strongly flavored items include pesto, tapenade, and sundried tomatoes.  I’m sure I’m forgetting some obvious possibilities…but you get the idea.    

I don’t know if the person who asked if the jam braid could be turned into a savory filled bread will see this post, but if he does, I would love to hear if he took a stab at it.  And of course I would also like to thank him for asking the question in the first place.  It was obviously a great source of inspiration.  I even think it’s possible that this version might make its way into a class someday….


Spinach, Mushroom & Cambozola Filled Braided Bread

1/4 c. (56 g.) lukewarm (105 to 115 degrees) water
2 1/4 t. active dry or instant yeast
1/2 c. (121 g.) sour cream
4 T. (56 g.) unsalted butter, sliced 1/4-inch thick and softened
1 large egg
3 c. (360 g.) unbleached all-purpose flour, divided
1 T. (12 g.) sugar
1 t. salt

1 c. (250g) whole milk ricotta
1/3 c. (30g) finely grated pecorino
1 fat clove garlic, smashed to a purée with a pinch of salt (or grated on a microplaner)
1 t. minced fresh rosemary
1 egg yolk (save the white for the egg wash)

2 to 4 T. olive oil
14 to 16 oz. crimini or white mushrooms, sliced
10 oz. baby spinach, large stems trimmed if necessary, leaves coarsely chopped
7 to 8 oz. Cambozola, sliced a scant 1/4-inch thick and torn into 1-inch pieces 

1 large egg white beaten until frothy with 1 T. cold water
3 to 4 T. sesame seeds

Place the water in a mixing bowl and scatter in the yeast.  Whisk or stir to dissolve.  Add the remaining ingredients in the order listed, adding only 340 grams of the flour and making sure the salt doesn’t touch the yeast-water mixture directly.  Mix and knead (by hand or mixer fitted with a dough hook) until you have a smooth, velvety dough.  The dough will be very dry at first; resist the urge to add more liquid. It'll come together and smooth out as you knead.  Once the dry ingredients are absorbed (and this only takes a minute or two) the dough may begin to stick.  Use small increments of the extra 20 grams of flour…and the help of your bench scraper…to keep the dough from sticking.  It is unlikely that you will need all of the reserved flour.

Place the dough in a lightly buttered bowl or other container, cover with plastic wrap and let rise until doubled in bulk (about an hour).  Deflate the dough, cover with plastic wrap and place in the refrigerator overnight (and up to three or four days).  It may or may not look risen when you pull it out to use it.  That's OK.

When you are ready to bake, make the filling: Combine the ricotta, pecorino, garlic, rosemary, and egg yolk.  Set aside.  

Prepare the mushrooms and spinach: Depending on the size of your pan, you may need to sauté the mushrooms in batches—don't overcrowd the pan. Heat a sauté pan (non-stick, if you have one) over high heat. Add oil to coat the pan.  When the oil shimmers, add the mushrooms. Cook, shaking the pan and tossing the mushrooms occasionally, until the mushrooms are browned, tender and any liquid that they have given off has evaporated. If they seem dry at any time as they cook, drizzle in a bit more oil. If sautéing in batches, transfer the finished mushrooms to a plate and season with salt & pepper.  Return the pan to the heat, add more oil and repeat with the remaining mushrooms.  When all the mushrooms are cooked, return them all to the pan and heat through.  


Begin adding the spinach to the pan a handful at a time, turning with tongs to coat the greens in the oil and mushrooms and adding successive handfuls of spinach as the previous one collapses.  Continue to cook until the spinach is tender and any liquid given off has evaporated.  Season well with salt and pepper and set aside to cool. 


Divide the chilled dough into two pieces. Working with one piece at a time (and keeping the other chilled), flatten/pat the dough into a rectangle.  


Flour the surface and dough very lightly and roll the dough out into a 10" x 15" rectangle.  Transfer the rectangle to a piece of parchment paper.

Spread half of the ricotta mixture down the center third of the rectangle.  Leave 1/4-inch of dough bare at each end.  

Spread half of the mushroom spinach mixture over the ricotta.  


Arrange half of the Cambozola over all. 


Using a pizza cutter (or a sharp knife), cut 12 to 13 slightly slanting lines down each side—angling the cuts from the edge of the filling to the outside edge of the dough.  The cuts should be a generous one inch apart and should start about 1/4-inch away from the edge of the ricotta.   Being careful not to stretch the dough, fold the strips of dough over the filling, criss-crossing the strips by alternating a strip from the left with a strip from the right.  


Lightly press/pinch at the two ends of the loaf to seal. 


Transfer the braid (using the parchment to lift it) to a sheet pan and cover loosely with greased/sprayed plastic wrap.  Repeat with the remaining dough and filling ingredients. 

Let the braids rest at room temperature for 30 to 40 minutes.  (Alternatively, transfer the formed covered loaves to the refrigerator for 8 to 10 hours or overnight.)

Whether you choose a traditional rise at room temperature or an overnight cold rise, the loaves will not “double in bulk.”   They might look a bit puffed, but that is all.  This is how it should be.

To finish and bake: Brush the egg white/water mixture over the loaves. Sprinkle generously with sesame seeds. 


Bake the braids in a preheated 375°F oven for 20 to 25 minutes, until they're puffed and golden brown.  The cheese might be bubbling or oozing a bit.  This is fine.   Remove the loaves from the oven and place them on a rack to cool slightly (10 minutes or so). Serve warm.  One loaf will serve 4 to 6 as an accompaniment to soup or salad as a light entrée.  Or, each loaf may be cut into 12 slices and served as part of an appetizer spread.

Store any leftovers, well-wrapped, for several days in the refrigerator or for longer in the freezer. To serve, thaw if frozen, and then reheat in a 350°F oven, wrapped in foil, for about 20 minutes.
 
Note:  Although you can put both of the loaves on one sheet pan, I find that they bake best on two sheets.  When one is done, just slide the second one into the oven…or bake on separate racks, rotating half way through the baking time.
 
Printable Version

Saturday, April 13, 2019

Changing up my Broccoli Routine…with a Pancake

Most people who cook regularly know that broccoli has a relatively short shelf life.  If you get it from a local grower (soon after harvesting)…or happen to get an unusually fresh head at the grocery store…you might be able to keep it for a week before it starts to turn yellow.  But that’s pretty unusual.  Most of the time it needs to be used up fairly quickly.


I’ve been thinking about this kind of thing as I have begun to adjust my cooking routine to accommodate food for one.  In general, cooking for one starts with smart shopping.  Whenever possible you purchase produce in smaller/one serving quantities.  When that isn’t possible, spreading out the timing and manner of use is the way to keep yourself from feeling like you’re having the same thing every night.  So, for things like root vegetables (or winter squash) that keep well, it is an easy thing to use a small amount of the whole one night and then a few nights later use some more in a different way…and then, if there is still some left, make something else a few nights later.  Unfortunately, things that are not that shelf stable (broccoli…)—AND that generally can’t be purchased in smaller quantities (broccoli…)—present a challenge.

Because I cook for a living—and I love to cook—I have seen this as a challenge that is well within my comfort zone.  It is also beneficial in that it is forcing me to get out of a few of my more well-worn cooking ruts. 


Rigatoni with Broccoli Cooked Two Ways for one with the first of a recent large head of broccoli...

The first thing I tend to make with a head (or crown) of broccoli is of course pasta.  I have two or three favorite recipes that I could happily eat one or the other of every time I purchase broccoli (even if that happens to mean every week).  When I was cooking for two I would take a head of broccoli, make enough pasta for two (plus a bit extra so there would be a little something leftover for someone’s lunch) and if there was any broccoli left after the pasta I would add it to a salad…or grain pilaf…or just use it for a simple vegetable side.  But a couple of weeks ago when I was on my second head of broccoli (maybe I should have purchased something other than broccoli the second time around…but it looked good when I was at the store…) and had made all my usual suspects, I knew I was going to have to come up with some new ideas.   

While poking around on line I had seen a recipe for a large root vegetable pancake for one that I was considering making with some carrots I had on hand.  But of course the carrots will keep and I had broccoli burning a hole in my produce bin.…  But the pancake made me think of the chard fritters I posted last summer.  It occurred to me that broccoli would make a nice fritter too…and that I could easily make the fritter batter into one large pancake.
                                                                                         
For the chard fritters, the chard is blanched and squeezed out.  Since blanching broccoli would introduce too much water (you can’t squeeze it out) and make for a gummy pancake, I cooked the grated stems and chopped florets in a little bit of olive oil in a sauté pan instead.  


This softens the broccoli without turning it to mush.  I then folded the cooked broccoli…along with a bit of julienned prosciutto…into a thick egg-rich (for loft), ricotta-based batter.   It made just enough to fill a 6-inch non-stick skillet with a half inch (or so) layer of the batter.  But you could of course make small pancakes (as in the chard fritter recipe), too.  And I should also point out, you can multiply this recipe to make pancakes for any number of diners (just keep them in a low oven while you cook them all).

I served the pancake with a blob of labneh (but thick/Greek yogurt would be fine if that’s what you have) and a roasted beet and arugula salad.  I think any tangy vegetable salad or relish (grated carrot, summer tomato, etc) would be good.


The broccoli pancake was a fantastic way to use the last of my broccoli.  It was light—but had plenty of substance and filled me up.  Best of all, it was delicious.  In fact, I liked my pancake so much I went out and bought another head of broccoli…   True story….


Savory Broccoli Pancake

For each large pancake you will need:

4 oz. trimmed broccoli (florets and stems separated)
Salt
1 to 1 1/2 T. olive oil
1 large egg
1 very small clove of garlic, smashed to a purée with a pinch of salt of finely grated using a microplaner
62 g/1/4 c. whole milk ricotta
30 g/2 T. whole milk
20 g/2 thin slices prosciutto, cut crosswise into rough quarter inch strips
20 g/about 3 T. all purpose flour
1/2 t. baking powder
Olive oil for frying
1 t. (or more) butter
Labneh or thick yogurt


Using the large holes of a box grater (or similar) grate the broccoli stems.  Roughly chop the florets, medium fine.  


Heat a tablespoon of olive oil in a small sauté pan set over medium to medium-high heat.  Add all of the broccoli along with good pinch of salt and let it sizzle, stirring occasionally until it has cooked down a bit and is just tender—four or five minutes.  If it seems dry at any point, add the remaining half tablespoon of olive oil.  Set aside to cool.

Crack the egg into a bowl and whisk to break up.  Add the garlic, ricotta and milk and whisk until smooth.  Fold in the broccoli and prosciutto.  Combine the flour and baking powder and fold in.  Taste and correct the seasoning with salt. 


Heat a 6-inch non-stick skillet over medium-high heat.  Film the pan with olive oil and add a teaspoon or so of butter.  When the butter melts and the foam subsides, scrape in the batter and use a spatula to spread it out into an even layer (it should be about a half inch thick).  


Regulate the heat as necessary to maintain a gentle sizzle, but don’t allow the pancake to scorch.  When set on the first side (after about 3 minutes), simultaneously tilt the pan and slide a pancake turner/spatula under the pancake.  Carefully turn the pancake over and continue to cook until the pancake is cooked through…another three minutes.  If multiplying the recipe, transfer the pancakes to a platter or baking dish as you make them, keeping them in a warm oven while you finish the remaining pancakes. 

Serve warm with a dollop of labneh/thick yogurt and a salad of spicy greens and/or vegetables. 

Printable Version