Showing posts with label Pepitas. Show all posts

Saturday, November 30, 2024

Autumn Salad with Grapes, Celery, Blue Cheese & Candied Pepitas

Several years ago while I was choosing a bag of grapes at my local grocery store, the produce manager saw me and directed my attention to his display of red Scarlatta grapes.  He told me they were just in—first of the new crop California grapes—and were especially good.  


I was surprisedI had always treated grapes as season-less.  Like broccoli, grapes of pretty good quality are almost always available.  But of course they do have a season.  I was aware that the harvest for wine grapes was in the fall (I was even working in Provence one year during the harvest!).   But as much as I think about seasonal eating, I'm embarrassed to admit that I had never really thought about table grapes being a fall item. 

The grapes I took home that day were—just as the produce manager had said—particularly good.  I still eat grapes year round (the miracle of shipping…), but ever since that moment in the produce aisle, I make note of when the California crop begins to hit the stores.  This is usually sometime in September.  (Sadly, they disappear in late December/early January.)  These grapes are always worth seeking out.

Unsurprisingly, grapes are good partners for other foods that share their season:  Figs…and nuts (most of which are harvested in the fall)...  Winter squashes…  Apples and pears...  Brussels sprouts, cabbage and chicories (endive, radicchio).  If you are in the habit of just purchasing grapes for snacking…or adding to your holiday fruit and cheese platters…you might consider branching out a bit by adding them to some of your fall salads.  

This year, right when the new crop first began to appear, I prepared a salad that featured grapes and some of these other autumn foods (celery, pepitas, spinach and radicchio) for one of my pop up dinners.


I loved the salad so much I have made it several times for myself since.  And I took it as my contribution to Thanksgiving dinner this year.  I will probably continue to make it throughout the cold months—even after the California crop has disappeared for the year.  If you are craving something fresh, crunchy, and juicy to counterbalance all the rich fare of the current season, this salad will be just the thing.  


Autumn Salad with Grapes, Celery, Blue Cheese & Candied Pepitas

2 oz. stemmed baby spinach
4 oz. trimmed Little Gem (see notes) lettuce, cut crosswise in 1-inch strips, or torn into bite-sized pieces
1 1/2 oz. cored Radicchio, cut crosswise in 1/2-inch strips, or torn into bite-sized pieces
2/3 lb. red grapes, halved (about 2 cups)
4 oz. trimmed celery, sliced thinly (1/8-inch) on a slight diagonal (about 1 cup)
3 1/2 oz. Gorgonzola Piccante, Roquefort, or other crumbly, sharp blue
Salt & freshly ground pepper
1/2 c. Cider-Honey Vinaigrette
1/3 c. Candied Pepitas


Place the first 5 ingredients in a large bowl.  Add half to three quarters of the blue cheese.  Season with salt and pepper.  Drizzle in 1/4 to 1/3 cup of the vinaigrette and toss well.  Mound the salad on a large platter or on individual plates.  Crumble the remaining blue cheese over.  Drizzle with more vinaigrette, if you like.  Scatter the pepitas over all.

Makes 4 large salads or 6 to 8 side salads.

Note:  Little Gem lettuce is a cross between Romaine and Bibb.  It has more crunch than Bibb...and is more tender than Romaine.  If you are not able to find it, you may use Artisan Romaine Hearts, or plain Romaine hearts.


Cider-Honey Vinaigrette

1/4 c. (60 g.) apple cider vinegar
2 T. (42 g.) honey
1 T. (14 g.) Dijon mustard
5/8 t. kosher salt
5 T. olive oil
5 T. canola oil (or use olive oil) 

Place the first four ingredients in a small bowl.  Whisk until smooth.  Drizzle in the oils, whisking constantly to form an emulsion.  Taste and correct the seasoning with salt and more vinegar or oil as necessary.  The vinaigrette should be tangy and sweet.

Makes a generous cup.  This is more than you need for the salad, but the vinaigrette keeps well in a jar in the fridge and is wonderful on salads featuring autumn fruits and/or roasted winter squash.


Candied Pepitas

1 T. sugar
1/4 t. kosher salt
Pinch of cayenne (to taste)
2 t. unsalted butter
1/2 c. raw pumpkin seeds
1 t. honey

Combine the sugar, salt and cayenne in a small ramekin and set aside.  Spray a plate or small sheet pan with pan spray (or brush lightly with oil).  Set aside.

In a small non-stick sauté pan set over medium heat, melt the butter.  Add the pumpkin seeds and toss to coat.  Sprinkle the sugar mixture over the pepitas and toss to coat.  Continue to cook, stirring and tossing until the sugar has melted and the pumpkin seeds are popping a bit and are lightly colored.  Remove the pan from the heat.  Wait 30 seconds.  Drizzle in the honey and toss to coat.

Spread the candied pepitas out on the prepared plate/pan and let cool—stirring occasionally as they cool so that they will be separate rather than clumpy.  


Store the candied pepitas in an airtight container at room temperature.

Printable Version

Thursday, March 21, 2024

Light Wheat Seeded Dinner Rolls


Last fall, a long time client requested a “brown seeded” roll to go with a luncheon that I was preparing for her. This wasn’t an item I had in my repertoire. Whole wheat is something that I enjoy in hearty, substantial loaves (brown soda bread…the home-made hippy-style whole wheat loaves of my childhood—toasted and drowned in butter…), but that I don’t tend to want in things that to me are inherently light or delicate—or that are typically made with white flour. I don’t really like whole wheat pasta, for example. And I was most definitely not a fan of my mother’s stealth additions of whole wheat flour to things like pancakes and French toast when I was a kid.  Even though I favor dinner rolls that are light and fluffy (like my Grandmother’s pan rolls)…or possibly light and crisp (like a classic petit pain)…I admit that I have on occasion had delicious light wheat dinner rolls, so I was certain I could find something I would feel good about making.

I looked in a few cookbooks…and online. I eventually decided to try out a recipe published by David Tanis. I have great respect for Tanis…the way he handles ingredients…his palate…the simple finesse of the foods he prepares. I figured anything he made would be good…if not excellent.

The recipe I found was called “Seeded Molasses Whole Wheat Dinner Rolls.” I’m sure they would have been fine if I had followed the recipe as written, but I admit that my desire for something lighter led me to cut some of the whole wheat flour with bread flour (the sponge in the original recipe was already all bread flour…but the rest of the flour was whole grain). I knew that this adjustment would produce something one would identify as a wheat roll, without it being too heavy.

Other than that, my changes were minor. I added more salt. And I altered the finishing mixture of seeds. The original rolls had a topping of mixed spices/seeds that seemed to be too strongly flavored for the luncheon I was preparing. So I just topped mine with sesame seeds (I love sesame seeds on rolls...sourdough loaves...hamburger buns...).

After testing the recipe, I looked no further. The rolls were fantastic. They have a complex flavor…are sufficiently “wheaty”…yet have a nice light texture. The mixture of seeds

Clockwise from top: Flaxseed, Millet, Sunflower seeds, Pepitas

is flavorful and adds a subtle crunch. I suspect you could alter the mix to suit your pantry. But I like it so much as is that I haven’t bothered to experiment.

I have since made these rolls several times. You could definitely say they are now a part of my regular repertoire. I love having them on hand to go with soups and salads (they freeze/thaw beautifully). I like serving them just slightly warm. And they are delicious when split and toasted. The recipe makes 24 fairly good sized rolls (about 3 inches in diameter and 2 inches tall). This is actually larger than what I think of as a dinner roll, but it somehow seems just perfect with the aforementioned soups and salads. They could be made larger and serve as a sandwich roll (would be amazing filled with egg salad)…or they can be formed into 32 smaller rolls and tucked into square baking pans to make “pan rolls.”

Split and toasted with a salad and frittata....

Even if you are not adept at bread making, if you have a stand mixer with a dough hook, you should be able to make these rolls without difficulty. The most important thing is to resist the temptation to keep adding flour. The rolls will be heavy if you add too much flour. The dough will seem wet…and will remain slightly sticky as you work with it. If you are worried that it will be unmanageable, follow the original recipe’s instruction and allow the dough to rise overnight in the fridge. The chilled dough is much easier to handle. If you must add more flour, I included a measured extra amount in the recipe (45 grams) to be added gradually as necessary during the kneading process.  You may add up to the full amount listed without adversely affecting the lightness of the rolls.

I'm so glad my client requested these rolls.  I hope you will give them a try...even if you think you're not really a fan of whole wheat bread....


Light Wheat Seeded Dinner Rolls

Sponge:
20 g. molasses
7 g. instant yeast (2 t.)
350 g. room temperature water
250 g. unbleached bread flour

Dough:
40 g. flaxseed
50 g. millet
40 g. sunflower seeds
40 g. pepitas
100 g./2 eggs, beaten
55 g. olive oil
140 g. spelt flour
200 g. whole wheat flour
100 g. unbleached bread flour, plus up to 45 g. more for kneading
14 g. kosher salt

Topping:
1 egg beaten with a pinch of salt
2 1/2 T. sesame seeds
Flaky salt for sprinkling


Place the molasses, yeast and water in the bowl of a stand mixer and stir to dissolve. Whisk in bread flour to obtain a batter-like consistency. Cover bowl with plastic wrap and leave at room temperature until mixture looks active, about 30 minutes.

the active sponge....

Meanwhile, soak the larger seeds for the dough: Put flaxseed, millet, sunflower and pepita seeds in a heat-proof bowl and cover with boiling water. Leave to soak for 30 minutes, then drain. Rinse with cool water and drain well (let sit in a strainer if necessary…seeds will absorb anywhere from 120 to 150 grams water). Stir the soaked seeds into the sponge mixture.


Add eggs, olive oil, spelt flour, whole-wheat flour, bread flour and salt. By hand, mix well until dough comes together in a shaggy mass. Using the dough hook, knead on medium low for about 10 minutes to develop the gluten, adding more flour if necessary (only add enough so that the dough can be handled). Turn out onto a lightly floured work surface and form into a smooth ball.


Transfer dough to an oiled bowl 


and let rise until doubled (about 1 to 2 hours).

Fully risen/doubled when you can stick  your finger into the ball of dough
and the hole doesn't fill back in.

Alternatively, transfer the dough to the refrigerator for a slow, cool rise overnight.

Heat oven to 375 degrees. Put risen dough on a lightly floured work surface. Cut dough into 24 65-gram pieces. Form each piece into a tight ball. Divide among 2 parchment-lined baking sheets, spacing evenly. Cover dough balls loosely with a large piece of sprayed plastic wrap and place baking sheet in a warm spot until balls have doubled, about 1 hour.

Uncover and paint tops of balls lightly with beaten egg. Sprinkle with sesame seeds and with sea salt, if using.

Bake for 15 to 20 minutes, or until nicely browned. Cool on a rack.

Makes 24 large dinner rolls.


Notes:
  • Making the dough a day in advance and letting it rise slowly in the refrigerator gives it a more complex character and makes it easier to handle. You can keep the dough in the refrigerator for up to 3 days before baking, or freeze raw dough for up to 1 month.
  • For a smaller roll, form into 32 50-gram balls and place in two 9- by 9-inch greased baking pans. After the rolls are cooked through (about 20 minutes) tip them out of the pan. If the bottom of the raft of rolls isn’t slightly golden, place them back in the oven (directly on the rack) for a few minutes.
(Adapted from New York Times, David Tanis)

Saturday, December 31, 2022

A Sweet & Spicy Snack Mix for New Year’s Eve

Most of the cooking that I have done at home in recent years has been all about using up odds and ends.  Sometimes these things come from classes and private events (leftover partial containers of ingredients…things I over bought so as not to run short…etc).  Other times it is simply the familiar story of cooking for a small household (a head of cauliflower or cabbage…a bunch of kale or chard…a big winter squash—are all things I love and want to eat, but because of their natural size they have to be spread out and worked into several meals in interesting ways).  I joked in a recent Instagram post that I needed to write a cookbook called “This Has Got to Go.”  But the truth is, it is difficult to share recipes/foods that come about because you are trying to use stuff up.  Everyone’s leftovers look different! 

Today’s post came about because of the remains of a box of graham crackers that I had to purchase for my private dinner business.
  After the event, I had 2/3 of a box left.  They will obviously keep for a little while….  But they will also be a temptation for late night snacking.  Finding a good home for them as soon as possible would be my preference.

Believe it or not, this rotating pantry of odds and ends is always rolling around in my head—as I look at cookbooks, recipes on line, food images on Instagram, etc.  Thus it was that the graham crackers came to mind as I was thinking about what to take to my family’s annual NYE game night.  Coming up with contributions is not as easy as I would like.  Foods I take to this gathering have to be appealing to a wide range of palates…easy to eat…and due to a nut allergy, nut free.  (This last is difficult for me.  I love nuts…and I use them a lot—particularly in snack-type foods.)

Nut free versions of “Chex mix” would obviously fit all of these criteria.
  But I have to admit I don’t like Chex Mix.  Furthermore I definitely don’t want any boxed cereal taking up space in my pantry.  But it occurred to me that shards of graham crackers would have the same textural impact as the cereal squares in the traditional mix…and would taste much better. 


After this “Aha” moment it was just a matter of coming up with seasonings. The sweet aspect of the graham crackers brought to mind an outstanding “Sweet and Spicy Seeds and Nuts” recipe from Sami Tamimi’s new book Falastin.  His unusual combination of curry, turmeric and hot pepper…along with sugar and salt…is positively addictive.   

As for the other components, pretzels seemed obvious.
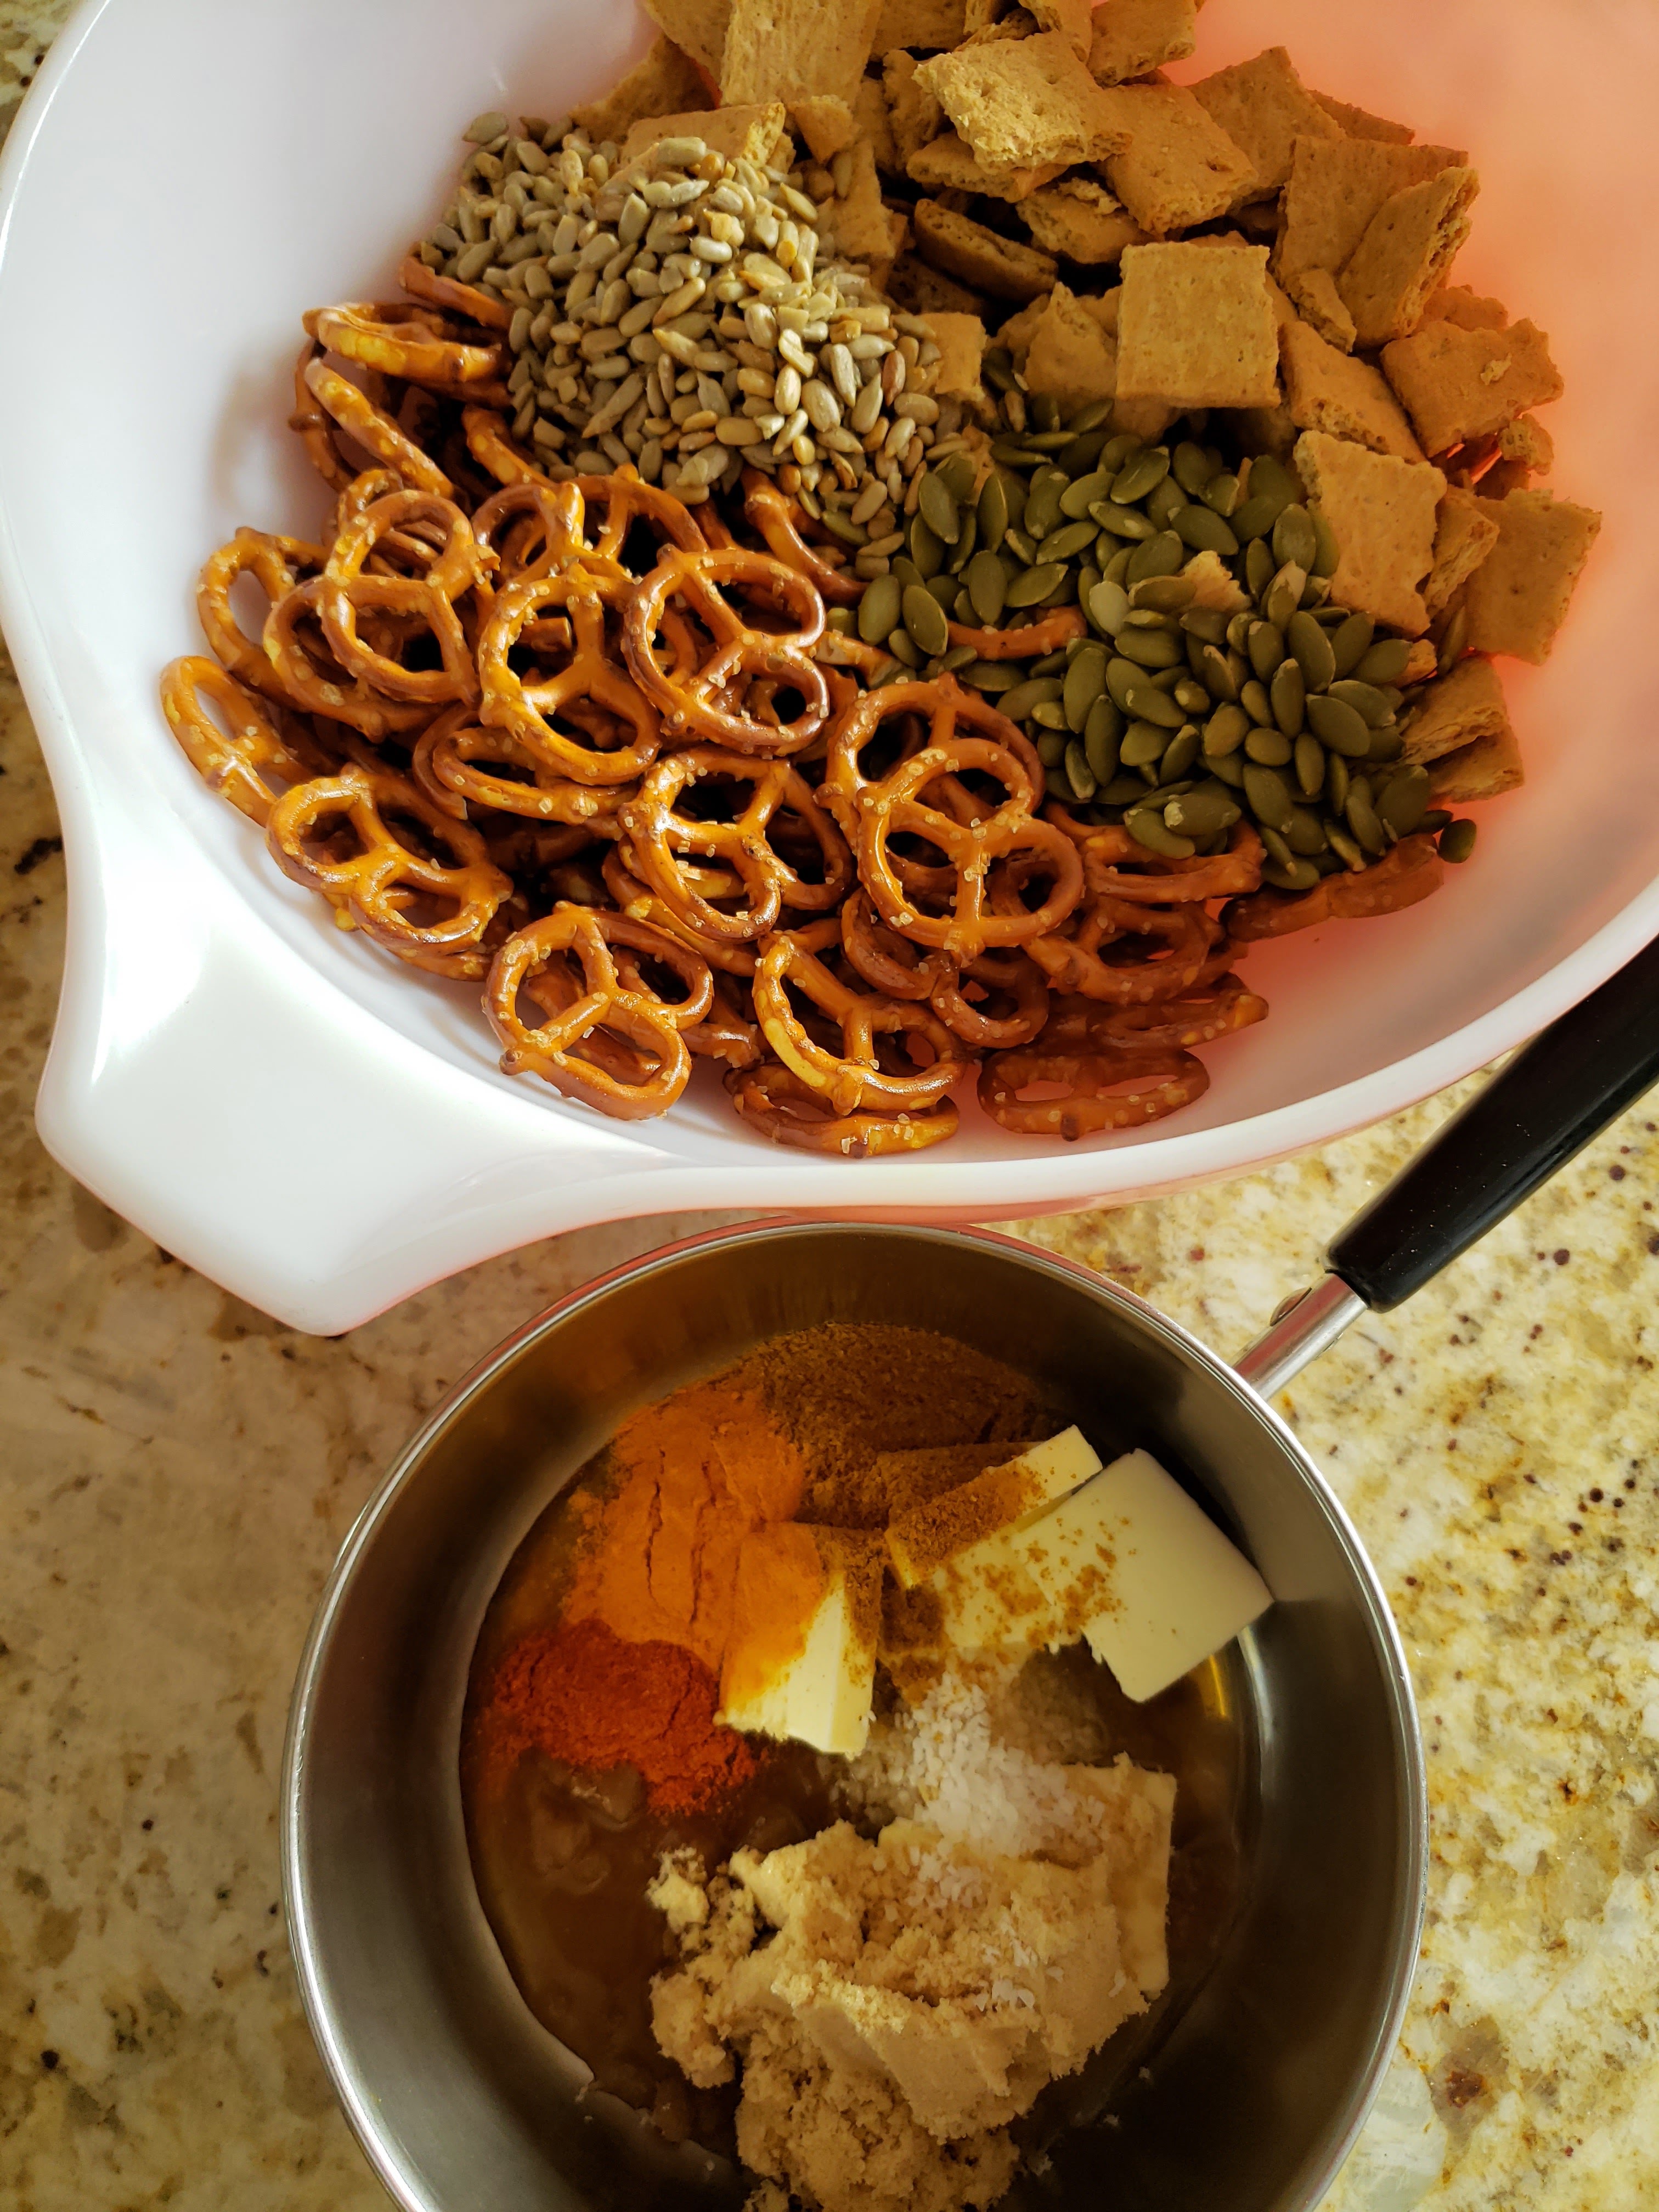
  Yes, they appear in Chex mix.  But more importantly, they are the one “processed” snack that I occasionally buy, so having a partial bag in my pantry isn’t the end of the world.  And finally, I included Tamimi’s “seeds”: pepitas and sunflower seeds.  I love them both…and always have them in my freezer. 

There isn’t too much to say about the process of making this snack mix.
  Because the spice mixture is a bit sticky and thick, it will take a little extra effort to coat the components.  It works best to add it in two additions.  Drizzling the first bit over and tossing well…then doing the same thing again with the second addition.  Two rubber spatulas accomplish the job efficiently.  Just think of it as tossing a salad: dipping in from the sides of the bowl and moving toward the center before lifting the spatulas up and then rotating the bowl before the next pass. 


As for the baking, it is mostly about drying out the syrupy coating so that you don’t have a gooey, sticky snack mix.  When you can touch the mix without your finger coming away wet or sticky, it’s ready.  If you’re worried, leave it in for another five minutes.

Finally, snack mix recipes direct you to stir at regular intervals while baking.
  Don’t do that with this mix.  The stirring is mostly to separate the ingredients…and for this mix I want the seeds to stick to the pretzels and graham crackers.


Before I end today's post, it occurs to me I should mention my long hiatus.  It isn’t that I haven’t been cooking.  (If you follow me on Instagram, you know that I cook all the time!)  Rather, in addition to the difficulties inherent in translating recipes for one that have been created from odds and ends, for most of the past three years I have been too busy trying to cobble together an income from what remains of my professional work (after the pandemic) to spend the time it takes to write posts about the things I have been cooking. 

I don’t know if this will change too much in 2023.
  As much as we like to believe that things get a nice magical reset at midnight on new year’s eve, the sad reality is that they don’t.  But I have always loved posting to my blog…so as I am able, I will try to get back to occasionally (maybe even regularly!) adding to this catalog of foods and techniques that I find interesting, inspiring and delicious.

Sweet & Spicy Snack Mix

140 g. ( 3 1/3 c.) mini pretzel twists
140 g. (1 package) graham crackers, broken into rough 1-inch pieces (about 2 1/3 c.)
40 g. (1/4 c.) pepitas
40 g. (1/4 c.) sunflower seeds
45 g. (3 T. plus 1 t.) unsalted butter
40 g. (2 T.) pure maple syrup
37 g. (3 T.) packed brown sugar
1 t. (5 g). kosher salt
2 t. curry powder
1/2 t. turmeric
3/8 t. cayenne (more…or less…depending on your heat preference)

Place the pretzels, graham cracker pieces, and seeds in a large bowl.


Place the remaining ingredients in a small saucepan and cook over medium high heat, stirring occasionally with a heat proof spatula, until the mixture is homogenous and bubbling.
 

Drizzle half of the spice mixture over the contents of the bowl and stir/fold to begin coating the ingredients.
  I find that two heatproof/non-stick rubber spatulas work best for this.  Add the remaining spice syrup (scraping the pan well) and continue to mix until all the components are evenly coated and sticky. 

Spread on an oiled/buttered/sprayed rimmed baking sheet/half sheet pan.
  Place in a 325° oven and bake for 20 to 25 minutes.  I don’t stir during the baking process because I like the seeds to stick to the pretzels and graham crackers…stirring will keep everything separate.  Rotate the pan once.  When done, the graham crackers and pretzels will no longer be sticky/wet to the touch. 

Cool the snack mix completely on the sheet pan.
  Transfer to a bowl to serve…or a sealed container if making in advance.  Makes 7 to 8 cups.

Printable Version 


Monday, November 30, 2020

Pumpkin Boule with Dried Cranberries & Pepitas

I have been baking yeast breads for a long time.  Long before I went to cooking school to become a chef I was making pizza dough…my grandmother’s dinner rollscinnamon buns…honey whole wheat loaves…etc.  I can probably knead dough in my sleep.  But at some point during the last 20 years or so the manner in which kneading is accomplished began to expand and change.  The methods and techniques I learned are still used…they work very well after all—and they still produce beautiful breads.  But among artisan bread bakers—whose amazing “old world” breads can now be found in specialty bakeries everywhere—you will often find that they are manipulating their doughs in a very different way. 


I was aware that this alternate method of working with dough was developing around me.  But it—along with sourdough—seemed beyond the purview of the occasional bread baker.  It was while learning about sourdough by watching the IG Live tutorials from Bread Ahead Bakery during the early days of the pandemic that I discovered that this new method (“folding” the dough…as opposed to kneading) was in fact less—rather than more—complicated.

The reason we knead dough is to develop gluten.
  Wheat flour contains a couple of proteins that produce gluten when water (or other liquid) is introduced via a mechanical action like stirring…or kneading.  The stretchy strands of gluten are what give yeast doughs their strength and their loft.  If you have ever kneaded dough, you have seen this development occur as the dough goes from a lumpy mass to a smooth, springy ball. 

If I understand the process correctly, in the slow measured pace of the “no knead” folding method, much of the mechanical action is occurring at the microscopic level as the yeast consumes the sugars in the flour.
  By occasionally folding the dough over on itself, you are exposing the yeast to fresh sources of food so it can continue to multiply…and at the same time as you stretch the dough during each fold you are strengthening the developing gluten.  And if you try this method, each time you return to the bowl to give the dough a fold, you will notice that the dough discernibly smoother and is increasingly more supple and elastic.  It really is amazing.  

Here are some pictures of Ciabatta from first sloppy mix to risen dough (after three sets of folds): 


Having described it as I understand it at this point, I feel I must add a caveat.
  I have barely scratched the surface in acquiring knowledge of this big world of artisan breads…my understanding of this process is minimal and mostly experiential.  Ten years from now I may come across this post and be appalled at how I’ve described it.  In the end, what I really know now is that the breads I have made using this method have been fantastic.  And I’m excited to continue to expand my repertoire of breads that use it.

There are a couple of ways (that I know of…probably more) to execute a fold.
  Many people simply leave the dough in the bowl.  To fold, simply grab one side of the dough, pull up—stretching it as far as it will allow without tearing or breaking—and then lay it down over itself.  Repeat this action three times, giving the bowl a quarter of a turn each time so that you are folding the dough from all four points of the compass.  My preferred way of folding is to tip the dough out on an oiled sheet pan (or you can simply oil your counter), gently flatten/stretch it a bit into a rectangle and then execute two letter or envelope-style folds:  fold the top third of the rectangle down…then the bottom third up (as if you were folding an 81/2- by 11-inch sheet of paper to stuff into an envelope).  Rotate the resulting slender rectangle a quarter of a turn…flatten it slightly and repeat the same style of fold.  Turn it over and put it back in the bowl. 

This fall as we approached pumpkin season, armed with my new knowledge, I was determined to work on a yeasted pumpkin bread that I have been playing around with for several years now.
  I always felt it had great potential…but I was somehow missing something in the process that would turn it into a consistent and delicious loaf.

"Crumb shot" of that first never-to-be-duplicated loaf.

The first time I made this pumpkin boule I had been poking around looking for a bread that used whey.  I frequently have whey on hand (left after making Labneh) and feel bad just throwing it away.  Somewhere I had read it was good in bread.   I found a recipe for a pumpkin and whey boule by Dan Lepard that looked interesting.  Then I had pumpkin bread on the brain so I started looking for other pumpkin yeast bread recipes.  I found one that was similar, but also included some traditional spices (which seemed like a great idea).  The loaf I ended up making pulled from both recipes…and it was delicious.

Unfortunately I was never really able to repeat the success (although I tried every year).
  This year though, with some of my newly acquired knowledge and experience, I thought I would try again…this time incorporating folding…and baking in a Dutch oven (something else I had never tried prior to the pandemic).

It’s amazing what a little knowledge can do.
  The loaf was all I had hoped and imagined it could be: a crusty boule with a tender crumb…studded with crispy pepitas and tangy craisins.  I realized only later that I had forgotten to use whey….  I like it so well just the way it is that I have never even tried to make it with whey (even though I have made it several times this fall).

I have loved having this bread on hand during the autumn months.  (So much so that it replaced my new “house” sourdough loaf for a while…).  It is delicious toasted …smeared with Labneh…or butter…and honey.  I’m sure no one is surprised to hear that I have put it through its paces for grilled cheese sandwiches.  (It makes an unbelievably good grilled cheese–especially if you include a little bit of tangy goat cheese…).  And of course it is very fine sandwiched around roast turkey, crunchy lettuce, cranberry sauce and mayo…plus whatever else you happen to like on your leftover turkey sandwich.  It is a loaf I am certain will be a part of my autumn repertoire for years to come. 


Pumpkin Boule with Craisins & Pepitas

285 g. warm water (see notes)
165 g. pumpkin purée/solid pack pumpkin
4 g. (1 1/4 t.) instant or active dry yeast
500 g. bread flour
25 g olive oil
10 g (1 1/2 t.) fine salt
1/8 t. each cinnamon, nutmeg, and ginger
Olive oil for folding
85 g. pepitas, lightly toasted (see notes)
125 g. craisins (left whole, or coarsely chopped)


Place the water in a large mixing bowl and whisk in the pumpkin.
  Sprinkle the yeast over this mixture and whisk in.  If you are using active dry yeast, wait a minute or two for the yeast to soften (instant yeast will dissolve “instantly”).  Add the flour, olive oil, salt and spices (in that order)


and mix until you have a homogenous mass.  (A Danish dough whisk is my new favorite tool for this initial mixing—but if you don’t have one, a rubber spatula or wooden spoon is fine—just remember to scrape all the dough off of your tool and back into the bowl—you don’t want to waste/lose any dough.)  


Using a rounded bowl scraper, scrape down the sides/clean the bowl so that you have a nice, neat mass of dough.


Cover with plastic wrap and let rest for 1 1/4 hour.


After an hour and a quarter, execute the first fold, incorporating the pepitas and craisins at the same time:  Drizzle a small amount of olive oil on a sheet pan 


and spread with your hands (or a brush) so that the dough won’t stick.  Scrape the dough in one mass onto the oiled sheet and with lightly oiled hands/fingertips, nudge the dough out into a large rectangle. (Only stretch as much as the dough will allow without tearing.)  Scatter two-thirds of the craisins and two-thirds of the pepitas over the bottom two-thirds of the rectangle.


Starting with the portion of the dough without any pepitas or craisins, fold the dough in thirds as if you were folding a letter to put it in an envelope.  


Rotate the dough 90
° and repeat this letter/envelope fold with the remaining third of the pepitas and craisins (spreading out the dough as much as it will allow and placing the craisins and pepitas only on the lower two-thirds of the dough). 


When you are done you will have a square-ish ball of dough with all of the craisins and pepitas encased inside.  Place the dough back in its bowl and cover again with plastic wrap.


After 45 minutes, scrape the dough back out onto the oiled sheet and give it another two letter/envelope-style folds exactly as before (only this time you obviously won’t be adding anything to the dough).  


Return to the bowl and let it remain at room temperature until almost doubled—about an hour.
  

Transfer to the refrigerator to slow down the fermentation and allow the flavor to develop overnight.

The next day, take the dough out of the fridge (it will have more than doubled) and scrape it onto a lightly floured counter.  


Give it a gentle pre-shape into a loose ball (in doing this, you will effectively deflate the dough—but don’t aggressively “punch it down” or “knock it back”—just gently form it into a round).  

Turn the bowl upside down over the ball of dough and let it rest on the counter for 20 to 30 minutes. 

After it has had a rest, scrape most of the flour off of the counter and form the dough into a tight ball/boule by working against the counter.  (If any craisins pop through the surface during this process, simply poke them back toward the interior of the loaf and pinch the dough around them—they will burn during the baking process is left exposed on the surface.)   Place the loaf with the pinched side/seams down on a semolina dusted or parchment-lined (see notes) sheet pan or pizza peel.

Turn the mixing bowl upside down over the dough again and let the loaf rise in a warmish spot until it is doubled (until the dough doesn’t spring back—or springs back very slowly—when prodded with a floured finger).  I often resort to sticking the peel/pan with the loaf in the oven with the light on…or with the proofing function on…when my house is very cold.  The loaf should be ready to bake in about 3 hours.

A half hour before you are ready to bake, place a covered 5 quart (or thereabout) Dutch oven in your oven and preheat the oven to 475°.  When ready to bake, uncover the loaf and dredge lightly (using a small sieve) with flour.  Give the loaf three parallel slashes with a sharp knife or razor blade.  

Take the Dutch oven out of the oven (be careful…it is screaming hot), remove the lid and transfer the loaf to the pot—either by placing your open hands on either side of the loaf and scooping it up and dropping it quickly and gently into the pot…or by lifting it using the edges of the parchment paper and placing it in the pot with the parchment underneath.  Put the lid back on and transfer to the oven.  Immediately reduce the oven temperature to 450°.  Bake for 30 minutes.  Remove the lid from the Dutch oven and continue to bake until the bread reaches an internal temperature of 205°…another 15 minutes (give or take, depending on your oven).

Remove the bread from the Dutch oven and cool on a wire rack (I cool mine just by letting it sit on the “grates” of my gas stove).  It should be completely cool before slicing.


Notes:
 

  • Cinnamon and ginger in small quantities enhance yeast activity. In large quantities they have the opposite effect and retard the activity of the yeast. Furthermore, this loaf is not intended to be “spicy” or have any kind of a sweet, “pumpkin spice” flavor profile. The spices are present to add warmth…and a hint of flavor and fragrance evocative of flavors we associate with autumn. Adding extra spice will not do any favors for the yeast…or, in my opinion, the final flavor.
  • Yeast thrives and is happiest in a warmish environment. When I mix up this dough, I aim for an initial dough temperature of 80 to 83 degrees. You will need to consider the temperature of the major ingredients (flour, pumpkin and water) in order to achieve this. In the fall and winter my home is cool (somewhere around 67° or less). This means my flour will be about that temperature…and the pumpkin too, if I am just opening a can. But more often than not, I make this bread when I have a portion of a can left…which means the temperature of the pumpkin will be closer to 40°. Since I want my dough to be around 80°, the only way to get it there is by manipulating the temperature of the water. For me, this means I use hot tap water and then I take the temperature of the water after I put it in the bowl (remember, the bowl is cool too, if it has been at room temperature, and will bring down the temperature of the water). I have found that with room temperature flour…and cold pumpkin…if my water temperature in the bowl is around 115°…that I end up with an initial dough temperature (right after mixing) of 81°. If your house is significantly warmer than mine…and if your pumpkin is at room temperature…you will need to lower the temperature of the water a bit. And if all of this is too complicated for you, just mix up your dough with warm water. As long as you don’t allow your yeast to come into contact with water/liquid that is hotter than 115° you will be able to produce a nice loaf…it will just rise/prove at a different rate than mine. 
  • To toast the pepitas, spread them in a small baking pan and place in a 350° oven for 7 to 10 minutes—or until some are beginning to turn golden around the edges. You may also toast them in a dry skillet over moderate heat (but you must stir frequently and regularly…and constantly at the end). 
  • This is not a particularly wet dough and I have not had difficulty moving it from the board to the Dutch oven, but if you are worried that it might stick…or that you will have difficulty scooping it up and moving it to the pot…let it proof/rise on a square of parchment paper. Then when it comes time to transfer it to the Dutch oven, simply lift and move it using the parchment paper. It will not harm the loaf to bake it with parchment paper in the pot. 
  • November 2024:  I didn't have quite enough pumpkin to make the full recipe.  So I made exactly 80% of the recipe.  If you have ever made this bread, you know it makes a very large loaf.  The 80% sized loaf made a more moderately sized loaf that I found particularly appealing.

Printable Version